How to join Nodes to a KubeOps Cluster
Categories:
6 minute read
This guide describes how to set up virtualization using KubeOps automatic install routines. The setup takes place on a physical or virtual machine and runs automatically - only a few settings are required by the user. An ISO file is booted on the machine to set up a preconfigured machine from which a node is later created on a corresponding node.
When the guide is carried out successfully, we have the following system:
- an additional node for the cluster
- an additional control plane node for the cluster
Requirements
To follow the next steps, make sure you have your credentials ready from your KubeOps.net account and your Red Hat Subscription-Manager account.
For more information about Red Hat Subscription-Manager, refer Red Hat Online Documentation.
Another prerequisite is that a KubeOps cluster already exists.
System Requirements
You can install the ISO on a physical machine or a virtual machine. Ensure that the machine supports the minimum system requirements.
| CPU | 4x |
| Memory | 8 GB |
| Disk space | 50 GB(unformatted non-partitioned disk storage) |
Step 1 - Download the Compliant-Base ISO File
Download the ISO file from https://kubeops.net/users-only/welcome.
Step 2 - Install the KubeOps-VM ISO
You will be prompted to make settings during the installation. Follow the instructions on the screen and enter the desired values.
- Boot your machine with the ISO.
- To start the installation, select “Install Red Hat Enterprise”.

- Select the hard disk where the ISO is to be installed.

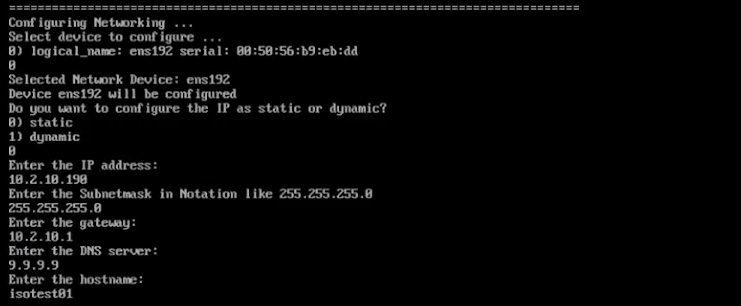
- Configure the networking.
- Select your preferred networking device.
- Select whether the IP is dynamic or static.
- Enter the IP address.
- Enter the subnet mask address.
- Enter the gateway address.
- Enter the DNS server address.
- Enter your preferred hostname. This will be the name of the machine.
-
Select your preferred activation method for the Red Hat Subscription-Manager.
-
Select your preferred security method for the grub bootloader. We recommend the option “random password” - this will set up the security automatically. For more information about the grub bootloader and its security, refer to the respective documentation.
Notice The setup can take a few minutes. Do not shut down the machine during setup. -
To finish the installation, follow the instructions on the screen.
Step 3 - Login to the Master Node on the Cluster
During setup using an ISO file, the master node was automatically preconfigured with a user (root) and its password.
| User | ko-admin |
| Password | KubeOps2024 |
- Log in to the master node remotely. For example, using
ssh. The first time you log in, you must use the preconfigured password (see above). Use the hostname or the IP address that you assigned in a previous step during the installation.
ssh ko-admin@[HOSTNAME]
or
ssh ko-admin@[IP ADDRESS]
- Switch to root user.
sudo -i
-
After logging in, you will be asked to change the user password. Follow the instructions on the screen. After changing the password, you will be automatically logged out.
Notice During the first booting of the machine, additional software and parameters are configured in the background, such as the cluster setup and configuration. -
Login to the machine again using your new credentials.
-
Most kubeops software needs root privileges. Switch to root user.
sudo -i
- To change the password of the roo user, run the
passwdcommand.
passwd
The machine setup is now complete.
Step 4 - Login to the Master Node on the Cluster
- Log in to the master node remotely. For example, using
ssh. The first time you log in, you must use the preconfigured password (see above). Use the hostname or the IP address that you assigned in a previous step during the installation.
ssh ko-admin@[HOSTNAME]
or
ssh ko-admin@[IP ADDRESS]
- Create an ssh connection to the new machine.
ssh ko-admin@[IP ADDRESS]
ssh ko-admin@[IP ADDRESS]
The SSH fingerprint must be confirmed.
- Distribute the ssh public key to the new node
ssh-copy-id [IP ADDRESS]
- Add new node to /etc/hosts
Add your additional nodes:
10.2.10.10 kubevirt
[IP ADDRESS] [HOSTNAME]
[IP ADDRESS] [HOSTNAME]
- Copy the /etc/hosts file to the new node
scp /etc/hosts root@[IP ADDRESS]:/etc/hosts
Step 5 - Add the new node to the kubeopsctl.yaml file
Make sure that you are on your master machine and are the root user.
Check the directoy /var/kubeops for the latest created kubeopsctl.yaml file.
We recommend to make a copy of that file to your home dir and edit it.
Add a worker node to your alraedy existing zone
If you want to add a worker node to the already existing zone zone1, simply add worker to the zone:
zones:
- name: zone1
  nodes:
    master:
    - name: kubevirt
      ipAdress: 10.2.10.10
      user: root
      kubeversion: 1.31.2
      status: active
      systemMemory: 200Mi
      systemCpu: 200m
    worker:
    - name: [HOSTNAME]
      ipAdress: [IP ADDRESS]
      user: root
      kubeversion: 1.31.2
      status: active
      systemMemory: 200Mi
      systemCpu: 200m
Please make sure that [HOSTNAME] and [IP ADDRESS] match your newly created machine.
Add another control plane node to your alraedy existing zone
If you want to add another control plane node to the already existing zone zone1, simply add it to the list of the master:
zones:
- name: zone1
  nodes:
    master:
    - name: kubevirt
      ipAdress: 10.2.10.10
      user: root
      kubeversion: 1.31.2
      status: active
      systemMemory: 200Mi
      systemCpu: 200m
    - name: [HOSTNAME]
      ipAdress: [IP ADDRESS]
      user: root
      kubeversion: 1.31.2
      status: active
      systemMemory: 200Mi
      systemCpu: 200m
Add multiple control plane and worker nodes to different zone
If you have many machines, you can distribute them across several zones:
zones:
- name: zone1
  nodes:
    master:
    - name: kubevirt
      ipAdress: 10.2.10.10
      user: root
      kubeversion: 1.31.2
      status: active
      systemMemory: 200Mi
      systemCpu: 200m
    worker:
    - name: [HOSTNAME]
      ipAdress: [IP ADDRESS]
      user: root
      kubeversion: 1.31.2
      status: active
      systemMemory: 200Mi
      systemCpu: 200m
    - name: [HOSTNAME]
      ipAdress: [IP ADDRESS]
      user: root
      kubeversion: 1.31.2
      status: active
      systemMemory: 200Mi
      systemCpu: 200m
    - name: [HOSTNAME]
      ipAdress: [IP ADDRESS]
      user: root
      kubeversion: 1.31.2
      status: active
      systemMemory: 200Mi
      systemCpu: 200m
- name: zone2
  nodes:
    master:
    - name: [HOSTNAME]
      ipAdress: [IP ADDRESS]
      user: root
      kubeversion: 1.31.2
      status: active
      systemMemory: 200Mi
      systemCpu: 200m
    worker:
    - name: [HOSTNAME]
      ipAdress: [IP ADDRESS]
      user: root
      kubeversion: 1.31.2
      status: active
      systemMemory: 200Mi
      systemCpu: 200m
    - name: [HOSTNAME]
      ipAdress: [IP ADDRESS]
      user: root
      kubeversion: 1.31.2
      status: active
      systemMemory: 200Mi
      systemCpu: 200m
    - name: [HOSTNAME]
      ipAdress: [IP ADDRESS]
      user: root
      kubeversion: 1.31.2
      status: active
      systemMemory: 200Mi
      systemCpu: 200m
- name: zone3
  nodes:
    master:
    - name: [HOSTNAME]
      ipAdress: [IP ADDRESS]
      user: root
      kubeversion: 1.31.2
      status: active
      systemMemory: 200Mi
      systemCpu: 200m
    worker:
    - name: [HOSTNAME]
      ipAdress: [IP ADDRESS]
      user: root
      kubeversion: 1.31.2
      status: active
      systemMemory: 200Mi
      systemCpu: 200m
    - name: [HOSTNAME]
      ipAdress: [IP ADDRESS]
      user: root
      kubeversion: 1.31.2
      status: active
      systemMemory: 200Mi
      systemCpu: 200m
    - name: [HOSTNAME]
      ipAdress: [IP ADDRESS]
      user: root
      kubeversion: 1.31.2
      status: active
      systemMemory: 200Mi
      systemCpu: 200m
Step 6 - Apply the kubeopsctl.yaml file
Run the follwing command as root user with your edited file:
kubeopsctl apply -f [your edited file]
e.g.
kubeopsctl apply -f kubeopsctl.yaml
Wait till the installation is sucessfull.
After the installation is done check the nodes with kubectl and kubeopsctl:
`kubectl get nodes
kubeopsctl status cluster/admincluster
Your cluster has now addional nodes.