This is the multi-page printable view of this section. Click here to print.
How To Guides
- 1: How to install KubeOps Virtualization (kubevirt)
- 2: How to create and deploy a Custom Virtual Machine using KubeOps
- 3: How to access a Virtual Machine in a KubeOps Cluster
- 4: How to Expose a Virtual Machine
- 5: How to join Nodes to a KubeOps Cluster
- 6: How to create a containerDisk from a local image
- 7: How to Import a VM from vSphere and Deploy it in a Cluster using KubeVirt
- 8: How to monitor kubevirt in Grafana
- 9: How to create L3 networking for VMs
- 10: How to backup vms and vm snapshots with velero
1 - How to install KubeOps Virtualization (kubevirt)
KubeVirt opens up a powerful way to run virtual machines on top of Kubernetes, creating a unified platform for both containerized and traditional workloads. This guide walks through the essential steps for getting KubeVirt up and running using the KOSI package manager - from pulling and preparing the KubeVirt package, to creating a custom configuration file with your credentials, and finally verifying a successful installation in the kubevirt namespace. Once these steps are complete, you’ll be ready to deploy and manage virtual machines alongside your existing container infrastructure - all within a single Kubernetes cluster.
kubevirt is a specialized package which extends the capabilities of the KubeOps platform to support machine virtualization.
Requirements
To follow the next steps, make sure you have your credentials ready from your KubeOps.net account.
Make sure you have prepared the following points:
- A KubeOps cluster with one master node.
- Access to the master node with root privileges.
Step 1 - Download kubevirtvm
- Log in to the master node remotely. For example, using
ssh. - Most kubeops software needs root privileges. Switch to root user.
sudo -i
- Login to KOSI using your kosi username.
kosi login -u [USERNAME]
- Use the KOSI package manager to search for available software packages.
In this case, we restrict the search to KubeOps virtualization using
kubeops-vm.
kosi search --hub kubeops-vm

- The package is named
kosi-example-package-userv4. Download the package using thekosi pullcommand and save the file with the desired file name. For example,kubevirt.tgz.
kosi pull --hub kubeops-vm kubeops/kubevirt:2.0.1 -o kubevirt.tgz
Step 2 - remove the taint of the master node
if you have a single node cluster, then you need to remove the taint on the master node.
replace [NODENAME] with the name of you master-node
kubectl taint nodes [NODENAME] node-role.kubernetes.io/control-plane:NoSchedule-
Step 3 - Create kubevirt Configuration File
Before you can install the package, you must create a configuration file (.yaml). Use the file below and save it in the same folder as the package. Name the file kubevirt-values.yaml.
🛑 Replace
[USERNAME]and[PASSWORD]with your KOSI credentials.🧹 IMPORTANT: If you do not have Prometheus and Grafana installed, you must remove the
monitorNamespaceandmonitorAccountfields entirely from the YAML file. Leaving them in without monitoring components will cause the deployment to fail.
kubevirtValues:
  namespace: kubevirt
  imagePullSecretCred:
    registry: registry.kubeops.net
    user: [USERNAME]
    password: [PASSWORD]
  kubevirtobject:
    spec:
      monitorNamespace: monitoring # change the namespace to the one in which your Grafana is running
      monitorAccount: prometheus-grafana # the standard grafana ServiceAccount of the KubeOps Platform, if you use the prometheus package of the platform, no changes are required
      configuration:
        developerConfiguration:
          logVerbosity:
            virtLauncher: 2
            virtHandler: 3
            virtController: 4
            virtAPI: 5
            virtOperator: 6
          featureGates:
          - ExpandDisks
          - CPUManager
          - ExperimentalIgnitionSupport
          - HypervStrictCheck
          - Sidecar
          - HostDevices
          - Snapshot
          - VMExport
          - HotplugVolumes
          - HostDisk
          - ExperimentalVirtiofsSupport
          - DownwardMetricsFeatureGate
          - Root
          - ClusterProfiler
          - WorkloadEncryptionSEV
          - VSOCK
          - DisableCustomSELinuxPolicy
          - KubevirtSeccompProfile
          - DisableMDEVConfiguration
          - PersistentReservation
          - VMPersistentState
          - MultiArchitecture
          - AutoResourceLimitsGate
          - AlignCPUs
          - VolumesUpdateStrategy
          - VolumeMigration
          - InstancetypeReferencePolicy
          useEmulation: false
Step 3 - Install kubevirt
- Install the kubevirt package using the prepared configuration file.
kosi install -p kubevirt.tgz -f kubevirt-values.yaml
- Check your installation using the
kubectlcommand.
kubectl get pods -n kubevirt
The installation is complete when the status of all pods is set to “Running”. For example:

if you have a image pull backoff error message, then you can create the image pullsecret anew. in this example the kubevirt namespace is used, if you have kubevirt deployed in a different namespace, then you need to replace the value of the -n parameter.
kubectl -n kubevirt create secret docker-registry kubeops-vm --docker-server=localhost:30002 --docker-username=admin --docker-password=<admin password - see harborpass value in kubeopsctl.yaml>
Next Steps
After installation, you can start setting up and deploying a custom VM (see [How to create and deploy a Custom Virtual Machine using KubeOps](How to create and deploy a Custom Virtual Machine using KubeOps)).
2 - How to create and deploy a Custom Virtual Machine using KubeOps
Creating custom virtual machines on top of Kubernetes is a powerful way to unify containerized and traditional workloads. In this introductory guide, you’ll learn how to set up your KubeOps cluster to deploy a Cirros-based VM using kubevirt, from checking off a few key prerequisites to preparing and applying a concise YAML configuration file.
Whether you’re a seasoned Kubernetes user looking to expand your virtualization capabilities or just getting started with hybrid infrastructure, these steps will walk you through everything from generating the custom VM file to verifying its running status and accessing it over SSH. By following this process, you’ll have a seamlessly integrated virtual machine environment in no time - ready to support your application needs.
Requirements
Make sure you have prepared the following points:
- A KubeOps cluster with at least one master node and root privileges.
- A running kubeVirt instance. (see [How to install KubeOps Virtualisation (kubevirt)](How to install KubeOps Virtualisation (kubevirt))).
- Enough resources to support a virtual machine
For example:

To follow this guide, use the following values to configure the custom virtual machine. If you wish, you can adjust the values yourself. Make sure that the adjusted values are applied accordingly everywhere.
| Filename (VM configuration file) | custom-vm.yaml |
| Virtual Machine Label | kubevirt.io/vm: customvm |
| Virtual Machine Name | customvm |
| Virtual Machine Namespace | kubevirt |
| Virtual Machine Memory | 64M |
Additional Information
For the user to understand the most basic functionality of kubeVirt, it must know about the following fundemental concepts:
kubeVirt offers different methods to engage with the virtual machines through specialized custom resources (CR). On the lowest level is the VirtualMachineInstance (VMI) which represents the stateless instance of a virtual machine. These VMIs can be managed by higher level resources, such as VirtualMachine (VM), which realizes a stateful VMI that can be stopped and started while maintaining its data and state.
The manifests for these resources contain a multitude of parameters that surpass the needs of most users. Consequently this guide will not explain all parameters.
How to create and deploy a Custom Virtual Machine
The following steps will show you, how to manually create and acces a virtual machine, using kubernetes with a running kubeVirt instance.
Step 1 - Create a Configuration File for the Virtual Machine
To set up a virtual machine you need to create a configuration file. The configuration file contains information, such as name of the vm as well as its namespace, used resources (e.g. RAM) and states (e.g. running, halted). Use the file contents below and make desired changes.
Use the following content to create a basic vm configuration file custom-vm.yaml.
apiVersion: kubevirt.io/v1
kind: VirtualMachine
metadata:
  labels:
    kubevirt.io/vm: customvm
  name: customvm
  namespace: kubevirt
spec:
  runStrategy: Always
  template:
    metadata:
      labels:
        kubevirt.io/vm: customvm
    spec:
      domain:
        devices:
          disks:
          - disk:
              bus: virtio
            name: containerdisk
          - disk:
              bus: virtio
            name: cloudinitdisk
        machine:
          type: ""
        resources:
          requests:
            memory: 64M
      terminationGracePeriodSeconds: 0
      volumes:
      - name: containerdisk
        containerDisk:
          image: kubevirt/cirros-container-disk-demo:latest
      - cloudInitNoCloud:
          userDataBase64: IyEvYmluL3NoCgplY2hvICdwcmludGVkIGZyb20gY2xvdWQtaW5pdCB1c2VyZGF0YScK
        name: cloudinitdisk
The image, from which the virtual machine is created, can be found in the first section of spec.templates.spec.volumes of the manifest. It is used in the form of a containerDisk, meaning the image is part of a container image, within a remote repository.
This manifest will use a preconfigured image from the repostitory kubevirt/cirros-container-disk-demo:latest with the following credentials:
| User (cirros image) | cirros |
| Password (cirros image) | gocubsgo |
KubeVirt supports the ability to assign a startup script to a virtual machine which is executed automatically when the it initializes. There are multiple datasources supported, which will inject those scripts through the use of ephemeral disks.
One of those datasources is called cloudInitNoCloud, which is mentioned here as the second volume in spec.templates.spec.volumes. VMs with the cloud-init package installed will detect the ephemeral disk and execute custom userdata scripts at boot.
Step 2 - Deploy the Virtual Machine
Deploy the vm using the kubectl command and the custom-vm.yaml file.
kubectl create -f custom-vm.yaml
Check the state of the vm.
kubectl get vmi -A
This command lists all virtual machine instances. Since we only have one VM installed, the output looks something like this.
NAMESPACE   NAME         AGE   PHASE     IP              NODENAME       READY
kubevirt    customvm   22h   Running   192.168.16.48   stackedadmin   True
Step 3 - Access the Custom VM
You can access the custom vm remotely from the master node. For example, using ssh.
- Login to the machine.
- Identify the IP address of your custom vm by using the
kubectl get vmicommand.
kubectl get vmi -A
This command lists all virtual machine instances. Since we only have one VM installed, the output looks something like this.
NAMESPACE   NAME         AGE   PHASE     IP              NODENAME       READY

kubevirt    example-vm   22h   Running   192.168.16.48   stackedadmin   True
Log in to the example VM remotely (e.g. using ssh). Use the IP address from the previous step. Use the credentials of the running cirros image.
ssh cirros@192.168.16.48
References
-
To know how to create a containerdisk from a local image, see Create a containerdisk from a local image guide
-
For more detailed explanation for virtual machine configuration files , see Detailed Explanation for Configuration File for Custom VMs.
3 - How to access a Virtual Machine in a KubeOps Cluster
If you’ve ever needed to log in to a custom virtual machine running in your KubeOps cluster, this guide is for you. In the steps ahead, we’ll cover the key prerequisites - such as having a KubeOps cluster with at least one master node, root privileges, a running virtual machine, and the correct credentials for the image inside that VM.
We’ll also walk through how to identify your VM instance using kubectl get vmi, locate the correct IP address, and finally access the machine via SSH. Along the way, we’ll discuss why KubeOps virtual machines aren’t exposed by default and how you can easily expose them if needed. Ready to get started? Let’s dive in!
Requirements
Make sure you have prepared the following points:
- A KubeOps cluster with at least one master node and root privileges.
- A running virtual machine in said cluster.
- The credentials of the running image within the virtuial machine (username and password).
For example:
In the example shown, the custom vm is accessed via the Master Node**, Worker Node 1**, or Worker Node 2.
A KubeOps virtual machine is not exposed by default and therefore cannot be accessed remotely by the Admin Node. If necessary you can easily expose the VM, see [How to Expose a Virtual Machine](How to Expose a Virtual Machine).
Step 1 - Identify your Virtual Machine
- Login to the master or worker machine.
- Most kubeops software needs root privileges. Switch to root user.
sudo -i
- Identify your virtual machine by running the
kubectl get vmicommand.
kubectl get vmi -A
This command lists all virtual machine instances. Choose the IP of the desired virtual machine.
NAMESPACE   NAME         AGE   PHASE     IP              NODENAME       READY

kubevirt    [CUSTOMVM-1]   22h   Running   [192.168.16.XXX]   stackedadmin   True
kubevirt    [CUSTOMVM-2]   22h   Running   [192.168.16.YYY]   stackedadmin   True
Step 2 - Access the Virtual Machine
- Log in to the example VM remotely (e.g. using
ssh). Use the IP address from the previous step. Use the credentials of the image. Replace[USERNAME]and[IP-ADDRESS]accordingly.
ssh [USERNAME]@[IP-ADDRESS].
4 - How to Expose a Virtual Machine
By default, virtual machines are only accessible within the cluster. If you want to reach them outside the cluster, you have to expose the VM. Learn how to expose a virtual machine in a KubeOps cluster for external access by creating and applying a patch file with a matching label selector, and optionally verifying connectivity via ping.
Requirements
Make sure you have prepared the following points:
- A KubeOps cluster with at least one master node and root privileges.
- A running virtual machine in said cluster.
- The original configuration file (yaml) of said VM or at least its
label.
For example:
To follow this guide, use the following values. If you wish, you can adjust the values yourself. Make sure that the adjusted values are applied accordingly everywhere.
| Filename (VM configuration file) | custom-vm.yaml |
| Virtual Machine Label | kubevirt.io/vm: customvm |
| Virtual Machine Name | customvm |
| Virtual Machine Memory | 64M |
Step 1 - Create a Patch File
With the patch file we can patch multiple settings and behaviors of a virtual machine. A patch file uses the selector to search for a label with the same value. If no label with the same value exists, the patch will not be applied.
- Fetch the
labelfrom the desired virtual machine. use thekubectl describe vmcommand. Replace [VMNAME] with the name of the virtual machine that is to be exposed.
kubectl describe vm [VMNAME]
This will produce an output similar to the following.
    Name:         customvm
Namespace:    default
Labels:       kubevirt.io/vm=customvm
Annotations:  <none>
API Version:  kubevirt.io/v1
Kind:         VirtualMachine
Metadata:
  Cluster Name:
  Creation Timestamp:  2018-04-30T09:25:08Z
  Generation:          0
  Resource Version:    6418
  Self Link:           /apis/kubevirt.io/v1/namespaces/default/virtualmachines/customvm
  UID:                 60043358-4c58-11e8-8653-525500d15501
Spec:
  Running:  true
  Template:
    Metadata:
      Creation Timestamp:  <nil>
      Labels:
        Kubevirt . Io / Ovmi:  customvm
    Spec:
      Domain:
        Devices:
          Disks:
            Disk:
              Bus:        virtio
            Name:         containerdisk
            Volume Name:  containerdisk
            Disk:
              Bus:        virtio
            Name:         cloudinitdisk
            Volume Name:  cloudinitdisk
        Machine:
          Type:
        Resources:
          Requests:
            Memory:                      64M
      Termination Grace Period Seconds:  0
      Volumes:
        Name:  containerdisk
        Registry Disk:
          Image:  kubevirt/cirros-registry-disk-demo:latest
        Cloud Init No Cloud:
          User Data Base 64:  IyEvYmluL3NoCgplY2hvICdwcmludGVkIGZyb20gY2xvdWQtaW5pdCB1c2VyZGF0YScK
        Name:                 cloudinitdisk
Status:
  Created:  true
  Ready:    true
Events:
  Type    Reason            Age   From                              Message
  ----    ------            ----  ----                              -------
  Normal  SuccessfulCreate  15s   virtualmachine-controller  Created virtual machine: customvm
- Create a new file, for
patch-expose-customvm.yaml. And edit the file with your favorite editor.
nano patch-expose-customvm.yaml
Fill in the patch file with the following content. Make sure the following values are identical:
label(in original configuration file)selector(in this patch file)
In this example kubevirt.io/vm: customvm.
apiVersion: v1
kind: Service
metadata:
  name: customvm-service
  namespace: kubevirt
spec:
  type: NodePort
  selector:
    kubevirt.io/vm: customvm
  ports:
    - port: 22
      targetPort: 22
      # Optional field:
      nodePort: 30637
Save the file after editing.
Step 2 - Apply the Patch
- Use the
kubectl applycommand to apply the patch.
kubectl apply -f patch-expose-customvm.yaml
Optional: Step 3 - Ping the VM from outside the Cluster
- Login to the master machine.
- Identify the IP address of your exposed VM by using the
kubectl get vmicommand.
kubectl get vmi -A
This command lists all virtual machine instances. Since we only have one VM installed, the output looks something like this.
NAMESPACE   NAME         AGE   PHASE     IP              NODENAME       READY

kubevirt    example-vm   22h   Running   192.168.16.48   stackedadmin   True
- Login a machine that is outside the cluster (e.g. the admin node).
- Use the
pingcommand to check if the exposed virtual machine is accessible. Use the IP address from the previous step.
ping [IP-ADDRESS]
Next Steps
For more detailed explanation for virtual machine configuration files , see [Detailed Explanation for Configuration File for Custom VMs](Detailed Explanation for Configuration File for Custom VMs).
5 - How to join Nodes to a KubeOps Cluster
This guide describes how to set up virtualization using KubeOps automatic install routines. The setup takes place on a physical or virtual machine and runs automatically - only a few settings are required by the user. An ISO file is booted on the machine to set up a preconfigured machine from which a node is later created on a corresponding node.
When the guide is carried out successfully, we have the following system:
- an additional node for the cluster
- an additional control plane node for the cluster
Requirements
To follow the next steps, make sure you have your credentials ready from your KubeOps.net account and your Red Hat Subscription-Manager account.
For more information about Red Hat Subscription-Manager, refer Red Hat Online Documentation.
Another prerequisite is that a KubeOps cluster already exists.
System Requirements
You can install the ISO on a physical machine or a virtual machine. Ensure that the machine supports the minimum system requirements.
| CPU | 4x |
| Memory | 8 GB |
| Disk space | 50 GB(unformatted non-partitioned disk storage) |
Step 1 - Download the Compliant-Base ISO File
Download the ISO file from https://kubeops.net/users-only/welcome.
Step 2 - Install the KubeOps-VM ISO
You will be prompted to make settings during the installation. Follow the instructions on the screen and enter the desired values.
- Boot your machine with the ISO.
- To start the installation, select “Install Red Hat Enterprise”.

- Select the hard disk where the ISO is to be installed.

- Configure the networking.
- Select your preferred networking device.
- Select whether the IP is dynamic or static.
- Enter the IP address.
- Enter the subnet mask address.
- Enter the gateway address.
- Enter the DNS server address.
- Enter your preferred hostname. This will be the name of the machine.
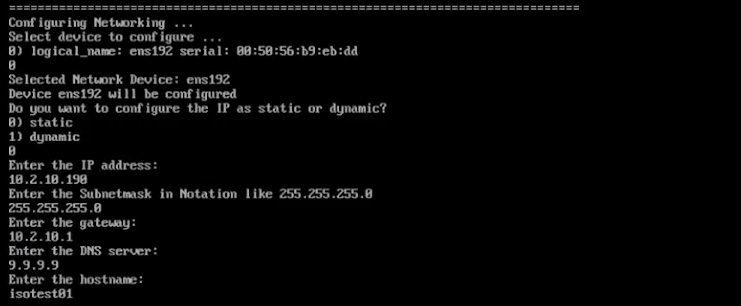
-
Select your preferred activation method for the Red Hat Subscription-Manager.
-
Select your preferred security method for the grub bootloader. We recommend the option “random password” - this will set up the security automatically. For more information about the grub bootloader and its security, refer to the respective documentation.
Notice The setup can take a few minutes. Do not shut down the machine during setup. -
To finish the installation, follow the instructions on the screen.
Step 3 - Login to the Master Node on the Cluster
During setup using an ISO file, the master node was automatically preconfigured with a user (root) and its password.
| User | ko-admin |
| Password | KubeOps2024 |
- Log in to the master node remotely. For example, using
ssh. The first time you log in, you must use the preconfigured password (see above). Use the hostname or the IP address that you assigned in a previous step during the installation.
ssh ko-admin@[HOSTNAME]
or
ssh ko-admin@[IP ADDRESS]
- Switch to root user.
sudo -i
-
After logging in, you will be asked to change the user password. Follow the instructions on the screen. After changing the password, you will be automatically logged out.
Notice During the first booting of the machine, additional software and parameters are configured in the background, such as the cluster setup and configuration. -
Login to the machine again using your new credentials.
-
Most kubeops software needs root privileges. Switch to root user.
sudo -i
- To change the password of the roo user, run the
passwdcommand.
passwd
The machine setup is now complete.
Step 4 - Login to the Master Node on the Cluster
- Log in to the master node remotely. For example, using
ssh. The first time you log in, you must use the preconfigured password (see above). Use the hostname or the IP address that you assigned in a previous step during the installation.
ssh ko-admin@[HOSTNAME]
or
ssh ko-admin@[IP ADDRESS]
- Create an ssh connection to the new machine.
ssh ko-admin@[IP ADDRESS]
ssh ko-admin@[IP ADDRESS]
The SSH fingerprint must be confirmed.
- Distribute the ssh public key to the new node
ssh-copy-id [IP ADDRESS]
- Add new node to /etc/hosts
Add your additional nodes:
10.2.10.10 kubevirt
[IP ADDRESS] [HOSTNAME]
[IP ADDRESS] [HOSTNAME]
- Copy the /etc/hosts file to the new node
scp /etc/hosts root@[IP ADDRESS]:/etc/hosts
Step 5 - Add the new node to the kubeopsctl.yaml file
Make sure that you are on your master machine and are the root user.
Check the directoy /var/kubeops for the latest created kubeopsctl.yaml file.
We recommend to make a copy of that file to your home dir and edit it.
Add a worker node to your alraedy existing zone
If you want to add a worker node to the already existing zone zone1, simply add worker to the zone:
zones:
- name: zone1
  nodes:
    master:
    - name: kubevirt
      ipAdress: 10.2.10.10
      user: root
      kubeversion: 1.31.2
      status: active
      systemMemory: 200Mi
      systemCpu: 200m
    worker:
    - name: [HOSTNAME]
      ipAdress: [IP ADDRESS]
      user: root
      kubeversion: 1.31.2
      status: active
      systemMemory: 200Mi
      systemCpu: 200m
Please make sure that [HOSTNAME] and [IP ADDRESS] match your newly created machine.
Add another control plane node to your alraedy existing zone
If you want to add another control plane node to the already existing zone zone1, simply add it to the list of the master:
zones:
- name: zone1
  nodes:
    master:
    - name: kubevirt
      ipAdress: 10.2.10.10
      user: root
      kubeversion: 1.31.2
      status: active
      systemMemory: 200Mi
      systemCpu: 200m
    - name: [HOSTNAME]
      ipAdress: [IP ADDRESS]
      user: root
      kubeversion: 1.31.2
      status: active
      systemMemory: 200Mi
      systemCpu: 200m
Add multiple control plane and worker nodes to different zone
If you have many machines, you can distribute them across several zones:
zones:
- name: zone1
  nodes:
    master:
    - name: kubevirt
      ipAdress: 10.2.10.10
      user: root
      kubeversion: 1.31.2
      status: active
      systemMemory: 200Mi
      systemCpu: 200m
    worker:
    - name: [HOSTNAME]
      ipAdress: [IP ADDRESS]
      user: root
      kubeversion: 1.31.2
      status: active
      systemMemory: 200Mi
      systemCpu: 200m
    - name: [HOSTNAME]
      ipAdress: [IP ADDRESS]
      user: root
      kubeversion: 1.31.2
      status: active
      systemMemory: 200Mi
      systemCpu: 200m
    - name: [HOSTNAME]
      ipAdress: [IP ADDRESS]
      user: root
      kubeversion: 1.31.2
      status: active
      systemMemory: 200Mi
      systemCpu: 200m
- name: zone2
  nodes:
    master:
    - name: [HOSTNAME]
      ipAdress: [IP ADDRESS]
      user: root
      kubeversion: 1.31.2
      status: active
      systemMemory: 200Mi
      systemCpu: 200m
    worker:
    - name: [HOSTNAME]
      ipAdress: [IP ADDRESS]
      user: root
      kubeversion: 1.31.2
      status: active
      systemMemory: 200Mi
      systemCpu: 200m
    - name: [HOSTNAME]
      ipAdress: [IP ADDRESS]
      user: root
      kubeversion: 1.31.2
      status: active
      systemMemory: 200Mi
      systemCpu: 200m
    - name: [HOSTNAME]
      ipAdress: [IP ADDRESS]
      user: root
      kubeversion: 1.31.2
      status: active
      systemMemory: 200Mi
      systemCpu: 200m
- name: zone3
  nodes:
    master:
    - name: [HOSTNAME]
      ipAdress: [IP ADDRESS]
      user: root
      kubeversion: 1.31.2
      status: active
      systemMemory: 200Mi
      systemCpu: 200m
    worker:
    - name: [HOSTNAME]
      ipAdress: [IP ADDRESS]
      user: root
      kubeversion: 1.31.2
      status: active
      systemMemory: 200Mi
      systemCpu: 200m
    - name: [HOSTNAME]
      ipAdress: [IP ADDRESS]
      user: root
      kubeversion: 1.31.2
      status: active
      systemMemory: 200Mi
      systemCpu: 200m
    - name: [HOSTNAME]
      ipAdress: [IP ADDRESS]
      user: root
      kubeversion: 1.31.2
      status: active
      systemMemory: 200Mi
      systemCpu: 200m
Step 6 - Apply the kubeopsctl.yaml file
Run the follwing command as root user with your edited file:
kubeopsctl apply -f [your edited file]
e.g.
kubeopsctl apply -f kubeopsctl.yaml
Wait till the installation is sucessfull.
After the installation is done check the nodes with kubectl and kubeopsctl:
`kubectl get nodes
kubeopsctl status cluster/admincluster
Your cluster has now addional nodes.
6 - How to create a containerDisk from a local image
How to create a containerDisk from a local image
kubeVirt supports multiple ways of using Images to create virtual machines. One of the more convenient ways is using the containerDisk feature, which provides the ability to store and distribute VM disks as container images in a registry.
To create a containerdisk, users can simply inject the image into a container in qcow2 or raw format. The container should be based on scratch and the images must be placed into the /disk directory. No other content is required.
The following commands show a simple way to create a container, containing only a fedora image file.
cat << END > Dockerfile
FROM scratch
ADD --chown=107:107 fedora25.qcow2 /disk/
END

podman build -t vmidisks/fedora25:latest .
Note: The containerDisk needs to be readable for the user with the UID 107 (qemu).
if you want to access the virtaulo machine, it is recommended that you use a ssh key in the userdata startup section in your yaml file:
      - name: cloudinitdisk
        cloudInitNoCloud:
          userData: |-
            #cloud-config
            ssh_authorized_keys:
              - ssh-rsa AAAAB3NzaK8L93bWxnyp test@test.com
7 - How to Import a VM from vSphere and Deploy it in a Cluster using KubeVirt
How to Import a VM from vSphere and Deploy it in a Cluster using KubeVirt
This guide outlines the steps to export a virtual machine from vSphere, convert it to the qcow2 format, and deploy it inside a Kubernetes cluster using KubeVirt.
Requirements
To follow these steps, ensure you have:
A VM in the vSphere environment.
A Kubernetes cluster with KubeVirt installed.
Access to a container registry to store the VM image.
Step 1 - Export OVF Template from vSphere
In vSphere, locate the VM you want to export.
Ensure the VM is powered off before exporting.
Right-click the VM, navigate to Template, and select Export OVF Template.
Provide a name for the exported template and click OK.
The export process will generate three files: *.vmdk, *.nvram, and *.ovf.
Only the *.vmdk file is required for further processing.
Step 2 - Convert the VMDK File to QCOW2 Format
KubeVirt requires disk images in qcow2 format. Use the qemu-img tool to convert the .vmdk file:
qemu-img convert -f vmdk -O qcow2 [input-file].vmdk [output-file].qcow2
Replace [input-file].vmdk with the name of your downloaded VMDK file and [output-file].qcow2 with your desired output name.
Step 3 - Create a Container Image from the QCOW2 File
To use the converted disk inside KubeVirt, create a containerDisk by building a container image with the qcow2 file.
Create a Dockerfile
Create a Dockerfile with the following content:
FROM scratch

ADD --chown=107:107 [filename].qcow2 /disk/
Replace [filename].qcow2 with the actual filename of your converted disk image.
Build and Push the Image
Execute the following commands to build the image and push it to a container registry:
podman build -t [registry]/[namespace]/[vm-image-name]:[tag] -t localhost/[namespace]/[vm-image-name]:[tag] .

podman push [registry]/[namespace]/[vm-image-name]:[tag]
Replace the placeholders as follows:
[registry]: The URL of your container registry
[namespace]: Your project name
[vm-image-name]: A name for the VM image
[tag]: The version tag (e.g., 1.0.0)
Once the image is pushed, it can be used as a containerDisk in KubeVirt to deploy a virtual machine.
Step 4 - Deploy the VM using KubeVirt
Create a secret for authentication:
kubectl create secret generic kubeops-vm-sec --from-literal=accessKeyId=kubeops --from-literal=secretKey=registry-token --namespace kubevirt-vms-import
kubectl -n kubevirt-vm create secret docker-registry kubeops-vm --docker-server=registry.kubeops.net --docker-username="<username>" --docker-password="<registry-token>"
kubectl patch serviceaccount default -n kubevirt-vm -p '{"imagePullSecrets": [{"name": "kubeops-vm"}]}'
Create a manifest file for the virtual machine:
apiVersion: kubevirt.io/v1
kind: VirtualMachine
metadata:
  labels:
    kubevirt.io/vm: sk2-master01
  name: sk2-master01-vm
  namespace: kubevirt-vms-import
spec:
  runStrategy: Always
  template:
    metadata:
      labels:
        kubevirt.io/vm: sk2-master01
    spec:
      domain:
        devices:
          disks:
          - name: datavolumedisk
            disk:
              bus: virtio
          - name: cloudinitvolume
            disk:
              bus: virtio
        resources:
          requests:
            memory: 4092M
      volumes:
      - name: datavolumedisk
        dataVolume:
          name: sk2-master01-dv
      - name: cloudinitvolume
        cloudInitNoCloud:
          userData: |-
            #cloud-config
            chpasswd:
              list: |
              expire: False
            ssh_pwauth: True
            disable_root: false
  dataVolumeTemplates:
  - metadata:
      name: sk2-master01-dv
    spec:
      storage:
        resources:
          requests:
            storage: 68Gi
        storageClassName: rook-cephfs
        accessModes:
          - ReadWriteMany
      source:
        registry:
          url: "docker://registry.kubeops.net/kubeops-vm/kubeops/kubevirt/sk2_master01_export:1.0.0"(change the url to the image you want to deploy)
          secretRef: kubeops-vm-sec
kubectl apply -f filename.yaml
Step 5 - Verify Deployment
Run the following commands to check if the VM is deployed successfully:
kubectl get dv -n kubevirt-vms-import

kubectl get vmi -n kubevirt-vms-import
Ensure that the DataVolume is successfully downloaded and the VirtualMachineInstance is running.
8 - How to monitor kubevirt in Grafana
Monitoring KubeVirt VMIs with Grafana and Prometheus
This guide explains how to monitor KubeVirt Virtual Machine Instances (VMIs) using Grafana and Prometheus. By the end of this guide, you will have a Grafana dashboard displaying metrics related to KubeVirt VMIs.
Prerequisites
-
A running multi-node Kubernetes cluster with KubeVirt installed
⚠️ Note: Single-node clusters are not supported due to component scheduling and storage limitations.
-
A functional storage provider (e.g., Rook-Ceph or any other CSI-compatible solution) must be installed and available
⚠️ Required for deploying both Prometheus and Grafana, as they rely on PersistentVolumeClaims (PVCs)
-
Prometheus deployed in the cluster
-
Grafana installed and configured to connect to Prometheus
Step 1: Ensure Prometheus is Collecting KubeVirt Metrics
KubeVirt exposes various metrics that Prometheus can scrape. These metrics are documented here: KubeVirt Metrics.
To check if Prometheus is collecting KubeVirt metrics:
-
Open the Prometheus Dashboard
-
Search for KubeVirt-related metrics, e.g.,
kubevirt_vmi_memory_available_bytes. -
If no metrics appear, ensure the KubeVirt servicemonitor is added to Prometheus:
kubectl get servicemonitor -A | grep kubevirt -
Check that KubeVirt has been installed correctly and that
monitorNamespaceandmonitorAccountare correct. How to install KubeOps Virtualization (kubevirt) -
Reload Prometheus operator.
-
Reload Kubevirt operator.
Step 2: Import the KubeVirt Grafana Dashboard
KubeVirt provides a ready-to-use Grafana dashboard JSON file: KubeVirt Grafana Dashboard.
To import it into Grafana:
- Open the Grafana Dashboard.
- Navigate to
Dashboards > New > Import. - Paste the JSON content from the KubeVirt dashboard file.
- Select Prometheus as the data source.
- Click
Load.
Step 3: Customize the Dashboard (Optional)
To add specific VMI-related metrics to the dashboard:
-
Click
Editon a panel. -
Use PromQL queries to fetch desired VMI metrics, e.g.,
- CPU Usage:
rate(kubevirt_vmi_cpu_usage_seconds_total[5m]) - Memory Usage:
kubevirt_vmi_memory_available_bytes - Network Traffic:
rate(kubevirt_vmi_network_receive_bytes_total[5m])
- CPU Usage:
-
Save the dashboard.
Note: Query output can be viewed in the Prometheus Dashboard.
Conclusion
You have successfully set up Grafana to monitor KubeVirt VMIs using Prometheus. You can now track VMI performance and resource usage effectively.
9 - How to create L3 networking for VMs
Setting up L3 networking with Multus for KubeVirt VMs enables efficient cross-node communication and network segmentation, enhancing flexibility and performance in a Kubernetes environment.
Prerequisites
- A running Kubernetes cluster
kubectlcommand-line tool configured to connect to your cluster- Calico and Multus installed and configured
- KOSI is installed and successfully authenticated
Configuring Node Networking using Network Manager State (NMState)
Network Manager State (nmstate) is a declarative network configuration tool for Linux. It provides an API and CLI to manage network settings in a structured, state-driven manner.
In Kubernetes, nmstate is often used with NodeNetworkConfigurationPolicy (NNCP) to configure node networking dynamically, allowing for changes such as setting up VLANs, bridges, bonds, and other networking features.
1. Deploying nmstate on a Kubernetes Cluster
First, create the nmstate-values.yaml file with the following content:
# nmstate-values.yaml
nmstateValues:
  namespace: nmstate
Use this values file to deploy the nmstate operator along with its CRDs:
kosi install --hub kubeops kubeops/nmstate:2.0.1 -f nmstate-values.yaml
2. Configuring Node Networking with NNCP
Create an nncp-values.yaml file to define network configurations dynamically, including bridges and routes:
# nncp-values.yaml
namespace: "nmstate"
nodes:
  - nodeName: cluster1master1
    nodeIP: 10.2.10.11
    bridgeIP: 10.10.1.1 # bridge IP for cluster1master1.
    bridgeSubnet: 10.10.1.0 # `/24` subnet for bridge
    nodeInterface: ens192 # use `ip a` or `ifconfig` to identify interface

  - nodeName: cluster1master2
    nodeIP: 10.2.10.12
    bridgeIP: 10.10.2.1
    bridgeSubnet: 10.10.2.0
    nodeInterface: ens192

  - nodeName: cluster1worker1
    nodeIP: 10.2.10.14
    bridgeIP: 10.10.3.1
    bridgeSubnet: 10.10.3.0
    nodeInterface: ens192

  - nodeName: cluster1worker2
    nodeIP: 10.2.10.15
    bridgeIP: 10.10.4.1
    bridgeSubnet: 10.10.4.0
    nodeInterface: ens192
Note:
If you’re adding a new node, you should assign a unique bridgeIP and bridgeSubnet, following the existing pattern.
For example, if your last node used:
bridgeIP: 10.10.4.1
bridgeSubnet: 10.10.4.0/24
  - nodeName: <new_node>
    nodeIP: <node_ip>
    bridgeIP: 10.10.5.1
    bridgeSubnet: 10.10.5.0
    nodeInterface: ens192
Use this values file to deploy the node network configuration policies on all nodes:
kosi install --hub kubeops kubeops/nncp:2.0.1 -f nncp-values.yaml
3. Allow Traffic betwwen the Interfaces
iptables -A FORWARD -i br-secondary -j ACCEPT
iptables -A FORWARD -o br-secondary -j ACCEPT
4. Check for Bridge Network and Evaluate the connection between the nodes via the BRidge network
-
Verify Bridge Creation on Each Node
Run the following command on each node to confirm that the bridge exists and has the correct IP:
ip a show br-secondary
-
Check Bridge Interface and Attached Interfaces
List all bridges and verify attached interfaces:
ip link show type bridge
-
Verify Routes and Connectivity
Check if the expected routes are in place:
ip route show
Then, test connectivity between nodes using ping:
ping -c 4 <another_node_bridgeIP>
Install KubeVirt
For installation instructions, please refer to the KubeVirt Installation Guide
Networks and Interfaces
L3 Networking with Multus
To set up L3 networking with Multus, each worker node requires a separate NetworkAttachmentDefinition (NAD) with a unique IP address and subnet matching the node’s network configuration. This allows isolated network environments for each pod, enabling multi-interface support on pods and communication between nodes in the cluster.
Network Planning
Before creating the NADs, plan the IP ranges and subnets for each worker node to avoid conflicts and ensure proper routing between nodes.
Example IP range mapping for worker nodes:
| Node | Subnet | Example IP for Pod |
|---|---|---|
| cluster1worker1 | 10.10.3.0/24 | 10.10.3.10 |
| cluster1worker2 | 10.10.4.0/24 | 10.10.4.10 |
Example NAD Configuration for Worker Node 1
This example shows how to configure a NetworkAttachmentDefinition (NAD) for worker node 1 (cluster1worker1), with a static IP range assigned to its pods:
# nad_cluster1worker1.yaml
apiVersion: k8s.cni.cncf.io/v1
kind: NetworkAttachmentDefinition
metadata:
  name: secondary-network-node1 # Assign unique names to each node's NAD
  annotations:
    k8s.v1.cni.cncf.io/nodeSelector: '{"kubernetes.io/hostname": "cluster1worker1"}'
spec:
  config: |
    {
      "cniVersion": "0.3.1",
      "name": "secondary-network",
      "type": "bridge",
      "bridge": "br-secondary",
      "ipam": {
        "type": "static",
        "addresses": [
          {
            "address": "10.10.3.10/24", # use correct worker node's subnet and mention the appropriate IP for pod's network
            "gateway": "10.10.3.1"
          }
        ],
        "routes": [
          {
            "dst": "10.10.4.0/24",
            "gw": "10.10.3.1"
          }
        ]
      }
    }
Apply the K8s Manifest Definition files
To deploy the NetworkAttachmentDefinition (NAD) objects for your nodes, apply the following Kubernetes manifest files:
kubectl apply -f nad_cluster1worker1.yaml
kubectl apply -f nad_cluster1worker2.yaml
Verify the created Network Attachment Definition Objects
To ensure that the NetworkAttachmentDefinition (NAD) objects have been successfully created, run the following command:
kubectl get net-attach-def -A
Deploy Virtual Machines (VMs) and Attach the Secondary Networks
Once the NADs are created, you can deploy Virtual Machines (VMs) and attach them to the secondary networks. The following is an example Kubernetes manifest for deploying a VM with a secondary network interface attached.
Network Selection from NADs
Each VM must be connected to the correct network defined by the NetworkAttachmentDefinition (NAD) for its corresponding node. For example, if you have created a NAD for cluster1worker1 named secondary-network-node1, ensure that the VM manifest refers to this network in the annotations section and correctly links to the networkName under the multus configuration.
Ensure that the network name in the manifest matches the NAD definition.
Create Image Pull Secret
Please create a secret for pulling image from registry.kubeops.net.
kubectl -n "l3-networking" create secret docker-registry kubeops-vm \
  --docker-server=registry.kubeops.net \
  --docker-username=<kubeops-user> \
  --docker-password=<harbor_token>
Example VM Manifest for Secondary Network
The following is an example Kubernetes manifest for deploying a VM with a secondary network interface attached to a specific NAD:
# vm1.yaml
apiVersion: kubevirt.io/v1
kind: VirtualMachine
metadata:
  name: "ubuntu-vm"
  namespace: "l3-networking"
  annotations:
    k8s.v1.cni.cncf.io/networks: secondary-network-node1 # Ensure this matches the NAD network name
spec:
  nodeSelector:
    kubernetes.io/hostname: cluster1worker1 # edit for scheduling node on other node
  runStrategy: Always
  template:
    metadata:
      labels:
        kubevirt.io/size: small
    spec:
      domain:
        cpu:
          cores: 1
        devices:
          disks:
            - name: containervolume
              disk:
                bus: virtio
            - name: cloudinitvolume
              disk:
                bus: virtio
          interfaces:
          - name: default
            masquerade: {}
          - name: secondary-network
            bridge: {}
        resources:
          requests:
            memory: 2048M
      networks:
      - name: default
        pod: {}
      - name: secondary-network
        multus:
          networkName: secondary-network-node1 # Ensure this matches the NAD network name
      volumes:
        - name: containervolume
          containerDisk:
            image: registry.kubeops.net/kubeops-vm/kubeops/ubuntu-cloudimg-focal:2.0.1
            imagePullSecret: kubeops-vm
            imagePullPolicy: Always
        - name: cloudinitvolume
          cloudInitNoCloud:
            userData: |-
              #cloud-config
              chpasswd:
                list: |
                  ubuntu:ubuntu
                  root:toor
                expire: False
              ssh_pwauth: True
              disable_root: false
Apply the VM Manifest
Once the NetworkAttachmentDefinition (NAD) objects have been created, you can deploy the Virtual Machines (VMs) and apply the manifests. The following commands apply the VM manifests to your Kubernetes cluster.
kubectl apply -f vm1.yaml
kubectl apply -f vm2.yaml
Verify the Networking
Upon successful VM startup, verify network connectivity using the following procedure:
On each VMs
1. Check the IP Address
First, check the IP address assigned to the pod (VM). This is crucial to ensure that the secondary network interface has been correctly assigned an IP.
kubectl exec -n <namespace> <pod-1> -- ip a
2. Assign IP Address if Not Automatically Assigned (Optional)
kubectl exec -n <namespace> <pod-1> -- sudo dhclient enp2s0
3. Check the Routes
Verify the routing configuration on the VM to ensure that traffic can flow through the secondary network. Use the following command:
kubectl exec -n <namespace> <pod-1> -- ip r
This will display the routing table for the VM and confirm if the secondary network is correctly set up.
Verify VM Communication
After ensuring the network settings are correct, test the communication between VMs by pinging the secondary network IP of another pod.
Test Connectivity Between VMs
Use the ping command to check if the VMs can communicate over the secondary network. Replace <pod2_secondary_network_IP> with the actual IP address of the secondary network interface on the second VM.
kubectl exec -n <namespace> <pod-1> -- ping -c 2 <pod2_secondary_network_IP>
If the ping is successful, it confirms that the VMs are able to communicate over the secondary network.
Additional Notes:
Ensure that the correct namespace and pod names are used when executing commands.
Make sure the secondary network interface is correctly configured on each VM, and the IP address and routes are properly assigned.
If the VMs cannot communicate, check for issues in the NetworkAttachmentDefinition (NAD) configuration or verify that the correct CNI plugins are running.
10 - How to backup vms and vm snapshots with velero
prerequisites
- a running cluster
- rook-ceph as storage provider
- a s3 storage ( in this case minio)
- a kubevirt vm running in the cluster
in this example minio is used.
step 1: configure velero
veleroValues:
 namespace: "velero"
 accessKeyId: "minio"
 secretAccessKey: "minio123"
 backupLocationConfig:
   s3Url: "http://10.2.10.110:30090" # nodeport of minio
in the kubeopsctl.yaml:
velero: true
after that you can execute:
kubeopsctl apply -f kubeopsctl.yaml
step 2: check the s3 storage bucket for velero
the bucket for velero ( default velero ) in the s3 storage should be accessible for velero, so check if you have correct rights for writing into the bucket. so in this example we set the bucket to public:

step 3: create backup of namespace
velero backup get
velero backup create kubeops1 --include-namespaces <Namespace of kubevirt vm>
the name backup name must be unique.
then you can check with
velero backup get
velero backup describe kubeops1
velero backup logs kubeops1
after that, you can restore
velero restore get
velero restore create kubeops1 --from-backup kubeops1
the restore name must be unique. you can check the restores with
velero restore get
velero restore create kubeops1 --from-backup kubeops1