How to install KOSI Proxy
4 minute read
How to install KOSI Proxy
This guide shows you how to install the KOSI Proxy. The KOSI Proxy enables controlled access to packages and container images by allowing downloads while blocking uploads to the internet. This guide describes how to install, configure, and operate the KOSI Proxy and Harbor registry integration.
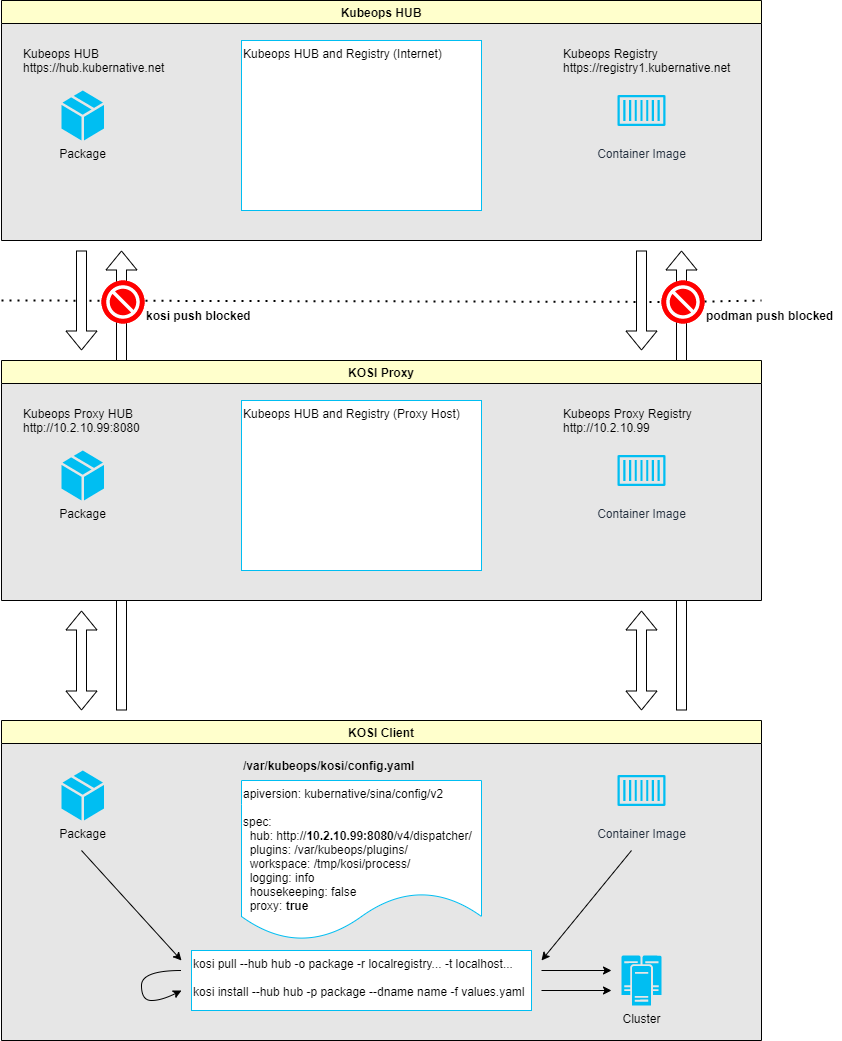
Architecture
The following diagram shows the architecture of the KOSI Proxy. Packages and container images can be fetched through the KOSI Proxy. Uploading packages and container images to the internet is blocked. Access can also be restricted to a HUB.
Prerequisites
To install the KOSI Proxy, you need a dedicated VM running RHEL9 OS and root access.
The minimum VM requirements are:
- 4 CPUs
- 8 GB RAM
- 50 GB disk space
The following software must be installed on this VM:
- docker
- docker compose
- kosi
# docker
subscription-manager register
subscription-manager refresh
subscription-manager attach --auto
dnf config-manager --add-repo=https://download.docker.com/linux/centos/docker-ce.repo
dnf repolist -v
dnf install docker-ce
systemctl enable docker --now
systemctl status docker

# docker compose
curl -L "https://github.com/docker/compose/releases/download/v2.24.5/docker-compose-$(uname -s)-$(uname -m)" -o /usr/local/bin/docker-compose
chmod +x /usr/local/bin/docker-compose

# kosi
dnf install -y kosi*.rpm

#### Configure the KOSI hub in ´/var/kubeops/kosi/config.yaml`
```yaml
apiversion: kubernative/sina/config/v2

spec:
  hub: https://dispatcher.preprod.kubeops.net/v4/dispatcher/ # <- set hub
  plugins: /var/kubeops/plugins/
  workspace: /tmp/kosi/process/
  logging: info
  housekeeping: false
  proxy: false # <- mandatory if kosi version >= 2.10.*
Install KOSI Proxy
Once all prerequisites are met, you can install the KOSI Proxy.
A values.yaml file is required for KOSI Proxy installation.
Below is an example values.yaml configuration for the environment:
# Proxy host IP address
proxyIP: 10.2.10.99

# Preprod config values
proxyPassthrough: preprod
proxyRegistry: registry.preprod.kubeops.net
aspnetcoreEnvironment: Development

# Prod config values
#proxyPassthrough: prod
#proxyRegistry: registry.kubeops.net
#aspnetcoreEnvironment: Production
Use the values for the environment you are deploying to.
- For preprod, use the preprod registry and preprod config values.
- For prod, use the prod registry and prod config values.
After creating the values.yaml file, the KOSI Proxy can be installed using a kosi package.
The KOSI Proxy will be installed in ~/kosi-proxy
kosi install --hub kubeops kubeops/kubeops/kosi-proxy:2.13.0.1_Alpha7 -f values.yaml
Start the KOSI Proxy:
cd ~/kosi-proxy
docker-compose up -d
Configure KOSI Proxy (Advanced)
The KOSI Proxy is already configured during installation; however, you can adjust additional parameters if needed.
1. Hub Whitelist
The hub whitelist can be configured in the app settings file ~/kosi-proxy/data/download-v4/appsettings.json.
By default the hubs kosi, kubeops and kosi-enterprise are set.
{
  "Logging": {
    "LogLevel": {
      "Microsoft": "Warning",
      "System": "Warning",
      "Microsoft.Hosting.Lifetime": "Information",
      "Kubeops": "Debug"
    },
    "Console": {
      "FormatterName": "simple",
      "FormatterOptions": {
        "SingleLine": false,
        "TimestampFormat": "HH:mm:ss ",
        "ColorBehavior": "Enabled",
        "UseUtcTimestamp": false
      }
    }
  },
  "AllowedHosts": "*",
  "Config": {
    "RepositoryPath": "/service/repository",
    "PermissionServiceUrl": "http://permission-v4/",
    "ProxyPassthroughUrl": "https://dispatcher.preprod.kubeops.net/v4/download/",
    "GuestQuota": 1000000,
    "HubWhitelist": "kosi, kubeops, kosi-enterprise"
  }
}
Install Harbor
Harbor is used as the registry endpoint in this setup.
1. Download installer
Download the Harbor offline installer:
# harbor
cd ~
curl -L https://github.com/goharbor/harbor/releases/download/v2.9.2/harbor-offline-installer-v2.9.2.tgz | tar -xvzf -
cd ~/harbor
cp harbor.yml.tmpl harbor.yml
2. Configure harbor.yml values
Edit the harbor.yml
Change:
hostname: 10.2.10.99  # line 5
insecure: true        # line 101
Comment out:
#  port: 443                            # line 15
#  certificate: /your/certificate/path  # line 17
#  private_key: /your/private/key/path  # line 18
3. Run install script:
cd ~/harbor
./install.sh
Configure Harbor
1. Port Forwarding
To log in to Harbor, port 80 of the proxy host must be forwarded.
The following example shows SSH port forwarding. Adjust the values as needed.
ssh -i "C:\Users\<user>\.ssh\id_rsa" -J <user>@10.9.112.19 -L 8080:10.2.10.99:80 root@10.2.10.99
You can then log in to Harbor -> http://localhost:8080
Default credentials:
- User: admin
- Initial Password: Harbor12345
2. Add Registry Endpoint
In Harbor, navigate to Administration → Registries → New Endpoint.

| Key | Value |
|---|---|
| Provider | Harbor |
| Name | Preprod |
| Description | [optional] |
| Endpoint URL | https://registry.preprod.kubeops.net |
| Access ID | kubeops |
| Access Secret | [enter kubeops password] |
| Verify Remote Cert | true |
When creating the Harbor registry endpoint, use the registry URL that matches your environment.
- Preprod: https://registry.preprod.kubeops.net
- Prod: https://registry.kubeops.net
3. Add Project
In Harbor, navigate to Project → New Project.
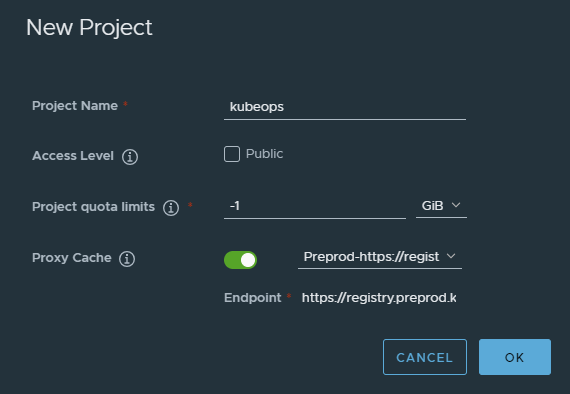
| Key | Value |
|---|---|
| Project Name | kubeops |
| Access Level | false |
| Project quota limits | -1 |
| Proxy Cache | true |
| Endpoint | https://registry.preprod.kubeops.net |
Manage applications with docker compose
1. KOSI Proxy
KOSI Proxy is installed in the folder ~/kosi-proxy.
cd ~/kosi-proxy

# show kosi proxy containers
docker compose ps

# show kosi proxy logs
docker compose logs -f

# stop kosi proxy
docker compose down

# start kosi proxy
docker compose up -d
2. Harbor
Harbor is installed in the folder ~/harbor.
cd ~/harbor

# show harbor containers
docker compose ps

# show harbor logs
docker compose logs -f

# stop harbor
docker compose down

# start harbor
docker compose up -d