This is the multi-page printable view of this section.
Click here to print.
Return to the regular view of this page.
How to Guides
Welcome to our comprehensive How-To Guide for using kosi. Whether youre a beginner aiming to understand the basics or an experienced user looking to fine-tune your skills, this guide is designed to provide you with detailed step-by-step instructions on how to navigate and utilize all the features of kosi effectively.
In the following sections, you will find everything from initial setup and configuration, to advanced tips and tricks that will help you get the most out of the software. Our aim is to assist you in becoming proficient with kosi, enhancing both your productivity and your user experience.
Lets get started on your journey to mastering kosi!
1 - Accessing kubeops-community packages
A brief overview of how you can access the kubeops-community packages.
This documentation describes how to search for, install, and manage packages from the kubeops-community hub using the Kosi CLI.
Searching for Packages
To list all available packages within the KubeOps community, you use the search command.
Command:
kosi search --hub kubeops-community
Example Output:
| User |
Name |
Version |
Description |
Install |
| kubeops-community |
hashicorp-vault |
0.32.0 |
Official HashiCorp Vault Chart |
kubeops-community/hashicorp-vault:0.32.0 |
| kubeops-community |
jenkins |
5.8.142 |
Deploys jenkins via helm |
kubeops-community/jenkins:5.8.142 |
| kubeops-community |
elasticsearch |
8.5.1 |
Deploys elasticsearch via helm |
kubeops-community/elasticsearch:8.5.1 |
Note: This overview shows you the exact path needed for the installation step in addition to the package name and version.
Installing Packages
Once you have found a suitable package, you can deploy it into your Kubernetes cluster using the install command. You can assign a specific name to your deployment using the --dname flag.
General Syntax:
kosi install --hub <Hub_Name> <Install_Path> --dname <Deployment_Name>
Examples
Installing HashiCorp Vault:
kosi install --hub kubeops-community kubeops-community/hashicorp-vault:0.32.0 --dname hashicorp-vault
Installing Jenkins:
kosi install --hub kubeops-community kubeops-community/jenkins:5.8.142 --dname jenkins
Installing Elasticsearch:
kosi install --hub kubeops-community kubeops-community/elasticsearch:8.5.1 --dname elasticsearch
Listing Deployed Packages
To view all currently installed packages and their deployment names, use the list command. The deployment name is required for updates and deletions.
Command:
Example Output:
| Deployment |
Package |
PublicHub |
Hub |
| hashicorp-vault |
kubeops-community/hashicorp-vault:0.32.0 |
|
kubeops-community |
| jenkins |
kubeops-community/jenkins:5.8.142 |
|
kubeops-community |
| elasticsearch |
kubeops-community/elasticsearch:8.5.1 |
|
kubeops-community |
Updating and Deleting Packages
To modify or remove an existing deployment, use the update or delete commands and include the --dname flag to specify which deployment you are targeting.
Updating a Package
The update command executes the update logic and updates the deployment in the Kubernetes cluster.
Example (Updating HashiCorp Vault):
kosi update --hub kubeops-community kubeops-community/hashicorp-vault:<new-version> --dname hashicorp-vault
Deleting a Package
The delete command executes the delete logic and removes the deployment from the Kubernetes cluster.
Example (Deleting HashiCorp Vault):
kosi delete --hub kubeops-community kubeops-community/hashicorp-vault:0.32.0 --dname hashicorp-vault
2 - How to install KOSI as a user
Setting up KOSI on RHEL systems requires a few key steps, including downloading the RPM file and configuring your environment. Here’s a quick guide to help you through the process.
How to install KOSI as a user
This guide explains how to install KOSI as a user. KOSI can only be downloaded from our official website.
Prerequisites
-
Operating System: A machine running RHEL 9.
-
Helm: Helm Must be installed on your machine. Refer to the Helm Official Documentation.
-
Podman:
KOSI requires Podman to be installed on your machine.
Note
If you are a non-root user, ensure that the number of user namespaces (
max_user_namespaces) is configured correctly. For more details, refer to this
GitHub tutorial.
Install on RHEL9:
⚠ Caution
KOSI supports only secure registries. If you use an insecure registry, you must explicitly add it as an insecure registry in registries.conf (/etc/containers/registries.conf).
Installation Steps
-
Download the KOSI RPM:
- Log in to your KubeOps account.
- Download your desired version of the KOSI RPM from the official download page.
-
Install the KOSI RPM on your admin node:
Run the following commands:
echo 'export KUBEOPSROOT=/home/<user>/kubeops' >> $HOME/.bashrc
source $HOME/.bashrc
sudo dnf install <path_to_rpm>/<kosi_file_name>.rpm
Note
- Replace
<path_to_rpm> with the directory path where the file is located.
- Replace
<kosi_file_name> with the exact RPM file name (including the .rpm extension).
$KUBEOPSROOT Variable
The $KUBEOPSROOT environment variable defines the location of the KOSI plugins, deployment.yaml, and config.yaml.
If you change the KUBEOPSROOT variable after installation, you must manually copy the updated deployment.yaml, config.yaml, and plugins.
Run the following commands to update them:
echo 'export KUBEOPSROOT=/home/<user>/kubeops' >> $HOME/.bashrc
source $HOME/.bashrc
cp -r /var/kubeops/kosi/config.yaml $KUBEOPSROOT/kosi/config.yaml
cp -r /var/kubeops/kosi/deployment.yaml $KUBEOPSROOT/kosi/deployment.yaml
cp -r /var/kubeops/plugins $KUBEOPSROOT/
For a clean installation, it is not necessary to move the deployment.yaml.
Check Installation
To verify that KOSI is installed correctly on your machine, run:
A successful installation will display version details, it will look similar like this:
2024-08-07 13:49:00 Info:      KOSI version: 2.14.0.0_XXXXXXXXXX
2024-08-07 13:49:00 Info:      This work is licensed under Creative Commons Attribution - NoDerivatives 4.0 International License(see https://creativecommons.org/licenses/by-nd/4.0/legalcode for more details).
2024-08-07 13:49:00 Info:      © KubeOps GmbH, Hinter Stöck 17, 72406 Bisingen - Germany, 2023
3 - How to use Variables in KOSI Packages
This guide explains how to use Variables that are set by KOSI plugins inside your KOSI package.
How to use Variables in KOSI Packages
KOSI plugins can produce internal variables during execution, which you can reference in subsequent steps of your package (for example in conditions or output messages). The following guide explains how to use variables set by various KOSI plugins and how to consume them using e.g. the if and fprint plugins (which allow conditional logic and formatted output, respectively).
Plugins that set Variables
Several plugins store their results in named variables. These include:
-
Firewall / Firewalld / IPTables – All three firewall plugins support a key like getFirewallStatus = "<var>". For example:
firewall
(
    type = "firewalld";
    action = "enable";
    getFirewallStatus = "status";
);
This stores the firewall status ("running" or "not running") into the variable status. You can then reference this status variable in later steps.
-
Hostname – The hostname plugin can get the current hostname into a variable or set a new hostname from a variable. Its keys are: get = "<var>" to save the current hostname and setVar = "<var>" to restore from a saved variable. For example:
hostname(get = "oldHostname");
This saves the machine’s current hostname into the variable oldHostname.
-
kubeadm – The kubeadm plugin runs kubeadm commands. Its outputVar = "<var>" option captures the command’s output into a variable. For example:
kubeadm
(
    operation = "version";
    kubeadmVersion = "version";
    outputVar = "kubeadmVersionOutput";
);
This saves the output of kubeadm version into the variable kubeadmVersionOutput.
-
kubectl – The kubectl plugin executes kubectl commands. Its outputVar = "<var>" captures the command output. For example:
kubectl
(
    operation = "get";
    resource = "pods";
    flags = "-n kube-system -o wide";
    outputVar = "podsOutput";
    outputFile = "/root/output.txt";
);
This saves the kubectl get pods output into podsOutput. You can then use podsOutput in subsequent steps.
-
osCheck – The osCheck plugin detects the OS name and version. It has two keys: getOSVar="<var>" for the OS name and getOSVersionVar="<var>" for the OS version. For example:
osCheck(getOSVar="osName"; getOSVersionVar="osVersion");
This stores the OS name in osName and the version in osVersion.
-
set – The set plugin lets you define arbitrary variables. Use variable="<name>"; value="<something>" to create a variable. For example:
set(variable = "envType"; value = "production");
This creates a variable named envType with value "production". Variables set by the set plugin are accessed via vars.<variableName>.
Referencing Plugin Variables
KOSI provides two main ways to use these variables:
-
Conditional checks with the if plugin: The if plugin evaluates an expression and branches accordingly. In the condition string, you can include plugin variables by name, enclosed in $...$. For example:
if(condition = "$oldHostname$ = 'myHost'") then {
    # ... do something ...
}
For variables set via the set plugin, access them as $vars.<name>$, e.g. $vars.envType$.
-
Formatted output with the fprint plugin: The fprint plugin prints a message and can include plugin-variable values. You provide a list of variable names in its variables key and placeholders {0}, {1}, etc. in the message. For example:
fprint
(
    message = "Firewall status is {0}";
    variables = "['status']";
);
For variables from the set plugin:
set(variable="userName"; value="Alice");
set(variable="userIP"; value="10.0.0.1");
fprint
(
    message = "User {0} has IP {1}";
    variables = "['vars.userName','vars.userIP']";
);
Example Workflow
-
Set or retrieve a variable:
hostname(get = "myHostname");
osCheck(getOSVar = "osName"; getOSVersionVar = "osVersion");
-
Conditionally act on it:
 if(condition = "$myHostname$ = 'expectedHost'") then {
     fprint
     (
         message = "Got expected hostname: {0}";
         variables = "['myHostname']";
     );
 }
-
Output or log values:
fprint
(
    message = "Running on {0} version {1}";
    variables = "['osName','osVersion']";
);
Plugins mentioned in this How to Guide that set or use variables
4 - Install package from Hub
Installing KOSI packages from the KubeOps Hub simplifies the installation of packages and programs within a Kubernetes cluster. This guide outlines the steps for installing packages from public and private hubs, including offline installations.
Installing KOSI packages from KubeOps Hub
To install KOSI packages from the KubeOps Hub on your machines, follow these steps:
-
Search for the Package:
Use the kosi search command to find the desired package on the KubeOps Hub.
(Refer to kosi search for more info.)
-
Install the Package:
Copy the installation address of the desired package and use it with the kosi install command:
[root@localhost ~]# kosi install --hub <hubname> <installation address>
To be able to install a package from the software Hub, you must be logged in as a user.
Install from Private Hub
Example:
The package wordpressdemo of user kosi with version 0.1.0 is to be installed from the private software Hub:
[root@localhost ~]# kosi install --hub kubeops kosi/wordpressdemo:0.1.0
Install from Public Hub
Example:
The package wordpressdemo of user kosi with version 0.1.0 is to be installed from the public software Hub:
[root@localhost ~]# kosi install --hub kubeops kosi/wordpressdemo:0.1.0
Install along with yaml files
The -f parameter is used to provide YAML files from the user.
[root@localhost ~]# kosi install --hub <hubname> <package> -f <user.yaml>
Example:
The package wordpressdemo of user kosi with version 0.1.0 is installed from the public software Hub with user-specific YAML files:
[root@localhost ~]# kosi install --hub kubeops kosi/wordpressdemo:0.1.0 -f userfile1.yaml
Install in specific namespace
The --namespace flag allows you to specify a Kubernetes namespace for the installation.
[root@localhost ~]# kosi install --hub <hubname> <package> --namespace <namespace>
Example:
The package wordpressdemo of user kosi with version 0.1.0 is installed from the public software Hub in a custom Kubernetes namespace:
[root@localhost ~]# kosi install --hub kubeops kosi/wordpressdemo:0.1.0 --namespace MyNamespace
Note: If no --namespace parameter is specified, the default namespace will be used.
Install with specific deployment name
The --dname flag allows you to assign a specific name to the deployment.
[root@localhost ~]# kosi install --hub <hubname> <package> --dname <deploymentname>
Example:
The package wordpressdemo of user kosi with version 0.1.0 is installed from the public software Hub with a deployment name set:
[root@localhost ~]# kosi install --hub kubeops kosi/wordpressdemo:0.1.0 --dname MyDeployment
If no --dname parameter is specified, a random deployment name will be generated.
Note: The deployment name is stored in the file /home/<user>/var/kubeops/kosi/deployment.yaml.
In these few steps, you can successfully install and use a KOSI package.
For additional functionality and features provided by KOSI, always refer to the Full Documentation.
Install on a machine with no internet connection
- Download the Package:
Use kosi pull on a machine with an internet connection to download the package:
[root@localhost ~]# kosi pull [package name from hub] -o [your preferred name] --hub public
-
Transfer the Package:
Move the downloaded package to the machine without an internet connection (which has KubeOps installed).
-
Install the Package:
Install the transferred package with the following command:
[root@localhost ~]# kosi install -p [package name]
5 - How to install and access the Plugins from the Hub
Installing and accessing plugins from the KubeOpsHub are straightforward steps to improve your KOSI experience. Below, you’ll find a guide on how to install and access the desired plugins.
How to access the Plugins
Note: Be sure you have a supported KOSI version 2.10.0 or higher.
All plugins are available as KOSI packages in the KubeOpsHub. Our plugins are grouped into several KOSI packages. To view the available packages, use the command:
KOSI Basic Plugins Version 1.6.X
kosi search --hub kosi-basic
2024-08-07 13:47:02 Info:      KOSI version: 2.14.0.0_XXXXXXXXXX
| User | Name          | Version     | Description        | Install                        |
|------|---------------|-------------|--------------------|--------------------------------|
| kosi | basic-plugins | 1.5.0_beta0 | KOSI Basic Plugins | kosi/basic-plugins:1.5.0_beta0 |
| kosi | basic-plugins | 1.5.0       | KOSI Basic Plugins | kosi/basic-plugins:1.5.0       |
| kosi | basic-plugins | 1.4.0       | KOSI Basic Plugins | kosi/basic-plugins:1.4.0       |
| kosi | basic-plugins | 1.6.0_Beta0 | KOSI Basic Plugins | kosi/basic-plugins:1.6.0_Beta0 |
| kosi | basic-plugins | 1.4.2       | KOSI Basic Plugins | kosi/basic-plugins:1.4.2       |
| kosi | basic-plugins | 1.4.1       | KOSI Basic Plugins | kosi/basic-plugins:1.4.1       |
This package contains the following plugins:
| Plugin |
Version |
| template |
1.6.0 |
| helm |
1.6.0 |
| print |
1.6.0 |
KOSI Professional Plugins Version 1.6.X
kosi search --hub kosi-professional
2024-08-07 13:47:36 Info:      KOSI version: 2.14.0.0_XXXXXXXXXX
| User | Name                 | Version     | Description               | Install                               |
|------|----------------------|-------------|---------------------------|---------------------------------------|
| kosi | professional-plugins | 1.5.0_beta0 | KOSI Professional Plugins | kosi/professional-plugins:1.5.0_beta0 |
| kosi | professional-plugins | 1.4.0       | KOSI Professional Plugins | kosi/professional-plugins:1.4.0       |
| kosi | professional-plugins | 1.5.0       | KOSI Professional Plugins | kosi/professional-plugins:1.5.0       |
| kosi | professional-plugins | 1.4.2       | KOSI Professional Plugins | kosi/professional-plugins:1.4.2       |
| kosi | professional-plugins | 1.4.1       | KOSI Professional Plugins | kosi/professional-plugins:1.4.1       |
| kosi | professional-plugins | 1.6.0_Beta0 | KOSI Professional Plugins | kosi/professional-plugins:1.6.0_Beta0 |
This are the plugins which the packages contains:
| Plugin |
Version |
| template |
1.6.0 |
| helm |
1.6.0 |
| print |
1.6.0 |
| kubectl |
1.6.0 |
| bash |
1.6.0 |
| cmd |
1.6.0 |
| sh |
1.6.0 |
| editfile |
1.6.0 |
| fprint |
1.6.0 |
| if |
1.6.0 |
| loop |
1.6.0 |
| kosi |
2.11.0.10 |
| merge |
1.6.0 |
| exit |
1.6.0 |
| setfact |
1.6.0 |
KOSI Enterprise Plugins Version 1.6.X
kosi search --hub kosi-enterprise
2024-08-07 13:47:59 Info:      KOSI version: 2.14.0.0_XXXXXXXXXX
| User | Name               | Version     | Description                  | Install                             |
|------|--------------------|-------------|------------------------------|-------------------------------------|
| kosi | enterprise-plugins | 1.5.0       | KOSI Enterprise Plugins      | kosi/enterprise-plugins:1.5.0       |
| kosi | piaoperator        | 1.4.0       | Pia Operator Install Package | kosi/piaoperator:1.4.0              |
| kosi | enterprise-plugins | 1.4.2       | KOSI Enterprise Plugins      | kosi/enterprise-plugins:1.4.2       |
| kosi | enterprise-plugins | 1.5.0_beta0 | KOSI Enterprise Plugins      | kosi/enterprise-plugins:1.5.0_beta0 |
| kosi | enterprise-plugins | 1.4.0       | KOSI Enterprise Plugins      | kosi/enterprise-plugins:1.4.0       |
| kosi | enterprise-plugins | 1.6.0_Beta0 | KOSI Enterprise Plugins      | kosi/enterprise-plugins:1.6.0_Beta0 |
| kosi | enterprise-plugins | 1.4.1       | KOSI Enterprise Plugins      | kosi/enterprise-plugins:1.4.1       |
This package contains the following plugins:
| Plugin |
Version |
| template |
1.6.0 |
| helm |
1.6.0 |
| print |
1.6.0 |
| kubectl |
1.6.0 |
| bash |
1.6.0 |
| cmd |
1.6.0 |
| sh |
1.6.0 |
| editfile |
1.6.0 |
| fprint |
1.6.0 |
| if |
1.6.0 |
| loop |
1.6.0 |
| kosi |
2.11.0.10 |
| merge |
1.6.0 |
| exit |
1.6.0 |
| setfact |
1.6.0 |
| auditlog |
1.6.0 |
| chmod |
1.6.0 |
| copy |
1.6.0 |
| firewall |
1.6.0 |
| firewallD |
1.6.0 |
| containerd |
1.6.0 |
| containerruntime |
1.6.0 |
| hostname |
1.6.0 |
| iptables |
1.6.0 |
| kubeadm |
1.6.0 |
| osCheck |
1.6.0 |
| packagemanager |
1.6.0 |
| pia |
1.6.0 |
| service |
1.6.0 |
| sudo |
1.6.0 |
How to install the Plugins
After installing the plugins with our KOSI install command, the plugins are automatically placed in the associated directory ($KUBEOPSROOT/plugins) and can be used directly.
kosi install --hub=<pluginhub> user/packagename:version
Example: The package enterprise-plugins of the user kosi with the version 1.6.0_Beta0 is to be installed from the kosi-enterprise hub.
kosi install --hub=kosi-enterprise kosi/enterprise-plugins:1.6.0_Beta0
Note: You can also use the Install Tab from the output to help with installation.
6 - How to update KOSI
Updating KOSI is a straightforward process that ensures you have the latest features and security enhancements. Follow this guide to update KOSI by downloading the appropriate RPM file and installing it on your system.
How to update KOSI
This guide shows you how to update KOSI. KOSI can only be downloaded from our official website.
Prerequisites
Before you begin, make sure the following prerequisites are met:
- A machine with the
RHEL 9 operating system.
- Helm must be installed on your machine.
Refer to the Helm Official Documentation for the Installation Guide.
-
For KOSI versions, you must have Podman installed on your machine.
Note
Before installing Podman, make sure that the number of user namespaces (max_user_namespaces) is specified on your system if you are a non-root user.
For more information, follow this GitHub link.
To install Podman, run the following command:
⚠ Caution
KOSI supports only secure registries. If you use an insecure registry, you must explicitly add it as an insecure registry in registries.conf (/etc/containers/registries.conf).
Update Steps
Each KOSI release includes an RPM file for manual installation. To download the RPM, you must log in to your KubeOps account.
-
Create a KubeOps Account:
If you haven’t already, create a KubeOps account on the KubeOps website and log in to your account.
-
Download the RPM:
Download your desired version of the KOSI RPM file from the official download page:
https://kubeops.net/products/downloads/kosi-downloads-en
-
Update the KOSI RPM:
On your admin node, update KOSI by installing the new RPM. This will replace the existing version. Run the following command:
sudo dnf install <path to rpm>/<kosi file name>
Note
  - Replace `<path_to_rpm>` with the directory path where the file is located.
  - Replace `<kosi_file_name>` with the exact file name of the RPM (including the `.rpm` extension).
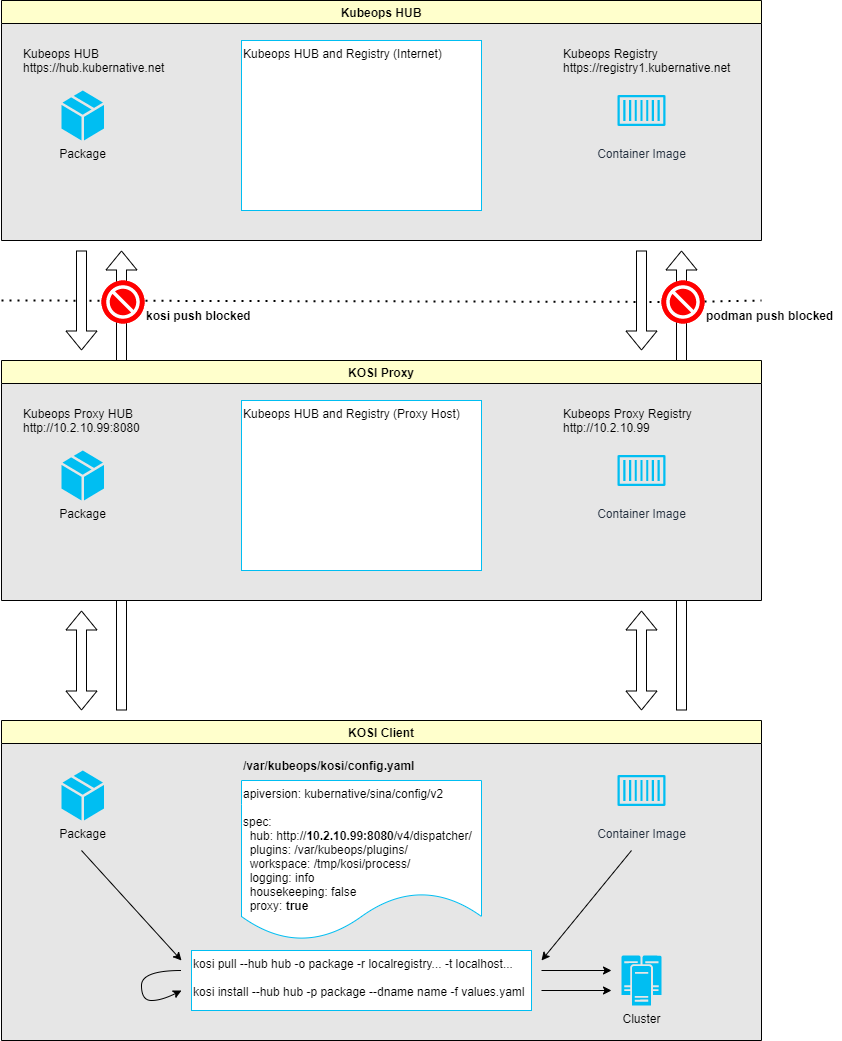
7 - How to install KOSI Proxy
The KOSI Proxy allows you to fetch packages and container images while blocking uploads to the internet and restricting access to a hub. This guide explains the installation and configuration steps for KOSI Proxy.
How to install KOSI Proxy
This guide shows you how to install the KOSI Proxy. The KOSI Proxy enables controlled access to packages and container images by allowing downloads while blocking uploads to the internet. This guide describes how to install, configure, and operate the KOSI Proxy and Harbor registry integration.
Architecture
The following diagram shows the architecture of the KOSI Proxy.
Packages and container images can be fetched through the KOSI Proxy.
Uploading packages and container images to the internet is blocked.
Access can also be restricted to a HUB.
Prerequisites
To install the KOSI Proxy, you need a dedicated VM running RHEL9 OS and root access.
The minimum VM requirements are:
- 4 CPUs
- 8 GB RAM
- 50 GB disk space
The following software must be installed on this VM:
- docker
- docker compose
- kosi
# docker
subscription-manager register
subscription-manager refresh
subscription-manager attach --auto
dnf config-manager --add-repo=https://download.docker.com/linux/centos/docker-ce.repo
dnf repolist -v
dnf install docker-ce
systemctl enable docker --now
systemctl status docker

# docker compose
curl -L "https://github.com/docker/compose/releases/download/v2.24.5/docker-compose-$(uname -s)-$(uname -m)" -o /usr/local/bin/docker-compose
chmod +x /usr/local/bin/docker-compose

# kosi
dnf install -y kosi*.rpm

#### Configure the KOSI hub in ´/var/kubeops/kosi/config.yaml`
```yaml
apiversion: kubernative/sina/config/v2

spec:
  hub: https://dispatcher.preprod.kubeops.net/v4/dispatcher/ # <- set hub
  plugins: /var/kubeops/plugins/
  workspace: /tmp/kosi/process/
  logging: info
  housekeeping: false
  proxy: false # <- mandatory if kosi version >= 2.10.*
Install KOSI Proxy
Once all prerequisites are met, you can install the KOSI Proxy.
A values.yaml file is required for KOSI Proxy installation.
Below is an example values.yaml configuration for the environment:
# Proxy host IP address
proxyIP: 10.2.10.99

# Preprod config values
proxyPassthrough: preprod
proxyRegistry: registry.preprod.kubeops.net
aspnetcoreEnvironment: Development

# Prod config values
#proxyPassthrough: prod
#proxyRegistry: registry.kubeops.net
#aspnetcoreEnvironment: Production
Note
Use the values for the environment you are deploying to.
- For preprod, use the preprod registry and preprod config values.
- For prod, use the prod registry and prod config values.
After creating the values.yaml file, the KOSI Proxy can be installed using a kosi package.
The KOSI Proxy will be installed in ~/kosi-proxy
kosi install --hub kubeops kubeops/kubeops/kosi-proxy:2.13.0.1_Alpha7 -f values.yaml
Start the KOSI Proxy:
cd ~/kosi-proxy
docker-compose up -d
The KOSI Proxy is already configured during installation; however, you can adjust additional parameters if needed.
1. Hub Whitelist
The hub whitelist can be configured in the app settings file ~/kosi-proxy/data/download-v4/appsettings.json.
By default the hubs kosi, kubeops and kosi-enterprise are set.
{
  "Logging": {
    "LogLevel": {
      "Microsoft": "Warning",
      "System": "Warning",
      "Microsoft.Hosting.Lifetime": "Information",
      "Kubeops": "Debug"
    },
    "Console": {
      "FormatterName": "simple",
      "FormatterOptions": {
        "SingleLine": false,
        "TimestampFormat": "HH:mm:ss ",
        "ColorBehavior": "Enabled",
        "UseUtcTimestamp": false
      }
    }
  },
  "AllowedHosts": "*",
  "Config": {
    "RepositoryPath": "/service/repository",
    "PermissionServiceUrl": "http://permission-v4/",
    "ProxyPassthroughUrl": "https://dispatcher.preprod.kubeops.net/v4/download/",
    "GuestQuota": 1000000,
    "HubWhitelist": "kosi, kubeops, kosi-enterprise"
  }
}
Install Harbor
Harbor is used as the registry endpoint in this setup.
1. Download installer
Download the Harbor offline installer:
# harbor
cd ~
curl -L https://github.com/goharbor/harbor/releases/download/v2.9.2/harbor-offline-installer-v2.9.2.tgz | tar -xvzf -
cd ~/harbor
cp harbor.yml.tmpl harbor.yml
Edit the harbor.yml
Change:
hostname: 10.2.10.99  # line 5
insecure: true        # line 101
Comment out:
#  port: 443                            # line 15
#  certificate: /your/certificate/path  # line 17
#  private_key: /your/private/key/path  # line 18
3. Run install script:
1. Port Forwarding
To log in to Harbor, port 80 of the proxy host must be forwarded.
The following example shows SSH port forwarding. Adjust the values as needed.
ssh -i "C:\Users\<user>\.ssh\id_rsa" -J <user>@10.9.112.19 -L 8080:10.2.10.99:80 root@10.2.10.99
You can then log in to Harbor -> http://localhost:8080
Default credentials:
- User: admin
- Initial Password: Harbor12345
2. Add Registry Endpoint
In Harbor, navigate to Administration → Registries → New Endpoint.

| Key |
Value |
| Provider |
Harbor |
| Name |
Preprod |
| Description |
[optional] |
| Endpoint URL |
https://registry.preprod.kubeops.net |
| Access ID |
kubeops |
| Access Secret |
[enter kubeops password] |
| Verify Remote Cert |
true |
Note
When creating the Harbor registry endpoint, use the registry URL that matches your environment.
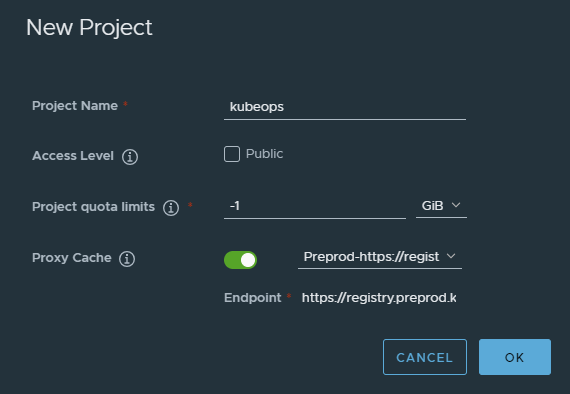
3. Add Project
In Harbor, navigate to Project → New Project.
Manage applications with docker compose
1. KOSI Proxy
KOSI Proxy is installed in the folder ~/kosi-proxy.
cd ~/kosi-proxy

# show kosi proxy containers
docker compose ps

# show kosi proxy logs
docker compose logs -f

# stop kosi proxy
docker compose down

# start kosi proxy
docker compose up -d
2. Harbor
Harbor is installed in the folder ~/harbor.
cd ~/harbor

# show harbor containers
docker compose ps

# show harbor logs
docker compose logs -f

# stop harbor
docker compose down

# start harbor
docker compose up -d
8 - How to template within the package.kosi
How to template within the package.kosi"
TBA
9 - Create Kosi package
Creating a KOSI package is an easy and efficient way to create your own packages. This guide outlines the essential steps and commands to help you successfully create your KOSI package.
Creating Kosi package
kosi create
To create a Kosi package, you must first run the kosi create command in your directory.
The kosi create command creates four files (package.yaml, template.yaml, logo.png and docs.tgz) in the current directory. These files can be edited.
[root@localhost ~]# kosi create
Created files:
- package.yaml - Defines properties of the Kosi package. (see below)
- template.yaml - Required if the template engine Scriban is to be used.
- logo.png - A package-thumbnail with the size of 50x50px, for showing logo on the KubeOpsHub.
- docs.tgz - A zipped directory with the documentation of the package, for showing documentation on the KubeOpsHub.
The documentation of the package is written in markdown. The file for the documentation is called readme.md.
To edit the markdown, you can unzip the docs.tgz in your directory with the command tar -xzf docs.tgz and zip it again with the command tar -czf docs.tgz docs/ after you finished.
Note: Please name your markdown files inside docs.tgz without a version-tag (docs/documentation-1.0.0.md).
Do not change the file names of any of the files above generated with the kosi create command.
package.yaml
The package.yaml defines a package in a specific version as well as the tasks needed to install it. The tasks which are used in the package.yaml are plugins, which can be created by the user.
Elements:
includes.files: Describes the files which are inluded in the Kosi package.includes.containers: Used for docker images. A container for the docker images will be created when the kosi install, kosi update or kosi delete command is used.installation.tasks: The tree describes the tasks (Kosi plugins), which are executed with the kosi install command.update.tasks: The tree describes the tasks (Kosi plugins), which are executed with the kosi update command.delete.tasks: The tree describes the tasks (Kosi plugins), which are executed with the kosi delete command.
IMPORTANT: It is required to enter the package name in lowercase.
Do not use any docker tags (:v1.0.0) in your package name.
Example package.yaml
apiversion: kubernative/kubeops/sina/user/v4 # Required field
name: kosi-example-packagev3 # Required field
description: kosi-example-package # Required field
version: 0.1.0 # Required field
includes:  # Required field: When "files" or "containers" are needed.
  files:  # Optional field: IF file is attached, e.g. "rpm, .extension"
    input: "template.yaml"
  containers: # Optional field: When "containers" are needed.
    example:
      registry: docker.io
      image: nginx
      tag: latest
docs: docs.tgz
logo: logo.png
installation: # Required field
  includes: # Optional field: When "files" or "containers" are needed.
    files: # Optional field:
      - input # Reference to includes
    containers: # Optional field:
      - example # Reference to includes
  tasks:
    - cmd:
        command: "touch ~/kosiExample1"
update: # Required field
  includes: # Optional field: When "files" or "containers" are needed.
    files: # Optional field:
      - input # Reference to includes
    containers: # Optional field:
      - example # Reference to includes
  tasks:
    - cmd:
        command: "touch ~/kosiExample2"
delete: # Required field
  includes: # Optional field: When "files" or "containers" are needed.
    files: # Optional field:
      - input # Reference to includes
    containers: # Optional field:
      - example # Reference to includes
  tasks:
    - cmd:
        command: "rm ~/kosiExample1"
    - cmd:
        command: "rm ~/kosiExample2"
kosi build
Now, after you created and edited the files from kosi create, you can simply build a Kosi package by just running the kosi build command in your directory.
[root@localhost ~]# kosi build
All files specified in the package.yaml are combined together with the package.yaml to form a kosi package.
In these few steps, you can successfully create and use the kosi package. This is the basic functionality offered by Kosi.
You can always explore Full Documentation to go through all the functionality and features provided by Kosi.