Try KOSI
Follow quickstart guides to learn how to securely deploy packages to clusters, nodes and other machines.
This is the multi-page printable view of this section. Click here to print.
Follow quickstart guides to learn how to securely deploy packages to clusters, nodes and other machines.
Here are the current supported KOSI Versions. The list contains: The KOSI version, Supported KOSI language version, Supported KOSI plugins and the Deprication date of all KOSI versions. X of the versions must be X of the plugins
| KOSI | Supported KOSI language | Supported KOSI plugins | Deprecation date |
|---|---|---|---|
| KOSI 2.14.X | v1.0.0 | Plugins 2.0.X | TBD |
| KOSI 2.13.X | v1.0.0 | Plugins 2.0.X | TBD |
| KOSI 2.12.X | v1.0.0 | Plugins 1.7.X | TBD |
added manage add user command
added manage add group command
added manage add-user-to-group command
added manage create group command
added manage list permissions command
added manage remove user command
added manage remove group command
added manage remove permission command
added manage user-from-group command
KOSI 2.12.0 does not support the old dispatcher url. it requires the new dispatcher: dispatcher.kubeops.net/v4/dispatcher. also supports only the new registry: registry.kubeops.net
KOSI 2.12.0 does not support the old dispatcher url. it requires the new dispatcher: dispatcher.kubeops.net/v4/dispatcher.
KOSI 2.12.0 does not support the old dispatcher url. it requires the new dispatcher: dispatcher.kubeops.net/v4/dispatcher.
KOSI 2.12.0 does not support the old dispatcher url. it requires the new dispatcher: dispatcher.kubeops.net/v4/dispatcher.
KOSI 2.12.0 does not support the old dispatcher url. it requires the new dispatcher: dispatcher.kubeops.net/v4/dispatcher.
KOSI 2.12.0 does not support the old dispatcher url. it requires the new dispatcher: dispatcher.kubeops.net/v4/dispatcher.
KOSI is a professional software installation tool tailored for Kubernetes clusters. Its primary function is to streamline the process of defining, installing, and managing self-contained packages within Kubernetes environments. These packages are versatile and can be adapted to suit various requirements and configurations.
By packaging applications and their associated Kubernetes resources into KOSI packages, developers can easily share and distribute their applications. Users can then use KOSI to install, upgrade, and manage these packages, making it easier to deploy complex applications in Kubernetes environments.
KOSI uses a quick-to-learn command line interface (CLI).
KOSI, drawing inspiration from Helm’s user-friendly design, empowers software developers to craft comprehensive packages. These packages can include multiple artifacts and essential dependencies, consolidated into a single KOSI package.
When deploying software into your environments, you simply retrieve this package from the KubeOps hub. KOSI efficiently manages all relevant dependencies, ensuring smooth installation processes.
This makes the process of installing software with KOSI into your cluster simplified, secure and flawless.
Supports Images and Artifacts in one Package
OSI stands out among other package managers because of its distinctive capability to package container images alongside other artifacts within the same package.
Self-Contained Packages
KOSI’s ability to generate a single, self-contained package reduces the risk of human errors that can result from manual steps during software deployment.
Customizable Plugins
KOSI offers pre-built plugins that facilitate the execution of several common tasks directly through KOSI packages. Additionally, you can easily access more plugins via our KubeOps hub.
Scalable and Secure
KOSI supports software distribution in complex environments, including those where outgoing proxies restrict broad internet access.
Integration and Support of other Tools KOSI seamlessly integrates with Helm, Podman and Docker, ensuring compatibility across various containerized environments. This compatibility allows users to leverage the strengths of Helms package management capabilities and Dockers containerization technology within the KOSI ecosystem. By supporting these widely used tools, KOSI enhances flexibility and efficiency in deploying and managing software across diverse infrastructure setups.
Click here to download and get started with KOSI now.
For KubeOps 1.7+ licences are required. KubeOps is a tool set which consists of 3 tools: KOSI, KubeOps Platform (Compliance and Compliance + VM). In the table you can see which functions are accessable with given licence.
If you create an account, you get a free 10 days trail-version of our licences.
| Functions | KOSI-Essential | KOSI-Enterprise |
|---|---|---|
| Push Packages | ✓ | ✓ |
| Pull Packages | ✓ | ✓ |
| List Packages | ✓ | ✓ |
| Install Packages | ✓ | ✓ |
| Update Packages | ✓ | ✓ |
| Delete Packages | ✓ | ✓ |
| Remove Packages | ✓ | ✓ |
| Encrypt Value-files | ✓ | ✓ |
| Lint Packages | ✓ | ✓ |
| Use Private Registry-space | ✓ | ✓ |
| Use Private Hub | ✓ | ✓ |
| Build *Basic Packages | ✓ | ✓ |
| Build **Advanced Packages | ✗ | ✓ |
| Price | FREE | Contact Sales |
| Functions | Compliance | Compliance + VM |
|---|---|---|
| Cluster Lifecycle Management | ✓ | ✓ |
| - Build Cluster | ✓ | ✓ |
| - Build Airgap Cluster | ✓ | ✓ |
| Security Hardening | ✓ | ✓ |
| Cloud Native VM Hypervisor | ✗ | ✓ |
| Price | Contact Sales | Contact Sales |
In this quickstart you will learn about:
KOSI seamlessly integrates with other package management software such as Helm and Podman. To ensure compatibility across different containerized environments, KOSI requires the installation of this software.
After the installation, KOSI is available as command line interface.
To get the most out of this guide, the following requirements should be met:
Make sure you have prepared the listed requirements before installing KOSI.
KOSI is designed to work with the latest versions of the following operating systems:
| OS | Diskspace |
|---|---|
| Red Hat Enterprise Linux 9.6 and 9.7 | 500 MB |
| Ubuntu 24.04.02 | 500 MB |
By default Red Hat Enterprise Linux restricts package management such as installing or updating. Before installing any software, you may need to register and subscribe with the Red Hat Customer Portal.
To register and subscribe, run the command subscription-manager register.
To easily install the kosi package you should add the kubeops package repo to your operating system’s package manager.
wget https://packagerepo.kubeops.net/pgp-key.public
cat pgp-key.public | sudo gpg --dearmor -o /usr/share/keyrings/kubeops.gpg
echo 'deb [arch=amd64 signed-by=/usr/share/keyrings/kubeops.gpg] https://packagerepo.kubeops.net/deb stable main' | sudo tee /etc/apt/sources.list.d/kubeops.list
sudo apt update
sudo dnf config-manager --add-repo https://packagerepo.kubeops.net/rpm/kubeops.repo
There are two ways to install kosi.
a) quick via the package repo of your operating system’s package manager.
sudo apt update
sudo apt install -y kosi=2.14*
sudo dnf install -y --disableexcludes=kubeops-repo kosi-2.14.0.0-0
b) manual download the kosi package from the official KubeOps Website and install it.
Login into your KubeOps account. If you don‘t have an account, you can create one by following the instructions for Create a KOSI account (with SSO).
Download your desired version of the KOSI package file (.rpm or .deb) from the official download page.
# download kosi deb manually and install with
sudo dpkg --install kosi_2.14.0.0-1_amd64.deb
# download kosi rpm manually and install with
sudo rpm --install -v kosi-2.14.0.0-0.x86_64.rpm
Set KUBEOPSROOT and XDG_RUNTIME_DIR in ~/.bashrc
# file ~/.bashrc
# Append these values to the end of your ~/.bashrc file
export KUBEOPSROOT=/home/<yourUser>/kubeops
export XDG_RUNTIME_DIR=$KUBEOPSROOT
Source .bashrc to apply the values
source ~/.bashrc
echo $KUBEOPSROOT
echo $XDG_RUNTIME_DIR
As a result you should see your KUBEOPSROOT-path two times.
This creates a kubeops directory in your home directory and transfers all necessary files, e.g., the kosi-config and the plugins, to it.
mkdir ~/kubeops
cd ~/kubeops
cp -R /var/kubeops/kosi/ .
cp -R /var/kubeops/plugins/ .
The config.yaml is in your KUBEOPSROOT-path (typically in
~/kubeops/kosi)
hub: https://dispatcher.kubeops.net/v4/dispatcher/plugins: /home/<yourUser>/kubeops/plugins, where # file $KUBEOPSROOT/kosi/config.yaml
apiversion: kubernative/sina/config/v2
spec:
hub: https://dispatcher.kubeops.net/v4/dispatcher/ # <-- set hub url
plugins: <your kubeopsroot>/plugins/ # <-- set the path to your plugin folder (~ for home or $KUBEOPSROOT don't work, it has to be the full path)
workspace: /tmp/kosi/process/
logging: info
housekeeping: false
proxy: false
kosi install --hub kosi-enterprise kosi/enterprise-plugins:2.0.0
To ensure compatibility across different containerized environments, KOSI requires the installation of Podman (latest version).
Install Podman using the inbuilt package manager.
sudo apt update
sudo apt install -y podman
sudo dnf install -y podman
Many KOSI packages use helm. Therefore, it is recommended to install helm.
Install Helm using the KubeOps package repo.
sudo apt update
sudo apt install -y helm
sudo dnf install -y helm
To verify the installation of KOSI on your system, use the command kosi version.
kosi version
The output displays the KOSI version along with relevant information. It confirms the successful installation of KOSI.
2026-01-23 16:09:55 Info:      KOSI version: 2.14.0.0
2026-01-23 16:09:55 Info:      Latest KOSI-package-apiversion: kubernative/kubeops/sina/user/v4
2026-01-23 16:09:55 Info:      Latest KOSI-lanugage-version is: 1.0.0
2026-01-23 16:09:55 Info:      This work is licensed under Creative Commons Attribution - NoDerivatives 4.0 International License(see https://creativecommons.org/licenses/by-nd/4.0/legalcode for more details).
2026-01-23 16:09:55 Info:      © KubeOps GmbH, Hinter Stöck 17, 72406 Bisingen - Germany, 2025
Check if you can log in with the command kosi login.
kosi login -u <yourUser>
The output confirms that you are successfully loged in.
2026-01-23 16:11:40 Info:      KOSI version: 2.14.0.0
2026-01-23 16:11:47 Info:      Login Succeeded to Hub.
2026-01-23 16:11:48 Info:      The login to registry was successful. You are now logged in as kubeops and can use the public and private registry.
You can register a KubeOps account either via the website or directly via the KubeOps-Registry.
You can create an account on our website by scrolling to the bottom of the page and clicking the Login button.
This will redirect you to our login page:
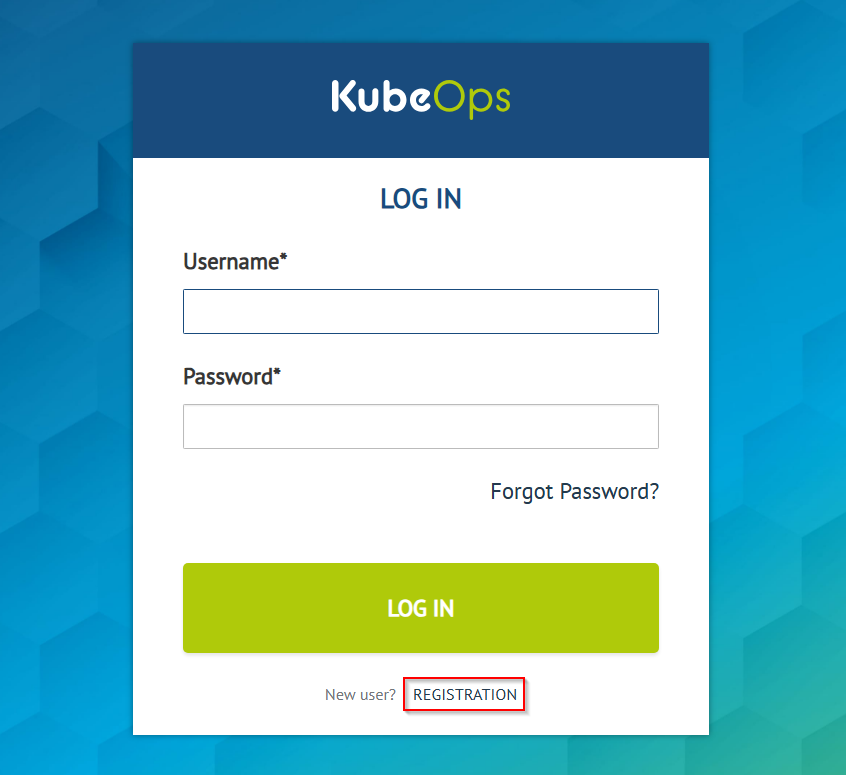
At the bottom of the form, you will find the REGISTRATION button. Click it to open the registration form, enter your details, and create your account.
After successful registration, you must log in once into the KubeOps-Registry. Once logged in, you can switch to KOSI and use it as normal.
You can also register a user account directly on the KubeOps-Registry page. Click LOGIN WITH keycloak. You will be redirected to the SSO page where you can REGISTER a new user account.
After successful registration, you must log in once to the KubeOps-Registry. Once logged in, you can switch to KOSI and use it as normal.
To manually push container images into your KubeOps-Registry project space, you need to use your Harbor CLI secret for authentication when using podman.
Click on your username and select User Profile.
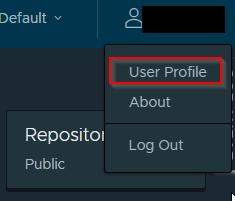
On the User Profile page, you can copy or change your CLI secret if needed.
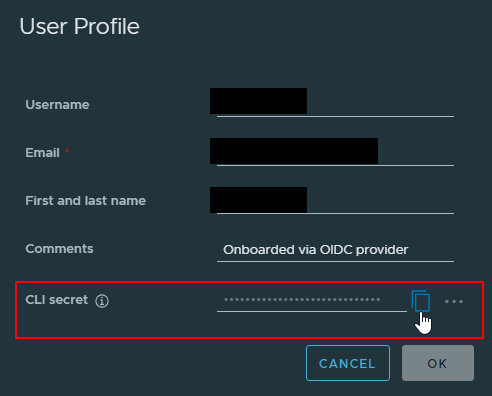
Now you can push your image using the CLI secret:
podman login registry.kubeops.net -u <username> -p <CLI_secret>
Note: Replace
<username>with your KubeOps username and<CLI_secret>with your actual CLI secret.
In this quickstart you will learn about:
The intent of this guide is to setup a demo WordPress page on your cluster or your machine.
We do not recommend this guide for production environments.
To get the most out of this guide, the following requirements should be met:
Helm or PodmanAfter the installation, KOSI is available as command line interface.
Login into the machine where KOSI is installed.
Create a new folder and use the command kosi create to create a default KOSI-package with pre-built files.
mkdir ~/kosi-demo
cd ~/kosi-demo

kosi create
Example output:
2024-08-07 13:49:00 Info:      KOSI version: 2.14.0.0_XXXXXXXXXX
2024-08-07 13:49:00 Info:      Write package.kosi to /root/kosi-demo
2024-08-07 13:49:00 Info:      Write template.yaml to /root/kosi-demo
2024-08-07 13:49:00 Info:      Write logo.png to /root/kosi-demo
2024-08-07 13:49:00 Info:      Write docs.tgz to /root/kosi-demo
| File | Description |
|---|---|
package.kosi |
Contains the „logic“ of the package. |
template.yml |
A template file for configurations and the templating engine. |
logo.png |
A logo for the package. replace this with your desired logo (png format). |
docs.tgz |
Contains your documentaion of your package. |
The package.kosi file contains the „logic“ of the package. This file uses the kosi format which itself uses the highly expressive KOSI Language.
Among other things the package.kosi file defines:
Templates make it possible to use variantes for your packages. For example, you want to reuse a package for different environments. Templates also allow to parse additional „value files“ as command line arguments.
Advanced templating makes it possible to split one large value files into smaller ones. In this case we use some of the defaultvalues but all values will be transfered.
For the transfer of values into a package, a valuestemplate.yaml file is needed.
Use an editor to edit the file:
nano ~/kosi-demo/valuestemplate.yaml
To get the most out of this guide, add the following line:
{{values}}
This command will allow to parse the values of the file values.yaml. On installing, the file values.yaml will be automatically transcluded into the cluster. This is helpful to reuse a package for different environments.
Notice the exact same naming of the command with the file.
In this guide we want to create a KOSI-package containing a demo WordPress page. Therefore you need to add the necessary repository via helm. Afterwards you need to pull the latest version of the helm chart.
helm repo add bitnami https://charts.bitnami.com/bitnami
helm pull bitnami/wordpress --version X.Y.Z
Configure the package to inlucde the valuestemplate.yaml file. Also add commands for install, update, and delete.
Use an editor to edit the file:
nano ~/kosi-demo/package.kosi
To get the most out of this guide, overwrite the file with the following lines:
languageversion = "1.0.0";
apiversion = "kubernative/kubeops/sina/user/v3";
name = "wordpressdemo";
description = "Deploys a wordpress helm chart";
version = "0.1.0";
docs = "docs.tgz";
logo = "logo.png";

files =
{
    wordpressvaluestemplate= "valuestemplate.yaml";
    chart = "wordpress-X.Y.Z.tgz";
}


install
{
    template(tmpl="valuestemplate.yaml";target="wordpressvalues.yaml");
    helm(command="upgrade";tgz="wordpress-X.Y.Z.tgz";values="['wordpressvalues.yaml']";deploymentName="wordpressdemo";namespace="wordpressdemo";flags="['--create-namespace',' --install']");
}

update
{
    template(tmpl="valuestemplate.yaml";target="wordpressvalues.yaml");
    helm(command="upgrade";tgz="wordpress-X.Y.Z.tgz";values="['wordpressvalues.yaml']";deploymentName="wordpressdemo";namespace="wordpressdemo";flags="['--create-namespace',' --install']");
}

delete
{
    cmd(command="echo delete wordpressdemo helm deployment.");
    helm(command="delete";deploymentName="wordpressdemo";namespace="wordpressdemo";flags="['--wait']");
    cmd(command="echo delete wordpressdemo namespace.");
    cmd(command="kubectl delete namespace wordpressdemo");
}
It is always a good practice to document your packages.
Within your package folder, create a docs folder:
mkdir -p ~/kosi-demo/docs
Create a simple README file (for example markdown format) and write some helpful descriptions. For example:
echo „My first KOSI-package. Contains a demo WordPress page.“ > ~/kosi-demo/docs/README.md
Afterwards you need to compress the whole docs folder using the tgs format.
cd ~/kosi-demo/
tar -cvzf docs.tgz docs/
These docs will be included when building the deployable package file.
When the package.kosi is finished and the documentation is done, the KOSI-package can be built. Navigate to the package folder and simply use the kosi build command.
cd ~/kosi-demo/
kosi build
During the build process, the files package.tgz and package.yaml are created.
To install the package.tgz, you need the package itself and some values. Among other things, you need to define the nodePorts for http at 30123. This node port will be needed to access and test your WordPress page.
In a previous step we made the package reuseable by using the valuestemplate.yaml file. This files expects a values.yaml file as command line argument.
Use an editor to edit the file:
nano ~/kosi-demo/values.yaml
To get the most out of this guide, add the following lines:
global:
    storageClass: rook-cephfs
service:
    type: NodePort
    nodePorts:
        http: 30123
mariadb:
    enabled: true
    auth:
        rootPassword: topsecretChangeMe
        password: secretChangeMe
    primary:
        persistence:
            enabled: true
            storageClass: rook-cephfs
            accessModes:
                - ReadWriteOnce
persistence:
    enabled: true
    storageClass: rook-cephfs
As recommended you need a running Kubernetes cluster to install and deploy your new KOSI-package. You must also be logged in to the Admin machine where you have created the KOSI-package. To set up a cluster easily and conveniently, you can use kubeopsctl (see kubeopsctl documentation).
Navigate to your built KOSI-package. Install the package and pass the prepared values.yaml file as command line argument.
cd ~/kosi-demo
kosi install -p package.tgz -f values.yaml
After you deployed the KOSI-package you can test the access via your cluster to the WordPress page.
Depending on your setup you need the following:
nodePorts as set in values.yamlIn this guides we set 30123 as nodePort. For example, in your browser navigate to:
http://master1:30123
For KubeOps 1.7+ licences are required. KubeOps is a tool set which consists of 3 tools: KOSI, KubeOps Platform (Compliance and Compliance + VM). Since 1.7 the background process is diffrent then in the older versions. To use your account in the future you have to do some steps to migrate your account.
If you created your account before March 2025, you must complete the migration steps. Most of the steps will be carried out by us, but some actions are required from your side:
IMPORTANT: These steps are only necessary if you want to use KubeOps 1.7+ tools and have no effect on versions below 1.7.
Every user who created an account before March 2025 must choose a new password due to a change in our login process. On your next login attempt, you will be required to set a new password.
If you want to use KubeOps tools, you must log in to the kubeops-registry first. A step-by-step guide is available here.
We have created new hub and registry spaces. Therefore, you must upload your existing packages to your new private space. The public hub is no longer available. If you encounter any issues while migrating your packages to the new hub, contact us via e-mail for technical support. Existing permissions will be migrated to the new system.
IMPORTANT: The old and new systems are not synchronized. If you want to keep packages in sync across both systems, you must upload them to both.
In the following sections, you will find everything from initial setup and configuration, to advanced tips and tricks that will help you get the most out of the software. Our aim is to assist you in becoming proficient with kosi, enhancing both your productivity and your user experience.
Lets get started on your journey to mastering kosi!
This documentation describes how to search for, install, and manage packages from the kubeops-community hub using the Kosi CLI.
To list all available packages within the KubeOps community, you use the search command.
Command:
kosi search --hub kubeops-community
Example Output:
| User | Name | Version | Description | Install |
|---|---|---|---|---|
| kubeops-community | hashicorp-vault | 0.32.0 | Official HashiCorp Vault Chart | kubeops-community/hashicorp-vault:0.32.0 |
| kubeops-community | jenkins | 5.8.142 | Deploys jenkins via helm | kubeops-community/jenkins:5.8.142 |
| kubeops-community | elasticsearch | 8.5.1 | Deploys elasticsearch via helm | kubeops-community/elasticsearch:8.5.1 |
Note: This overview shows you the exact path needed for the installation step in addition to the package name and version.
Once you have found a suitable package, you can deploy it into your Kubernetes cluster using the install command. You can assign a specific name to your deployment using the --dname flag.
General Syntax:
kosi install --hub <Hub_Name> <Install_Path> --dname <Deployment_Name>
Installing HashiCorp Vault:
kosi install --hub kubeops-community kubeops-community/hashicorp-vault:0.32.0 --dname hashicorp-vault
Installing Jenkins:
kosi install --hub kubeops-community kubeops-community/jenkins:5.8.142 --dname jenkins
Installing Elasticsearch:
kosi install --hub kubeops-community kubeops-community/elasticsearch:8.5.1 --dname elasticsearch
To view all currently installed packages and their deployment names, use the list command. The deployment name is required for updates and deletions.
Command:
kosi list
Example Output:
| Deployment | Package | PublicHub | Hub |
|---|---|---|---|
| hashicorp-vault | kubeops-community/hashicorp-vault:0.32.0 | kubeops-community | |
| jenkins | kubeops-community/jenkins:5.8.142 | kubeops-community | |
| elasticsearch | kubeops-community/elasticsearch:8.5.1 | kubeops-community |
To modify or remove an existing deployment, use the update or delete commands and include the --dname flag to specify which deployment you are targeting.
The update command executes the update logic and updates the deployment in the Kubernetes cluster.
Example (Updating HashiCorp Vault):
kosi update --hub kubeops-community kubeops-community/hashicorp-vault:<new-version> --dname hashicorp-vault
The delete command executes the delete logic and removes the deployment from the Kubernetes cluster.
Example (Deleting HashiCorp Vault):
kosi delete --hub kubeops-community kubeops-community/hashicorp-vault:0.32.0 --dname hashicorp-vault
This guide explains how to install KOSI as a user. KOSI can only be downloaded from our official website.
Operating System: A machine running RHEL 9.
Helm: Helm Must be installed on your machine. Refer to the Helm Official Documentation.
Podman:
KOSI requires Podman to be installed on your machine.
max_user_namespaces) is configured correctly. For more details, refer to this GitHub tutorial.
Install on RHEL9:
sudo dnf install podman
Download the KOSI RPM:
Install the KOSI RPM on your admin node:
Run the following commands:
echo 'export KUBEOPSROOT=/home/<user>/kubeops' >> $HOME/.bashrc
source $HOME/.bashrc
sudo dnf install <path_to_rpm>/<kosi_file_name>.rpm
<path_to_rpm> with the directory path where the file is located.<kosi_file_name> with the exact RPM file name (including the .rpm extension).The $KUBEOPSROOT environment variable defines the location of the KOSI plugins, deployment.yaml, and config.yaml.
If you change the KUBEOPSROOT variable after installation, you must manually copy the updated deployment.yaml, config.yaml, and plugins.
Run the following commands to update them:
echo 'export KUBEOPSROOT=/home/<user>/kubeops' >> $HOME/.bashrc
source $HOME/.bashrc
cp -r /var/kubeops/kosi/config.yaml $KUBEOPSROOT/kosi/config.yaml
cp -r /var/kubeops/kosi/deployment.yaml $KUBEOPSROOT/kosi/deployment.yaml
cp -r /var/kubeops/plugins $KUBEOPSROOT/
deployment.yaml.
To verify that KOSI is installed correctly on your machine, run:
kosi version
A successful installation will display version details, it will look similar like this:
2024-08-07 13:49:00 Info:      KOSI version: 2.14.0.0_XXXXXXXXXX
2024-08-07 13:49:00 Info:      This work is licensed under Creative Commons Attribution - NoDerivatives 4.0 International License(see https://creativecommons.org/licenses/by-nd/4.0/legalcode for more details).
2024-08-07 13:49:00 Info:      © KubeOps GmbH, Hinter Stöck 17, 72406 Bisingen - Germany, 2023
KOSI plugins can produce internal variables during execution, which you can reference in subsequent steps of your package (for example in conditions or output messages). The following guide explains how to use variables set by various KOSI plugins and how to consume them using e.g. the if and fprint plugins (which allow conditional logic and formatted output, respectively).
Several plugins store their results in named variables. These include:
Firewall / Firewalld / IPTables – All three firewall plugins support a key like getFirewallStatus = "<var>". For example:
firewall
(
    type = "firewalld";
    action = "enable";
    getFirewallStatus = "status";
);
This stores the firewall status ("running" or "not running") into the variable status. You can then reference this status variable in later steps.
Hostname – The hostname plugin can get the current hostname into a variable or set a new hostname from a variable. Its keys are: get = "<var>" to save the current hostname and setVar = "<var>" to restore from a saved variable. For example:
hostname(get = "oldHostname");
This saves the machine’s current hostname into the variable oldHostname.
kubeadm – The kubeadm plugin runs kubeadm commands. Its outputVar = "<var>" option captures the command’s output into a variable. For example:
kubeadm
(
    operation = "version";
    kubeadmVersion = "version";
    outputVar = "kubeadmVersionOutput";
);
This saves the output of kubeadm version into the variable kubeadmVersionOutput.
kubectl – The kubectl plugin executes kubectl commands. Its outputVar = "<var>" captures the command output. For example:
kubectl
(
    operation = "get";
    resource = "pods";
    flags = "-n kube-system -o wide";
    outputVar = "podsOutput";
    outputFile = "/root/output.txt";
);
This saves the kubectl get pods output into podsOutput. You can then use podsOutput in subsequent steps.
osCheck – The osCheck plugin detects the OS name and version. It has two keys: getOSVar="<var>" for the OS name and getOSVersionVar="<var>" for the OS version. For example:
osCheck(getOSVar="osName"; getOSVersionVar="osVersion");
This stores the OS name in osName and the version in osVersion.
set – The set plugin lets you define arbitrary variables. Use variable="<name>"; value="<something>" to create a variable. For example:
set(variable = "envType"; value = "production");
This creates a variable named envType with value "production". Variables set by the set plugin are accessed via vars.<variableName>.
KOSI provides two main ways to use these variables:
Conditional checks with the if plugin: The if plugin evaluates an expression and branches accordingly. In the condition string, you can include plugin variables by name, enclosed in $...$. For example:
if(condition = "$oldHostname$ = 'myHost'") then {
    # ... do something ...
}
For variables set via the set plugin, access them as $vars.<name>$, e.g. $vars.envType$.
Formatted output with the fprint plugin: The fprint plugin prints a message and can include plugin-variable values. You provide a list of variable names in its variables key and placeholders {0}, {1}, etc. in the message. For example:
fprint
(
    message = "Firewall status is {0}";
    variables = "['status']";
);
For variables from the set plugin:
set(variable="userName"; value="Alice");
set(variable="userIP"; value="10.0.0.1");
fprint
(
    message = "User {0} has IP {1}";
    variables = "['vars.userName','vars.userIP']";
);
Set or retrieve a variable:
hostname(get = "myHostname");
osCheck(getOSVar = "osName"; getOSVersionVar = "osVersion");
Conditionally act on it:
 if(condition = "$myHostname$ = 'expectedHost'") then {
     fprint
     (
         message = "Got expected hostname: {0}";
         variables = "['myHostname']";
     );
 }
Output or log values:
fprint
(
    message = "Running on {0} version {1}";
    variables = "['osName','osVersion']";
);
Plugins mentioned in this How to Guide that set or use variables
To install KOSI packages from the KubeOps Hub on your machines, follow these steps:
Search for the Package:
Use the kosi search command to find the desired package on the KubeOps Hub.
(Refer to kosi search for more info.)
Install the Package:
Copy the installation address of the desired package and use it with the kosi install command:
[root@localhost ~]# kosi install --hub <hubname> <installation address>
To be able to install a package from the software Hub, you must be logged in as a user.
Example:
The package wordpressdemo of user kosi with version 0.1.0 is to be installed from the private software Hub:
[root@localhost ~]# kosi install --hub kubeops kosi/wordpressdemo:0.1.0
Example:
The package wordpressdemo of user kosi with version 0.1.0 is to be installed from the public software Hub:
[root@localhost ~]# kosi install --hub kubeops kosi/wordpressdemo:0.1.0
The -f parameter is used to provide YAML files from the user.
[root@localhost ~]# kosi install --hub <hubname> <package> -f <user.yaml>
Example:
The package wordpressdemo of user kosi with version 0.1.0 is installed from the public software Hub with user-specific YAML files:
[root@localhost ~]# kosi install --hub kubeops kosi/wordpressdemo:0.1.0 -f userfile1.yaml
The --namespace flag allows you to specify a Kubernetes namespace for the installation.
[root@localhost ~]# kosi install --hub <hubname> <package> --namespace <namespace>
Example:
The package wordpressdemo of user kosi with version 0.1.0 is installed from the public software Hub in a custom Kubernetes namespace:
[root@localhost ~]# kosi install --hub kubeops kosi/wordpressdemo:0.1.0 --namespace MyNamespace
Note: If no
--namespaceparameter is specified, the default namespace will be used.
The --dname flag allows you to assign a specific name to the deployment.
[root@localhost ~]# kosi install --hub <hubname> <package> --dname <deploymentname>
Example:
The package wordpressdemo of user kosi with version 0.1.0 is installed from the public software Hub with a deployment name set:
[root@localhost ~]# kosi install --hub kubeops kosi/wordpressdemo:0.1.0 --dname MyDeployment
If no --dname parameter is specified, a random deployment name will be generated.
Note: The deployment name is stored in the file
/home/<user>/var/kubeops/kosi/deployment.yaml.
In these few steps, you can successfully install and use a KOSI package.
For additional functionality and features provided by KOSI, always refer to the Full Documentation.
kosi pull on a machine with an internet connection to download the package:[root@localhost ~]# kosi pull [package name from hub] -o [your preferred name] --hub public
Transfer the Package:
Move the downloaded package to the machine without an internet connection (which has KubeOps installed).
Install the Package:
Install the transferred package with the following command:
[root@localhost ~]# kosi install -p [package name]
Note: Be sure you have a supported KOSI version 2.10.0 or higher.All plugins are available as KOSI packages in the KubeOpsHub. Our plugins are grouped into several KOSI packages. To view the available packages, use the command:
kosi search --hub kosi-basic
2024-08-07 13:47:02 Info:      KOSI version: 2.14.0.0_XXXXXXXXXX
| User | Name          | Version     | Description        | Install                        |
|------|---------------|-------------|--------------------|--------------------------------|
| kosi | basic-plugins | 1.5.0_beta0 | KOSI Basic Plugins | kosi/basic-plugins:1.5.0_beta0 |
| kosi | basic-plugins | 1.5.0       | KOSI Basic Plugins | kosi/basic-plugins:1.5.0       |
| kosi | basic-plugins | 1.4.0       | KOSI Basic Plugins | kosi/basic-plugins:1.4.0       |
| kosi | basic-plugins | 1.6.0_Beta0 | KOSI Basic Plugins | kosi/basic-plugins:1.6.0_Beta0 |
| kosi | basic-plugins | 1.4.2       | KOSI Basic Plugins | kosi/basic-plugins:1.4.2       |
| kosi | basic-plugins | 1.4.1       | KOSI Basic Plugins | kosi/basic-plugins:1.4.1       |
This package contains the following plugins:
| Plugin | Version |
|---|---|
| template | 1.6.0 |
| helm | 1.6.0 |
| 1.6.0 |
kosi search --hub kosi-professional
2024-08-07 13:47:36 Info:      KOSI version: 2.14.0.0_XXXXXXXXXX
| User | Name                 | Version     | Description               | Install                               |
|------|----------------------|-------------|---------------------------|---------------------------------------|
| kosi | professional-plugins | 1.5.0_beta0 | KOSI Professional Plugins | kosi/professional-plugins:1.5.0_beta0 |
| kosi | professional-plugins | 1.4.0       | KOSI Professional Plugins | kosi/professional-plugins:1.4.0       |
| kosi | professional-plugins | 1.5.0       | KOSI Professional Plugins | kosi/professional-plugins:1.5.0       |
| kosi | professional-plugins | 1.4.2       | KOSI Professional Plugins | kosi/professional-plugins:1.4.2       |
| kosi | professional-plugins | 1.4.1       | KOSI Professional Plugins | kosi/professional-plugins:1.4.1       |
| kosi | professional-plugins | 1.6.0_Beta0 | KOSI Professional Plugins | kosi/professional-plugins:1.6.0_Beta0 |
This are the plugins which the packages contains:
| Plugin | Version |
|---|---|
| template | 1.6.0 |
| helm | 1.6.0 |
| 1.6.0 | |
| kubectl | 1.6.0 |
| bash | 1.6.0 |
| cmd | 1.6.0 |
| sh | 1.6.0 |
| editfile | 1.6.0 |
| fprint | 1.6.0 |
| if | 1.6.0 |
| loop | 1.6.0 |
| kosi | 2.11.0.10 |
| merge | 1.6.0 |
| exit | 1.6.0 |
| setfact | 1.6.0 |
kosi search --hub kosi-enterprise
2024-08-07 13:47:59 Info:      KOSI version: 2.14.0.0_XXXXXXXXXX
| User | Name               | Version     | Description                  | Install                             |
|------|--------------------|-------------|------------------------------|-------------------------------------|
| kosi | enterprise-plugins | 1.5.0       | KOSI Enterprise Plugins      | kosi/enterprise-plugins:1.5.0       |
| kosi | piaoperator        | 1.4.0       | Pia Operator Install Package | kosi/piaoperator:1.4.0              |
| kosi | enterprise-plugins | 1.4.2       | KOSI Enterprise Plugins      | kosi/enterprise-plugins:1.4.2       |
| kosi | enterprise-plugins | 1.5.0_beta0 | KOSI Enterprise Plugins      | kosi/enterprise-plugins:1.5.0_beta0 |
| kosi | enterprise-plugins | 1.4.0       | KOSI Enterprise Plugins      | kosi/enterprise-plugins:1.4.0       |
| kosi | enterprise-plugins | 1.6.0_Beta0 | KOSI Enterprise Plugins      | kosi/enterprise-plugins:1.6.0_Beta0 |
| kosi | enterprise-plugins | 1.4.1       | KOSI Enterprise Plugins      | kosi/enterprise-plugins:1.4.1       |
This package contains the following plugins:
| Plugin | Version |
|---|---|
| template | 1.6.0 |
| helm | 1.6.0 |
| 1.6.0 | |
| kubectl | 1.6.0 |
| bash | 1.6.0 |
| cmd | 1.6.0 |
| sh | 1.6.0 |
| editfile | 1.6.0 |
| fprint | 1.6.0 |
| if | 1.6.0 |
| loop | 1.6.0 |
| kosi | 2.11.0.10 |
| merge | 1.6.0 |
| exit | 1.6.0 |
| setfact | 1.6.0 |
| auditlog | 1.6.0 |
| chmod | 1.6.0 |
| copy | 1.6.0 |
| firewall | 1.6.0 |
| firewallD | 1.6.0 |
| containerd | 1.6.0 |
| containerruntime | 1.6.0 |
| hostname | 1.6.0 |
| iptables | 1.6.0 |
| kubeadm | 1.6.0 |
| osCheck | 1.6.0 |
| packagemanager | 1.6.0 |
| pia | 1.6.0 |
| service | 1.6.0 |
| sudo | 1.6.0 |
After installing the plugins with our KOSI install command, the plugins are automatically placed in the associated directory ($KUBEOPSROOT/plugins) and can be used directly.
kosi install --hub=<pluginhub> user/packagename:version
Example: The package enterprise-plugins of the user kosi with the version 1.6.0_Beta0 is to be installed from the kosi-enterprise hub.
kosi install --hub=kosi-enterprise kosi/enterprise-plugins:1.6.0_Beta0
Note: You can also use the Install Tab from the output to help with installation.
This guide shows you how to update KOSI. KOSI can only be downloaded from our official website.
Before you begin, make sure the following prerequisites are met:
RHEL 9 operating system.Refer to the Helm Official Documentation for the Installation Guide.
For KOSI versions, you must have Podman installed on your machine.
Before installing Podman, make sure that the number of user namespaces (max_user_namespaces) is specified on your system if you are a non-root user.
For more information, follow this GitHub link.
To install Podman, run the following command:
sudo dnf install podman
KOSI supports only secure registries. If you use an insecure registry, you must explicitly add it as an insecure registry in registries.conf (/etc/containers/registries.conf).
Each KOSI release includes an RPM file for manual installation. To download the RPM, you must log in to your KubeOps account.
Create a KubeOps Account:
If you haven’t already, create a KubeOps account on the KubeOps website and log in to your account.
Download the RPM:
Download your desired version of the KOSI RPM file from the official download page:
https://kubeops.net/products/downloads/kosi-downloads-en
Update the KOSI RPM:
On your admin node, update KOSI by installing the new RPM. This will replace the existing version. Run the following command:
sudo dnf install <path to rpm>/<kosi file name>
  - Replace `<path_to_rpm>` with the directory path where the file is located.
  - Replace `<kosi_file_name>` with the exact file name of the RPM (including the `.rpm` extension).
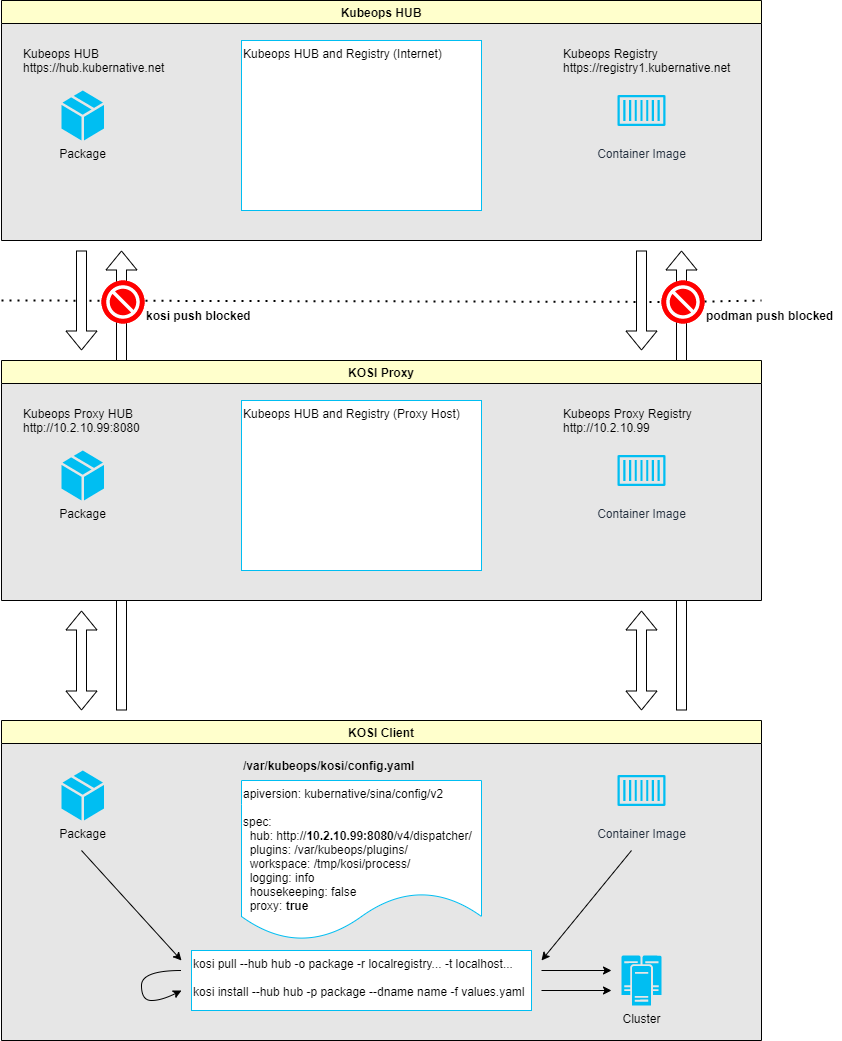
This guide shows you how to install the KOSI Proxy. The KOSI Proxy enables controlled access to packages and container images by allowing downloads while blocking uploads to the internet. This guide describes how to install, configure, and operate the KOSI Proxy and Harbor registry integration.
The following diagram shows the architecture of the KOSI Proxy. Packages and container images can be fetched through the KOSI Proxy. Uploading packages and container images to the internet is blocked. Access can also be restricted to a HUB.
To install the KOSI Proxy, you need a dedicated VM running RHEL9 OS and root access.
The minimum VM requirements are:
The following software must be installed on this VM:
# docker
subscription-manager register
subscription-manager refresh
subscription-manager attach --auto
dnf config-manager --add-repo=https://download.docker.com/linux/centos/docker-ce.repo
dnf repolist -v
dnf install docker-ce
systemctl enable docker --now
systemctl status docker

# docker compose
curl -L "https://github.com/docker/compose/releases/download/v2.24.5/docker-compose-$(uname -s)-$(uname -m)" -o /usr/local/bin/docker-compose
chmod +x /usr/local/bin/docker-compose

# kosi
dnf install -y kosi*.rpm

#### Configure the KOSI hub in ´/var/kubeops/kosi/config.yaml`
```yaml
apiversion: kubernative/sina/config/v2

spec:
  hub: https://dispatcher.preprod.kubeops.net/v4/dispatcher/ # <- set hub
  plugins: /var/kubeops/plugins/
  workspace: /tmp/kosi/process/
  logging: info
  housekeeping: false
  proxy: false # <- mandatory if kosi version >= 2.10.*
Once all prerequisites are met, you can install the KOSI Proxy.
A values.yaml file is required for KOSI Proxy installation.
Below is an example values.yaml configuration for the environment:
# Proxy host IP address
proxyIP: 10.2.10.99

# Preprod config values
proxyPassthrough: preprod
proxyRegistry: registry.preprod.kubeops.net
aspnetcoreEnvironment: Development

# Prod config values
#proxyPassthrough: prod
#proxyRegistry: registry.kubeops.net
#aspnetcoreEnvironment: Production
Use the values for the environment you are deploying to.
After creating the values.yaml file, the KOSI Proxy can be installed using a kosi package.
The KOSI Proxy will be installed in ~/kosi-proxy
kosi install --hub kubeops kubeops/kubeops/kosi-proxy:2.13.0.1_Alpha7 -f values.yaml
Start the KOSI Proxy:
cd ~/kosi-proxy
docker-compose up -d
The KOSI Proxy is already configured during installation; however, you can adjust additional parameters if needed.
The hub whitelist can be configured in the app settings file ~/kosi-proxy/data/download-v4/appsettings.json.
By default the hubs kosi, kubeops and kosi-enterprise are set.
{
  "Logging": {
    "LogLevel": {
      "Microsoft": "Warning",
      "System": "Warning",
      "Microsoft.Hosting.Lifetime": "Information",
      "Kubeops": "Debug"
    },
    "Console": {
      "FormatterName": "simple",
      "FormatterOptions": {
        "SingleLine": false,
        "TimestampFormat": "HH:mm:ss ",
        "ColorBehavior": "Enabled",
        "UseUtcTimestamp": false
      }
    }
  },
  "AllowedHosts": "*",
  "Config": {
    "RepositoryPath": "/service/repository",
    "PermissionServiceUrl": "http://permission-v4/",
    "ProxyPassthroughUrl": "https://dispatcher.preprod.kubeops.net/v4/download/",
    "GuestQuota": 1000000,
    "HubWhitelist": "kosi, kubeops, kosi-enterprise"
  }
}
Harbor is used as the registry endpoint in this setup.
Download the Harbor offline installer:
# harbor
cd ~
curl -L https://github.com/goharbor/harbor/releases/download/v2.9.2/harbor-offline-installer-v2.9.2.tgz | tar -xvzf -
cd ~/harbor
cp harbor.yml.tmpl harbor.yml
Edit the harbor.yml
Change:
hostname: 10.2.10.99  # line 5
insecure: true        # line 101
Comment out:
#  port: 443                            # line 15
#  certificate: /your/certificate/path  # line 17
#  private_key: /your/private/key/path  # line 18
cd ~/harbor
./install.sh
To log in to Harbor, port 80 of the proxy host must be forwarded.
The following example shows SSH port forwarding. Adjust the values as needed.
ssh -i "C:\Users\<user>\.ssh\id_rsa" -J <user>@10.9.112.19 -L 8080:10.2.10.99:80 root@10.2.10.99
You can then log in to Harbor -> http://localhost:8080
Default credentials:
In Harbor, navigate to Administration → Registries → New Endpoint.

| Key | Value |
|---|---|
| Provider | Harbor |
| Name | Preprod |
| Description | [optional] |
| Endpoint URL | https://registry.preprod.kubeops.net |
| Access ID | kubeops |
| Access Secret | [enter kubeops password] |
| Verify Remote Cert | true |
When creating the Harbor registry endpoint, use the registry URL that matches your environment.
In Harbor, navigate to Project → New Project.
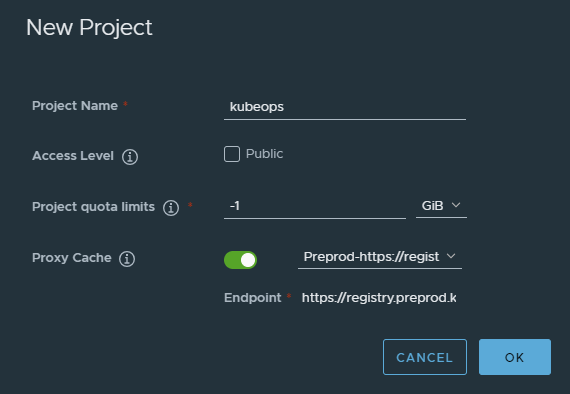
| Key | Value |
|---|---|
| Project Name | kubeops |
| Access Level | false |
| Project quota limits | -1 |
| Proxy Cache | true |
| Endpoint | https://registry.preprod.kubeops.net |
KOSI Proxy is installed in the folder ~/kosi-proxy.
cd ~/kosi-proxy

# show kosi proxy containers
docker compose ps

# show kosi proxy logs
docker compose logs -f

# stop kosi proxy
docker compose down

# start kosi proxy
docker compose up -d
Harbor is installed in the folder ~/harbor.
cd ~/harbor

# show harbor containers
docker compose ps

# show harbor logs
docker compose logs -f

# stop harbor
docker compose down

# start harbor
docker compose up -d
To create a Kosi package, you must first run the kosi create command in your directory.
The kosi create command creates four files (package.yaml, template.yaml, logo.png and docs.tgz) in the current directory. These files can be edited.
[root@localhost ~]# kosi create
Created files:
The documentation of the package is written in markdown. The file for the documentation is called readme.md.
To edit the markdown, you can unzip the docs.tgz in your directory with the commandtar -xzf docs.tgzand zip it again with the commandtar -czf docs.tgz docs/after you finished.
Note: Please name your markdown files inside docs.tgz without a version-tag (docs/documentation-1.0.0.md).
Do not change the file names of any of the files above generated with thekosi createcommand.
The package.yaml defines a package in a specific version as well as the tasks needed to install it. The tasks which are used in the package.yaml are plugins, which can be created by the user.
Elements:
includes.files: Describes the files which are inluded in the Kosi package.includes.containers: Used for docker images. A container for the docker images will be created when the kosi install, kosi update or kosi delete command is used.installation.tasks: The tree describes the tasks (Kosi plugins), which are executed with the kosi install command.update.tasks: The tree describes the tasks (Kosi plugins), which are executed with the kosi update command.delete.tasks: The tree describes the tasks (Kosi plugins), which are executed with the kosi delete command.IMPORTANT: It is required to enter the package name in lowercase.
Do not use any docker tags (:v1.0.0) in your package name.
apiversion: kubernative/kubeops/sina/user/v4 # Required field
name: kosi-example-packagev3 # Required field
description: kosi-example-package # Required field
version: 0.1.0 # Required field
includes:  # Required field: When "files" or "containers" are needed.
  files:  # Optional field: IF file is attached, e.g. "rpm, .extension"
    input: "template.yaml"
  containers: # Optional field: When "containers" are needed.
    example:
      registry: docker.io
      image: nginx
      tag: latest
docs: docs.tgz
logo: logo.png
installation: # Required field
  includes: # Optional field: When "files" or "containers" are needed.
    files: # Optional field:
      - input # Reference to includes
    containers: # Optional field:
      - example # Reference to includes
  tasks:
    - cmd:
        command: "touch ~/kosiExample1"
update: # Required field
  includes: # Optional field: When "files" or "containers" are needed.
    files: # Optional field:
      - input # Reference to includes
    containers: # Optional field:
      - example # Reference to includes
  tasks:
    - cmd:
        command: "touch ~/kosiExample2"
delete: # Required field
  includes: # Optional field: When "files" or "containers" are needed.
    files: # Optional field:
      - input # Reference to includes
    containers: # Optional field:
      - example # Reference to includes
  tasks:
    - cmd:
        command: "rm ~/kosiExample1"
    - cmd:
        command: "rm ~/kosiExample2"
Now, after you created and edited the files from kosi create, you can simply build a Kosi package by just running the kosi build command in your directory.
[root@localhost ~]# kosi build
All files specified in the package.yaml are combined together with the package.yaml to form a kosi package.
In these few steps, you can successfully create and use the kosi package. This is the basic functionality offered by Kosi.
You can always explore Full Documentation to go through all the functionality and features provided by Kosi.
All plugins are available as KOSI packages in the KubeOpsHub. Our plugins are grouped into several KOSI packages described below. To see our KOSI packages in the KubeOpsHub use the command:
kosi search --ps kubeops --hub public
kosi install --hub=public <user/packagename:version>
The plugins are automatically placed in the associated directory($KUBEOPSROOT/plugins) and can be used directly.
In this section you can find the plugin packages and the documentation for each plugin.
The auditLog plugin enables or disables audit logging for your Kubernetes cluster. This plugin allows you to control logging settings and define paths for policy and log storage.
| Key | Description | |
|---|---|---|
| state | Mandatory | Set to on to enable or off to disable audit logging for the cluster. |
| policyPath | Mandatory | Specifies the directory where the policy.yaml file is stored. |
| logPath | Mandatory | Defines the directory where the audit.log file will be saved. |
languageversion = "1.0.0";
apiversion = "kubernative/kubeops/kosi/user/v4";
name = "kosi-example-packagev3";
description = "kosi-example-package";
version = "0.1.0";
docs = "docs.tgz";
logo = "logo.png";

files =
{
    input = "template.yaml";
}

containers =
{
    example = ["docker.io", "nginx", "latest"];
}

install
{
    auditLog
    (
        state = "on";
        policyPath = "/root/test/policyDir/";
        logPath = "/root/test/logging/";
    );
}
languageversion = "1.0.0";
apiversion = "kubernative/kubeops/kosi/user/v4";
name = "kosi-example-packagev3";
description = "kosi-example-package";
version = "0.1.0";
docs = "docs.tgz";
logo = "logo.png";

files =
{
    input = "template.yaml";
}

containers =
{
    example = ["docker.io", "nginx", "latest"];
}

install
{
    auditLog
    (
        state = "off";
        policyPath = "/root/test/policyDir/";
        logPath = "/root/test/logging/";
    );
}
The bash plugin allows users to execute shell commands within a Bash environment. It is useful for running system commands, scripting automation tasks, or performing custom operations that require command-line execution within a KOSI package. This plugin ensures that commands are executed inside a Bash shell, which provides compatibility with shell scripting syntax and built-in commands. Supports command chaining using ;.
| Key | Description | |
|---|---|---|
| command | Mandatory | Contains a string representing a bash command or a sequence of commands to be executed. Multiple commands can be specified, separated by a semicolon (;). |
languageversion = "1.0.0";
apiversion = "kubernative/kubeops/sina/user/v4";
name = "kosi-example-packagev3";
description = "kosi-example-package";
version = "0.1.0";
docs = "docs.tgz";
logo = "logo.png";

files =
{
    input = "template.yaml";
}

install
{
    cmd(command = "echo Using the bash plugin.");

    bash(command = "echo Hello World!");
}
2025-02-26 15:17:00 Info:      use plugin bash if available
2025-02-26 15:17:00 Info:      Executing with non sudo privilegs
2025-02-26 15:17:00 Info:      Using the bash plugin.

2025-02-26 15:17:00 Info:      Executing with non sudo privilegs
2025-02-26 15:17:00 Info:      Hello World!

2025-02-26 15:17:00 Info:      Installation successful.
languageversion = "1.0.0";
apiversion = "kubernative/kubeops/sina/user/v4";
name = "kosi-example-packagev3";
description = "kosi-example-package";
version = "0.1.0";
docs = "docs.tgz";
logo = "logo.png";

files =
{
    input = "template.yaml";
}

install
{
    cmd(command = "echo Using the bash plugin.");

    bash(command = "echo 1.Hello;echo 2.World;echo 3.Hello World.");
}
2025-02-26 15:18:28 Info:      run cmd plugin
2025-02-26 15:18:28 Info:      use plugin bash if available
2025-02-26 15:18:28 Info:      Executing with non sudo privilegs
2025-02-26 15:18:28 Info:      Using the bash plugin.

2025-02-26 15:18:28 Info:      Executing with non sudo privilegs
2025-02-26 15:18:28 Info:      1.Hello
2.World
3.Hello World.

2025-02-26 15:18:28 Info:      Installation successful.
Using bash with the set and if plugins
This example shows the interaction of several plug-ins.
In this example, we use the bash plugin together with the set and if plugins to check a condition (which is set before) before executing a bash command:
languageversion = "1.0.0";
apiversion = "kubernative/kubeops/sina/user/v4";
name = "kosi-example-bash-if";
description = "Example using bash with set and if";
version = "0.1.0";
docs = "docs.tgz";
logo = "logo.png";

files =
{
    input = "template.yaml";
}

install
{
    set
    (
        variable = "myVar";
        value = "Hello";
    );

    if (condition = "$vars.myVar$ = 'Hello'") then
    {
        bash(command = "echo Variable is 'Hello'");
    }
    else
    {
        bash(command = "echo Variable is not 'Hello'");
    }
}
If myVar is Hello:
2025-02-26 15:18:28 Info: Variable is 'Hello'
If myVar is not Hello:
2025-02-26 15:18:28 Info: Variable is not 'Hello'
The chmod plugin allows you to modify access permissions for a specified file or directory. By defining a path, state, and mode, you can change file permissions using the Linux chmod command.
| Key | Description | |
|---|---|---|
| path | Mandatory | Absolute path of the file or directory whose permissions you want to change. |
| state | Mandatory | Set to file or directory depending on whether the path is a file or directory. |
| mode | Mandatory | Permission mode using the Linux numeric syntax (supports three-digit and four-digit octal representation). |
| sudo | optional | Set to true to use sudo for the chmod command. |
| sudoPassword | optional | Password for executing sudo commands. A root user must assign this password to a non-root user beforehand. |
Note: If you’re not yet familiar with Linux permissions, check out this short introduction from RedHat.
languageversion = "1.0.0";
apiversion = "kubernative/kubeops/sina/user/v4";
name = "kosi-example-packagev3";
description = "kosi-example-package";
version = "0.1.0";
docs = "docs.tgz";
logo = "logo.png";

files =
{
    input = "template.yaml";
}

containers =
{
    example = ["docker.io", "nginx", "latest"];
}

install
{
    cmd(command = "echo Changing file permissions using the chmod-plugin");
    chmod
    (
        path = "/user/myuser/myUserApp.sh";
        state = "file";
        mode = "777"
    );
}
languageversion = "1.0.0";
apiversion = "kubernative/kubeops/sina/user/v4";
name = "kosi-example-packagev3";
description = "kosi-example-package";
version = "0.1.0";
docs = "docs.tgz";
logo = "logo.png";

files =
{
    input = "template.yaml";
}

containers =
{
    example = ["docker.io", "nginx", "latest"];
}

install
{
    cmd(command = "echo Changing directory permissions using the chmod-plugin");
    chmod
    (
        path = "/root";
        state = "directory";
        mode = "777";
        sudo = "true";
        sudoPassword = "myPassword";
    );
    bash(command = "ls -la /root");
}
languageversion = "1.0.0";
apiversion = "kubernative/kubeops/sina/user/v4";
name = "kosi-example-packagev3";
description = "kosi-example-package";
version = "0.1.0";
docs = "docs.tgz";
logo = "logo.png";

files =
{
    input = "template.yaml";
}

containers =
{
    example = ["docker.io", "nginx", "latest"];
}

install
{
    cmd(command = "echo Restricting file permissions using chmod-plugin");
    chmod
    (
        path = "/user/myuser/myUserApp.sh";
        state = "file";
        mode = "444";
    );
}
The cmd plugin allows execution of Linux shell commands within a deployment configuration. It relies on either the bash or sh plugin to process commands, depending on availability. If the bash plugin is present, it will be used; otherwise, the sh plugin will handle execution.
If you want to use the plugin cmd you need one of following plugins:
The cmd plugin itself does not execute commands directly. Instead, it acts as a wrapper, passing the specified command to a shell environment. Since bash and sh are the most common shell interpreters in Linux, the plugin requires at least one of them to function properly.
Note: Each
cmdcall is executed in its own shell instance. Changes to the shell environment (e.g., cd, export, etc.) do not persist across multiplecmdcalls. If multiple commands depend on a shared shell context, they should be combined into a singlecmdcall.
For example:cmd(command="cd /root/test-cmd-Plugin && pwd && ls -lah")
| Key | Description | |
|---|---|---|
| command | Mandatory | set this to a command for the bash or the sh terminal . |
Note: The command has to be surrounded by double quotes, otherwise it will not be recognized.
languageversion = "1.0.0";
apiversion = "kubernative/kubeops/sina/user/v4";
name = "kosi-example-packagev3";
description = "kosi-example-package";
version = "0.1.0";
docs = "docs.tgz";
logo = "logo.png";

files =
{
    input="template.yaml";
}

containers =
{
    example=["docker.io", "nginx", "latest"];
}

install
{
    cmd(command = "echo Using the cmd-plugin");
    cmd(command = "echo Hello World");
}
This will be printed to the console:
2023-12-01 10:44:30 Info:      use plugin bash if available
Using the cmd-plugin
Hello World
languageversion = "1.0.0";
apiversion = "kubernative/kubeops/sina/user/v4";
name = "kosi-example-packagev3";
description = "kosi-example-package";
version = "0.1.0";
docs = "docs.tgz";
logo = "logo.png";

files =
{
    input = "template.yaml";
}

containers =
{
    example = ["docker.io", "nginx", "latest"];
}

install
{
    cmd(command = "echo Using the cmd-plugin");
    cmd(command = "echo Hello World! '>' test.txt");
    cmd(command = "cat test.txt");
}
A file named test.txt is created and “Hello World!” is written to the file.
The second command outputs the contents of the file.
2023-12-01 11:06:17 Info:      run cmd plugin
Using the cmd-plugin
2023-12-01 11:06:17 Info:      run cmd plugin
Hello World!
languageversion = "1.0.0";
apiversion = "kubernative/kubeops/sina/user/v4";
name = "kosi-example-packagev3";
description = "kosi-example-package";
version = "0.1.0";
docs = "docs.tgz";
logo = "logo.png";

files =
{
    input = "template.yaml";
}

containers =
{
    example = ["docker.io", "nginx", "latest"];
}
install
{
    cmd(command = "mkdir -p /tmp/mydirectory");
    cmd(command = "ls -la /tmp/mydirectory");
}
The containerd plugin allows you to manage your container runtime efficiently. It provides options to execute commands with or without flags and enables gathering information about the current container runtime status.
| Key | Description | |
|---|---|---|
| command | Mandatory | The command you want to execute inside the container. |
| containerName | - | The name of the container or the temporary name of a created cluster.*1 |
| destImage | - | The new image name for tagging srcImage. |
| execID | - | The ID or name of your execution.*2 |
| flag | - | Stores information on enabled options. Examples include -a or –all for listing all containers, or -n or –last for the last container in the list. Multiple flags can be appended. |
| sudo | - | Can be true or false. If true, the plugin executes with sudo privileges. |
| sudoPassword | - | The password for executing the command with sudo privileges. |
| srcImage | - | The image you want to pull, push, or tag. |
| option | Mandatory | Specifies the operation to execute (e.g., run, ps, images, exec). |
Available Operations:
*1:Note: For containerd, containers do not have names, only IDs. When using startTask, stopTask, or deleteTask, containerName is treated as the task name.
*2:Note: Only required for execution commands with containerd.
languageversion = "1.0.0";
apiversion = "kubernative/kubeops/kosi/user/v4";
name = "kosi-example-packagev3";
description = "kosi-example-package";
version = "0.1.0";
docs = "docs.tgz";
logo = "logo.png";

files =
{
    input = "template.yaml";
}

containers =
{
    example = ["docker.io", "nginx", "latest"];
}

install
{
    containerd
    (
        option = "ps";
        flag = "--last";
        sudo = "true";
        sudoPassword = "Drowssap";
    );
}
languageversion = "1.0.0";
apiversion = "kubernative/kubeops/kosi/user/v4";
name = "kosi-example-packagev3";
description = "kosi-example-package";
version = "0.1.0";
docs = "docs.tgz";
logo = "logo.png";

files =
{
    input = "template.yaml";
}

containers =
{
    example = ["docker.io", "nginx", "latest"];
}

install
{
    containerd
    (
        option = "images";
        flag = "--all";
        sudo = "true";
        sudoPassword = "Drowssap";
    );
}
languageversion = "1.0.0";
apiversion = "kubernative/kubeops/kosi/user/v4";
name = "kosi-example-packagev3";
description = "kosi-example-package";
version = "0.1.0";
docs = "docs.tgz";
logo = "logo.png";

files =
{
    input = "template.yaml";
}

containers =
{
    example = ["docker.io", "nginx", "latest"];
}

install
{
    containerd
    (
        option = "run";
        flag = "-w /path/to/dir/ -i -t";
        srcImage = "registry.kubernative.net/lima:v0.8.0";
        containerName = "myFirstContainer";
        runtime = "status";
        sudo = "true";
        sudoPassword = "Drowssap";
    );
}
languageversion = "1.0.0";
apiversion = "kubernative/kubeops/kosi/user/v4";
name = "kosi-example-packagev3";
description = "kosi-example-package";
version = "0.1.0";
docs = "docs.tgz";
logo = "logo.png";

files =
{
    input = "template.yaml";
}

containers =
{
    example = ["docker.io", "nginx", "latest"];
}

install
{
    containerd
    (
        option = "status";
        sudo = "true";
        sudoPassword = "Drowssap";
    );
}
languageversion = "1.0.0";
apiversion = "kubernative/kubeops/kosi/user/v4";
name = "kosi-example-packagev3";
description = "kosi-example-package";
version = "0.1.0";
docs = "docs.tgz";
logo = "logo.png";

files =
{
    input = "template.yaml";
}

containers =
{
    example = ["docker.io", "nginx", "latest"];
}

install
{
    containerd
    (
        option = "exec";
        execID = "exec1";
        containerName = "registry.kubernative.net/lima:v0.8.0";
        command = "mkdir /tmp/testdir";
        sudo = "true";
        sudoPassword = "Drowssap";
    );
}
languageversion = "1.0.0";
apiversion = "kubernative/kubeops/kosi/user/v4";
name = "kosi-example-packagev3";
description = "kosi-example-package";
version = "0.1.0";
docs = "docs.tgz";
logo = "logo.png";

files =
{
    input = "template.yaml";
}

containers =
{
    example = ["docker.io", "nginx", "latest"];
}

install
{
    containerd
    (
        option = "tag";
        srcImage = "registry.kubernative.net/lima:v0.8.0";
        destImage = "yourRegistry/yourName:v0.8.0";
        sudo = "true";
        sudoPassword = "Drowssap";
    );
}
languageversion = "1.0.0";
apiversion = "kubernative/kubeops/kosi/user/v4";
name = "kosi-example-packagev3";
description = "kosi-example-package";
version = "0.1.0";
docs = "docs.tgz";
logo = "logo.png";

files =
{
    input = "template.yaml";
}

containers =
{
    example = ["docker.io", "nginx", "latest"];
}

install
{
    containerd
    (
        option = "pull/push";
        srcImage = "registry.kubernative.net/lima:v0.8.0";
        sudo = "true";
        sudoPassword = "Drowssap";
    );
}
languageversion = "1.0.0";
apiversion = "kubernative/kubeops/kosi/user/v4";
name = "kosi-example-packagev3";
description = "kosi-example-package";
version = "0.1.0";
docs = "docs.tgz";
logo = "logo.png";

files =
{
    input = "template.yaml";
}

containers =
{
    example = ["docker.io", "nginx", "latest"];
}

install
{
    containerd
    (
        option = "deleteCon";
        containerName = "myFirstContainer";
        sudo = "true";
        sudoPassword = "Drowssap";
    );
}
languageversion = "1.0.0";
apiversion = "kubernative/kubeops/kosi/user/v4";
name = "kosi-example-packagev3";
description = "kosi-example-package";
version = "0.1.0";
docs = "docs.tgz";
logo = "logo.png";

files =
{
    input = "template.yaml";
}

containers =
{
    example = ["docker.io", "nginx", "latest"];
}

install
{
    containerd
    (
        type = "containerd";
        option = "psTask";
        sudo = "true";
        sudoPassword = "Drowssap";
    );
}
languageversion = "1.0.0";
apiversion = "kubernative/kubeops/kosi/user/v4";
name = "kosi-example-packagev3";
description = "kosi-example-package";
version = "0.1.0";
docs = "docs.tgz";
logo = "logo.png";

files =
{
    input = "template.yaml";
}

containers =
{
    example = ["docker.io", "nginx", "latest"];
}

install
{
    containerd
    (
        option = "stopTask / startTask / deleteTask";
        containerName = "task1";
        sudo = "true";
        sudoPassword = "Drowssap";
    );
}
All plugins are available as KOSI packages in the KubeOpsHub. Our plugins are grouped into several KOSI packages described below. To see our KOSI packages in the KubeOpsHub use the command:
kosi search --ps kubeops --hub public
kosi install --hub=public <user/packagename:version>
The plugins are automatically placed in the associated directory($KUBEOPSROOT/plugins) and can be used directly.
In this section you can find the plugin packages and the documentation for each plugin.
These plugins are part of the kubeops-basic-plugins package.
These plugins are part of the kubeops-kubernetes-plugins package.
These plugins are installed with the installation of KOSI.
The ContainerRuntime plugin allows you to manage container runtimes efficiently. It provides options to execute commands with or without flags and retrieve runtime status information. Supported runtimes include Docker, CRI-O, and containerd.
To use the ContainerRuntime plugin, you need the following dependencies installed:
| Key | Description | |
|---|---|---|
| command | Mandatory | Specifies the command to execute inside the container. |
| containerConfig | - | Configuration file (JSON or YAML) for container creation. Example: containerConfiguration.json or containerConfiguration.yaml. |
| containerName | - | Name of the container in which the command will be executed. |
| destImage | - | New image name when tagging an existing image. |
| execID | - | ID or name of the execution (only for containerd execution commands). |
| flag | - | Options to enable specific command behaviors (e.g., -a or –all). Multiple flags can be used. |
| runtime | - | Temporarily stores the runtime type when the key containerRuntime is set to status. |
| srcImage | - | Source image for pull, push, or tag operations. |
| sudo | - | If true, the plugin executes with sudo privileges. |
| sudoPassword | - | Mandatory if sudo is set to true. |
| type | - | Specifies the container runtime type. If unspecified, the plugin detects the running runtime automatically. Docker is preferred if multiple runtimes are active. |
| option | Mandatory | Specifies the operation to execute. |
| Option | Description |
|---|---|
| ps | Lists all existing containers. |
| images | Lists all available container images. |
| run | Starts a container. |
| status | Displays the runtime state (e.g., “active” if running). |
| exec | Executes a command within a running container. |
| tag | Renames an image (e.g., docker tag oldImage newImage). |
| pull | Pulls a specified image. |
| push | Pushes a specified image. (Not available in CRI-O.) |
| stop | Stops a specified container. |
| start | Starts a specified container. |
| deleteCon | Deletes a specified container. |
| Option | Description |
|---|---|
| psTask | Lists all existing tasks for containerd. |
| startTask | Starts a task from a given container. |
| stopTask | Stops a specified task. |
| deleteTask | Deletes a specified task. |
These keys specify JSON or YAML configuration files required for pod creation (e.g., podConfiguration.json or podConfiguration.yaml).
languageversion = "1.0.0";
apiversion = "kubernative/kubeops/kosi/user/v4";
name = "kosi-example-packagev3";
description = "kosi-example-package";
version = "0.1.0";
docs = "docs.tgz";
logo = "logo.png";

files =
{
    input = "template.yaml";
}

containers =
{
    example = ["docker.io", "nginx", "latest"];
}

install
{
    containerruntime
    (
        type = "docker / crio / containerd";
        option = "ps";
        flag = "--last";
        runtime = "status";
        sudo = "true";
        sudoPassword = "Drowssap";
    );
}
languageversion = "1.0.0";
apiversion = "kubernative/kubeops/kosi/user/v4";
name = "kosi-example-packagev3";
description = "kosi-example-package";
version = "0.1.0";
docs = "docs.tgz";
logo = "logo.png";

files =
{
    input = "template.yaml";
}

containers =
{
    example = ["docker.io", "nginx", "latest"];
}

install
{
    containerruntime
    (
        type = "docker / crio / containerd";
        option = "images";
        flag = "--all";
        runtime = "status";
        sudo = "true";
        sudoPassword = "Drowssap";
    );
}
languageversion = "1.0.0";
apiversion = "kubernative/kubeops/kosi/user/v4";
name = "kosi-example-packagev3";
description = "kosi-example-package";
version = "0.1.0";
docs = "docs.tgz";
logo = "logo.png";

files =
{
    input = "template.yaml";
}

containers =
{
    example = ["docker.io", "nginx", "latest"];
}

install
{
    containerruntime
    (
        type = "docker / crio / containerd";
        option = "run";
        flag = "-w /path/to/dir/ -i -t";
        srcImage = "registry.kubernative.net/lima:v0.8.0";
        containerName = "myFirstContainer";
        runtime = "status";
        sudo = "true";
        sudoPassword = "Drowssap";
    );
}
languageversion = "1.0.0";
apiversion = "kubernative/kubeops/kosi/user/v4";
name = "kosi-example-packagev3";
description = "kosi-example-package";
version = "0.1.0";
docs = "docs.tgz";
logo = "logo.png";

files =
{
    input = "template.yaml";
}

containers =
{
    example = ["docker.io", "nginx", "latest"];
}

install
{
    containerruntime
    (
        type = "crio";
        option = "run";
        containerConfig = "/root/podConfig.json / .yaml";
        podConfig = "/root/podConfig.json / .yaml";
        runtime = "status";
        sudo = "true";
        sudoPassword = "Drowssap";
    );
}
languageversion = "1.0.0";
apiversion = "kubernative/kubeops/kosi/user/v4";
name = "kosi-example-packagev3";
description = "kosi-example-package";
version = "0.1.0";
docs = "docs.tgz";
logo = "logo.png";

files =
{
    input = "template.yaml";
}

containers =
{
    example = ["docker.io", "nginx", "latest"];
}

install
{
    containerruntime
    (
        type = "docker / crio / contianerd";
        option = "status";
        runtime = "status";
        sudo = "true";
        sudoPassword = "Drowssap";
    );
}
languageversion = "1.0.0";
apiversion = "kubernative/kubeops/kosi/user/v4";
name = "kosi-example-packagev3";
description = "kosi-example-package";
version = "0.1.0";
docs = "docs.tgz";
logo = "logo.png";

files =
{
    input = "template.yaml";
}

containers =
{
    example = ["docker.io", "nginx", "latest"];
}

install
{
    containerruntime
    (
        type = "contianerd";
        option = "exec";
        execID = "exec1";
        containerName = "registry.kubernative.net/lima:v0.8.0";
        command = "mkdir /tmp/testdir";
        runtime = "status";
        sudo = "true";
        sudoPassword = "Drowssap";
    );
}
languageversion = "1.0.0";
apiversion = "kubernative/kubeops/kosi/user/v4";
name = "kosi-example-packagev3";
description = "kosi-example-package";
version = "0.1.0";
docs = "docs.tgz";
logo = "logo.png";

files =
{
    input = "template.yaml";
}

containers =
{
    example = ["docker.io", "nginx", "latest"];
}

install
{
    containerruntime
    (
        type = "docker / crio";
        option = "exec";
        containerName = "registry.kubernative.net/lima:v0.8.0";
        command = "mkdir /tmp/testdir";
        runtime = "status";
        sudo = "true";
        sudoPassword = "Drowssap";
    );
}
languageversion = "1.0.0";
apiversion = "kubernative/kubeops/kosi/user/v4";
name = "kosi-example-packagev3";
description = "kosi-example-package";
version = "0.1.0";
docs = "docs.tgz";
logo = "logo.png";

files =
{
    input = "template.yaml";
}

containers =
{
    example = ["docker.io", "nginx", "latest"];
}

install
{
    containerruntime
    (
        type = "docker / containerd";
        option = "tag";
        srcImage = "registry.kubernative.net/lima:v0.8.0";
        destImage = "yourRegistry/yourName:v0.8.0";
        runtime = "status";
        sudo = "true";
        sudoPassword = "Drowssap";
    );
}
languageversion = "1.0.0";
apiversion = "kubernative/kubeops/kosi/user/v4";
name = "kosi-example-packagev3";
description = "kosi-example-package";
version = "0.1.0";
docs = "docs.tgz";
logo = "logo.png";

files =
{
    input = "template.yaml";
}

containers =
{
    example = ["docker.io", "nginx", "latest"];
}

install
{
    containerruntime
    (
        type = "docker / crio / containerd";
        option = "deleteCon / start / stop";
        containerName = "myFirstContainer";
        runtime = "status";
        sudo = "true";
        sudoPassword = "Drowssap";
    );
}
languageversion = "1.0.0";
apiversion = "kubernative/kubeops/kosi/user/v4";
name = "kosi-example-packagev3";
description = "kosi-example-package";
version = "0.1.0";
docs = "docs.tgz";
logo = "logo.png";

files =
{
    input = "template.yaml";
}

containers =
{
    example = ["docker.io", "nginx", "latest"];
}

install
{
    containerruntime
    (
        type = "docker / crio / containerd";
        option = "pull / push";
        srcImage = "registry.kubernative.net/lima:v0.8.0";
        runtime = "status";
        sudo = "true";
        sudoPassword = "Drowssap";
    );
}
Note: CRI-O does not support the push and tag operations.
languageversion = "1.0.0";
apiversion = "kubernative/kubeops/kosi/user/v4";
name = "kosi-example-packagev3";
description = "kosi-example-package";
version = "0.1.0";
docs = "docs.tgz";
logo = "logo.png";

files =
{
    input = "template.yaml";
}

containers =
{
    example = ["docker.io", "nginx", "latest"];
}

install
{
    containerruntime
    (
        type = "containerd";
        option = "psTask";
        flag = "--all";
        runtime = "status";
        sudo = "true";
        sudoPassword = "Drowssap";
    );
}
languageversion = "1.0.0";
apiversion = "kubernative/kubeops/kosi/user/v4";
name = "kosi-example-packagev3";
description = "kosi-example-package";
version = "0.1.0";
docs = "docs.tgz";
logo = "logo.png";

files =
{
    input = "template.yaml";
}

containers =
{
    example = ["docker.io", "nginx", "latest"];
}

install
{
    containerruntime
    (
        type = "containerd";
        option = "startTask /stopTask / deleteTask";
        flag = "--null-io";
        containerName = "myFirstTask";
        runtime = "status";
        sudo = "true";
        sudoPassword = "Drowssap";
    );
}
The copy plugin allows you to copy either a single file or an entire directory, including all its contents, recursively. It provides options to control overwriting behavior when files already exist in the destination.
| Key | Description | |
|---|---|---|
| src | Mandatory | Specifies the absolute path of the source file or directory to be copied. |
| dest | Mandatory | Specifies the absolute path of the destination file or directory where the source will be copied. |
| overwrite | true/false | Controls whether existing files in the destination should be replaced. |
⚠️ Warning: Overwritten data will be permanently lost and cannot be recovered! Proceed with caution. ⚠️
The following example demonstrates how to copy a single file from a source location to a destination.
languageversion = "1.0.0";
apiversion = "kubernative/kubeops/kosi/user/v4";
name = "kosi-example-packagev3";
description = "kosi-example-package";
version = "0.1.0";
docs = "docs.tgz";
logo = "logo.png";

files =
{
    input = "template.yaml";
}

containers =
{
    example = ["docker.io", "nginx", "latest"];
}

install
{
    copy
    (
        src = "/absolute/path/to/file";
        dest = "/absolute/path/to/the/dest/file";
        overwrite = "true/false";
    );
}
Note: Copying a file will not change its name. The destination file will retain the same name as the source file unless explicitly changed in the dest parameter.
The following example demonstrates how to copy a folder from a source location to a destination.
languageversion = "1.0.0";
apiversion = "kubernative/kubeops/kosi/user/v4";
name = "kosi-example-packagev3";
description = "kosi-example-package";
version = "0.1.0";
docs = "docs.tgz";
logo = "logo.png";

files =
{
    input = "template.yaml";
}

containers =
{
    example = ["docker.io", "nginx", "latest"];
}

install
{
    copy
    (
        src = "/absolute/path/to/folder";
        dest = "/absolute/path/to/the/dest/folder";
        overwrite = "true/false";
    );
}
The following example copies all .txt files from the source directory to the destination directory.
languageversion = "1.0.0";
apiversion = "kubernative/kubeops/kosi/user/v4";
name = "kosi-example-packagev3";
description = "kosi-example-package";
version = "0.1.0";
docs = "docs.tgz";
logo = "logo.png";

files =
{
    input = "template.yaml";
}

containers =
{
    example = ["docker.io", "nginx", "latest"];
}

install
{
    cmd(command = "echo Copying all .txt files from source to destination");
    copy
    (
        src = "/absolute/path/to/source/*.txt";
        dest = "/absolute/path/to/destination/";
        overwrite = "true/false";
    );
}
The editFile plugin allows automated modifications to YAML and plain text files by supporting three main operations: add, overwrite, and delete. It enables precise targeting by allowing users to specify YAML keys or line numbers for text files.
| Key | Required | Description |
|---|---|---|
operation |
Yes | Defines the type of modification: add, overwrite, or delete. |
filePath |
Yes | Absolute path to the file being edited. |
fileType |
Yes | File type: yaml or text. |
key |
Required for fileType yaml |
Specifies the YAML key to be modified (dot-separated path format). |
line |
Required for fileType text |
Line number for the operation (1-based indexing). |
value |
Required for operation add and overwrite |
The content to insert or replace. Escaped linebreaks (\\n) and tabs (\\t) are supported in text files. |
Notes:
- For YAML files, only the
keyfield is used to identify the node.- For text files, only the
linefield is required to specify the line position.- For
valuein text: Double escaping (\\n,\\t) is required because the configuration parser interprets strings literally.- If using
overwriteoperation, ensure the file has enough lines, otherwise you may get an IndexOutOfRange error.
Shown as
/root/KosiPlugin/config.yamlin the examples below
spec:
  clusterMaster:
    existingText: this is an example
    toBeOverwritten: this will be replaced
languageversion = "1.0.0";
apiversion = "kubernative/kubeops/sina/user/v4";
name = "kosi-example-packagev3";
description = "kosi-example-package";
version = "0.1.0";
docs = "docs.tgz";
logo = "logo.png";

files =
{
    input = "template.yaml";
}

install
{
    editFile
    (
        operation = "add";
        fileType = "yaml";
        filePath = "/root/KosiPlugin/config.yaml";
        key = "spec.clusterMaster.newEntry";
        value = "new value added";
    );
}
Expected Result:
spec:
  clusterMaster:
    existingText: this is an example
    toBeOverwritten: this will be replaced
    newEntry: new value added
languageversion = "1.0.0";
apiversion = "kubernative/kubeops/sina/user/v4";
name = "kosi-example-packagev3";
description = "kosi-example-package";
version = "0.1.0";
docs = "docs.tgz";
logo = "logo.png";

files =
{
    input = "template.yaml";
}

install
{
    editFile
    (
        operation = "overwrite";
        fileType = "yaml";
        filePath = "/root/KosiPlugin/config.yaml";
        key = "spec.clusterMaster.toBeOverwritten";
        value = "this text has been replaced";
    );
}
Expected Result:
spec:
  clusterMaster:
    existingText: this is an example
    toBeOverwritten: this text has been replaced
languageversion = "1.0.0";
apiversion = "kubernative/kubeops/sina/user/v4";
name = "kosi-example-packagev3";
description = "kosi-example-package";
version = "0.1.0";
docs = "docs.tgz";
logo = "logo.png";

files =
{
    input = "template.yaml";
}

install
{
    editFile
    (
        operation = "delete";
        fileType = "yaml";
        filePath = "/root/KosiPlugin/config.yaml";
        key = "spec.clusterMaster.toBeOverwritten";
    );
}
Expected Result:
spec:
  clusterMaster:
    existingText: this is an example
Shown as
/root/KosiPlugin/todo.txtin the examples below
To-do List:
 - Buy groceries
 - Clean house
 - Pay bills
languageversion = "1.0.0";
apiversion = "kubernative/kubeops/sina/user/v4";
name = "kosi-example-packagev3";
description = "kosi-example-package";
version = "0.1.0";
docs = "docs.tgz";
logo = "logo.png";

files =
{
    input = "template.yaml";
}

install
{
    editFile
    (
        operation = "add";
        fileType = "text";
        filePath = "/root/KosiPlugin/todo.txt";
        line = "'4'";
        value = " - Call the bank";
    );
}
Expected Result:
To-do List:
 - Buy groceries
 - Clean house
 - Pay bills
 - Call the bank
languageversion = "1.0.0";
apiversion = "kubernative/kubeops/sina/user/v4";
name = "kosi-example-packagev3";
description = "kosi-example-package";
version = "0.1.0";
docs = "docs.tgz";
logo = "logo.png";

files =
{
    input = "template.yaml";
}

install
{
    editFile
    (
        operation = "overwrite";
        fileType = "text";
        filePath = "/root/KosiPlugin/todo.txt";
        line = "'3'";
        value = " - Pay insurance";
    );
}
Expected Result:
To-do List:
 - Buy groceries
 - Clean house
 - Pay insurance
languageversion = "1.0.0";
apiversion = "kubernative/kubeops/sina/user/v4";
name = "kosi-example-packagev3";
description = "kosi-example-package";
version = "0.1.0";
docs = "docs.tgz";
logo = "logo.png";

files =
{
    input = "template.yaml";
}

install
{
    editFile
    (
        operation = "delete";
        fileType = "text";
        filePath = "/root/KosiPlugin/todo.txt";
        line = "'2'";
    );
}
Expected Result:
To-do List:
 - Clean house
 - Pay bills
languageversion = "1.0.0";
apiversion = "kubernative/kubeops/sina/user/v4";
name = "kosi-example-packagev3";
description = "kosi-example-package";
version = "0.1.0";
docs = "docs.tgz";
logo = "logo.png";

files =
{
    input = "template.yaml";
}

install
{
    editFile
    (
        operation = "overwrite";
        fileType = "text";
        filePath = "/root/KosiPlugin/script.txt";
        line = "'3'";
        value = "Cluster Configuration:\\n  clusterName: exampleCluster\\n  hosts:\\n    nodes:\\n      - 192.168.79.130";
    );
}
Expected Behavior:
IndexOutOfRange error will be thrown.Hint: Always ensure the file has enough lines when using multiline
valuewithoverwriteon text files.
Escape Rule: When using special characters invalue, escape them as\\n(newline),\\t(tab) in text files.
The Firewall Plugin allows you to manage your firewall settings efficiently. You can open or close ports, enable or disable the firewall, and retrieve the current firewall status. The plugin currently supports two firewall types:
| Key | Description | |
|---|---|---|
| type | Mandatory | Specifies the firewall type to which actions will be applied (firewalld or iptables). |
| action | Mandatory | Defines the action to be performed (e.g., enable, disable, open, or close ports). |
| ports | Mandatory | Required when opening or closing ports. Accepts a list of ports in the format: “ports” or “ports-range”/protocol. |
| getFirewallStatus | Mandatory | Stores the firewall status, which can be either “running” or “not running”. If both firewalld and iptables are running, firewalld is selected. |
languageversion = "1.0.0";
apiversion = "kubernative/kubeops/sina/user/v4";
name = "kosi-example-packagev3";
description = "kosi-example-package";
version = "0.1.0";
docs = "docs.tgz";
logo = "logo.png";

files =
{
    input = "template.yaml";
}

containers =
{
    example = ["docker.io", "nginx", "latest"];
}

install
{
    firewall
    (
        type = "firewalld";
        action = "close / open / disable";
        ports = "['5555/tcp','6666/tcp','8888-9999/udp']";
        getFirewallStatus = "status";
    );

    fprint
    (
        message = "The firewall is {0}";
        variables = "['status']";
    );
}
The FirewallD Plugin allows you to manage your firewall settings efficiently. You can open or close ports, enable or disable the firewall, and retrieve the current firewall status. The plugin currently supports two firewall types:
| Key | Description | |
|---|---|---|
| action | Mandatory | Defines the action to be performed (e.g., enable, disable, open, or close ports). |
| ports | Mandatory | Required when opening or closing ports. Accepts a list of ports in the format: “ports” or “ports-range”/protocol. |
| getFirewallStatus | Mandatory | Stores the firewall status, which can be either “running” or “not running”. If both firewalld and iptables are running, firewalld is selected. |
languageversion = "1.0.0";
apiversion = "kubernative/kubeops/sina/user/v4";
name = "kosi-example-packagev3";
description = "kosi-example-package";
version = "0.1.0";
docs = "docs.tgz";
logo = "logo.png";

files =
{
    input = "template.yaml";
}

containers =
{
    example = ["docker.io", "nginx", "latest"];
}

install
{
    firewallD
    (
        action = "open";
        ports = "['5555/tcp','6666/tcp','8888-9999/udp']";
        getFirewallStatus = "status";
    );
}
The fprint plugin functions similarly to the print plugin by allowing messages to be displayed as key-value pairs. However, fprint extends this functionality by enabling the inclusion of variables from other plugins, which are also printed as part of the message.
For details on handling variables from other plugins, see the loop-plugin Reference.
| Key | Description | |
|---|---|---|
| message | Mandatory | A string that represents the command-line output message. |
| variables | - | A list of strings representing variable names. If these variables were created by other plugins, fprint will retrieve and include their values in the message. |
languageversion = "1.0.0";
apiversion = "kubernative/kubeops/sina/user/v4";
name = "kosi-example-packagev3";
description = "kosi-example-package";
version = "0.1.0";
docs = "docs.tgz";
logo = "logo.png";

files =
{
    input = "template.yaml";
}

containers =
{
    example = ["docker.io", "nginx", "latest"];
}

install
{
    set
    (
        variable = "name";
        value = "root";
    );

    set
    (
        variable = "ips";
        value = "0.0.0.0";
    );

    fprint
    (
        message = "Hello {0} with the ips {1}";
        variables = "['vars.name','vars.ips']";
    );
}
The Helm Plugin allows users to manage Helm packages. It enables the installation, upgrade, and deletion of Helm charts via KOSI package.
The Key Features are:
| Key | Required | Description |
|---|---|---|
command |
Yes | Defines the operation to perform. Possible values: install, upgrade or delete. |
tgz |
Yes (only for install and upgrade) |
The filename of the Helm chart archive (.tgz). |
values |
Optional | A list of YAML files containing configuration values for the Helm chart. |
flags |
Optional | Additional Helm command flags. |
namespace |
Optional, Default: default |
The Kubernetes namespace in which to deploy the chart. |
deploymentName |
Yes (only for upgrade and delete) |
Specifies the name of the Helm release. If omitted during installation, a random name will be generated. |
Important Notes:
- A
helmvalues.yamlfile must be present in the execution directory when running KOSI install commands.- The Helm
.tgzpackage (Helm chart) must be included in the files tree inside the includes tree.- KOSI’s
--dnameargument is not related to Helm’sdeploymentNameparameter.--dnamein KOSI is used to define a KOSI deployment name, whereasdeploymentNamein the Helm plugin specifies the Helm release name.- Helm charts and values files (
.tgzand.yaml) can be obtained from sources like ArtifactHub, or you can package your own Helm chart usinghelm package. Knowledge of Helm is required here.
This command deploys a Helm chart to a Kubernetes cluster.
languageversion = "1.0.0";
apiversion = "kubernative/kubeops/sina/user/v4";
name = "kosi-example-package";
description = "helm-installation-example";
version = "0.1.0";
docs = "docs.tgz";
logo = "logo.png";

files =
{
    guestbook = "guestbook.tgz";
    values1 = "gbValues.yaml";
    values2 = "values2.yaml";
}

install
{
    cmd(command="echo Installing Helm chart...");

    helm
    (
        command = "install";
        tgz = "guestbook.tgz";
        values = "['gbValues.yaml','values2.yaml']";
        deploymentName = "guestbook";
        namespace = "dev";
    );
}
guestbook.tgz Helm chart is installed.gbValues.yaml and values2.yaml) customize the deployment.guestbook in the dev namespace.cmd plugin ensures a status message is displayed before execution.Upgrades an existing Helm release to a new version or updates its values.
languageversion = "1.0.0";
apiversion = "kubernative/kubeops/sina/user/v4";
name = "kosi-example-package";
description = "helm-upgrade-example";
version = "0.1.0";
docs = "docs.tgz";
logo = "logo.png";

files =
{
    guestbook = "guestbook.tgz";
    values1 = "gbValues.yaml";
    values2 = "values2.yaml";
}

update
{
    cmd(command = "echo Upgrading Helm chart...");

    helm
    (
        command = "upgrade";
        tgz = "guestbook.tgz";
        values = "['gbValues.yaml','values2.yaml']";
        deploymentName = "guestbook";
        namespace = "dev";
    );
}
guestbook Helm release using an updated guestbook.tgz chart.gbValues.yaml and values2.yaml.Deletes a Helm release from the Kubernetes cluster.
languageversion = "1.0.0";
apiversion = "kubernative/kubeops/sina/user/v4";
name = "kosi-example-package";
description = "helm-delete-example";
version = "0.1.0";
docs = "docs.tgz";
logo = "logo.png";

files =
{
    guestbook = "guestbook.tgz";
    values1 = "gbValues.yaml";
    values2 = "values2.yaml";
}

delete
{
   cmd(command = "echo Deleting Helm chart...");

   helm
   (
      command = "delete";
      deploymentName = "guestbook";
      namespace = "dev";
      flags = "['--wait']";
  );
}
dev namespace.--wait flag ensures the command waits for all resources to be fully removed.The hostname plugin for KOSI allows users to manage and modify the hostname of a machine dynamically. It provides functionalities to:
sudo).This plugin is particularly useful in automated deployments, system provisioning, or scenarios where hostnames need to be dynamically managed during a KOSI package installation.
| Key | Required | Description |
|---|---|---|
get |
Optional* | Retrieves the current hostname and saves it in a variable for later use. This variable remains accessible until the KOSI session ends. |
set |
Optional* | Sets the machine’s hostname to the specified value. |
setVar |
Optional* | Sets the hostname using a previously stored variable from the internal storage. |
sudo |
Optional | If set to true, the plugin will execute commands with sudo privileges. |
sudoPassword |
Yes if sudo is true |
The password required for executing sudo commands. |
Note:
- * One of the keys must be present. (Either
get,setorsetVar)- The
sudoPasswordis mandatory ifsudois enabled, ensuring the required privileges for modifying system settings.
This example retrieves the current hostname and saves it in the internal variable oldHostname. The variable can be used later within the same KOSI session.
languageversion = "1.0.0";
apiversion = "kubernative/kubeops/sina/user/v4";
name = "kosi-example-packagev3";
description = "kosi-example-package";
version = "0.1.0";
docs = "docs.tgz";
logo = "logo.png";

files =
{
    input = "template.yaml";
}

install
{
    hostname
    (
        get = "oldHostname";
        sudo = "true";
        sudoPassword = "YourSecurePassword";
    );
}
This example sets the machine’s hostname to master permanently.
languageversion = "1.0.0";
apiversion = "kubernative/kubeops/sina/user/v4";
name = "kosi-example-packagev3";
description = "kosi-example-package";
version = "0.1.0";
docs = "docs.tgz";
logo = "logo.png";

files =
{
    input = "template.yaml";
}

install
{
    hostname
    (
        set = "master";
        sudo = "true";
        sudoPassword = "YourSecurePassword";
    );
}
After execution, the system’s hostname will be permanently changed to master.
If a hostname was previously retrieved and stored in oldHostname, this example restores it.
languageversion = "1.0.0";
apiversion = "kubernative/kubeops/sina/user/v4";
name = "kosi-example-packagev3";
description = "kosi-example-package";
version = "0.1.0";
docs = "docs.tgz";
logo = "logo.png";

files =
{
    input = "template.yaml";
}

install
{
    hostname
    (
        setVar = "oldHostname";
        sudo = "true";
        sudoPassword = "YourSecurePassword";
    );
}
This is particularly useful in rollback scenarios where a hostname needs to be reverted to its original value after temporary changes.
Using hostname with the if and print plugins
This example shows the interaction of several plugins.
In this example, we use the hostname plugin together with the if and print plugins to check whether it is the correct hostname and to output a specific message and perform a corresponding action:
languageversion = "1.0.0";
apiversion = "kubernative/kubeops/sina/user/v4";
name = "kosi-example-hostname-if-print";
description = "Example using hostname with if and print";
version = "0.1.0";
docs = "docs.tgz";
logo = "logo.png";

files =
{
    input = "template.yaml";
}

install
{
    hostname(get = "oldHostname");

    if (condition = "$oldHostname$ = 'myHostname'") then
    {
        print(message = "The hostname myHostname should not be taken, so the hostname is changed to myVeryVeryNewHostname..");

        hostname
        (
            set = "myVeryVeryNewHostname";
            sudo = "true";
            sudoPassword = "SecurePassword";
        );
    }
    else
    {
        print(message = "The hostname is OK, do not make any changes.");
    }
}
If hostname is myHostname:
2025-02-26 15:18:28 Info: The hostname myHostname should not be taken, so the hostname is changed to myVeryVeryNewHostname..
myVeryVeryNewHostname.Otherwise:
2025-02-26 15:18:28 Info: The hostname is OK, do not make any changes.
else part of the if plugin, nothing else happens in the else part.The ‘if’ Plugin for KOSI packages enables the introduction of conditional control flow into your workflow. This plugin allows you to define logic that executes specific actions based on whether a given condition is met. It functions similarly to traditional programming if-else statements, where:
This functionality provides greater flexibility and decision-making capabilities within KOSI packages, allowing workflows to dynamically adapt based on real-time conditions.
| Key | Description | |
|---|---|---|
| condition | Mandatory | set to a string that will be evaluated as an expression. Condition is based on net5.0 DataColumn expressions and follows almost the same syntax. The only difference are plugin variables can also be used in the condition |
| then | Mandatory | defines the block of commands that execute if the ‘condition’ evaluates to true. Commands inside the then block will run sequentially when the condition holds true. |
| else | Optional | defines an alternative block of commands that execute if the ‘condition’ evaluates to false. If omitted, no alternative actions will take place when the condition is false. |
When using the set plugin:
condition = "$vars.variableName$"
When using other plugins that set variables (for example osCheck):
condition = "$variableName$"
condition = '{{values.variable}}'
languageversion = "1.0.0";
apiversion = "kubernative/kubeops/sina/user/v4";
name = "kosi-example-packagev3";
description = "kosi-example-package";
version = "0.1.0";
docs = "docs.tgz";
logo = "logo.png";

files =
{
    guestbook = "guestbook.tgz";
    gbValues = "gbValues.yaml";
    values2 = "values2.yaml";
}

containers =
{
    example = ["docker.io", "nginx", "latest"];
}

install
{
    cmd(command = "echo Using the if plugin.");

    if(condition = "'{{values.myVar}}' < 0") then
    {
        print(message = "myVar is less than 0.");
    }
    else
    {
        print(message = "myVar is equal or greater than 0.");
    }

    print(message = "This will always print.");
}
[ 06/22/2021 16:56:54 Info    default ] myVar is equal or more than 0
[ 06/22/2021 16:56:54 Info    default ] this will always print
or
[ 06/22/2021 16:57:37 Info    default ] myVar is less than 0
[ 06/22/2021 16:57:37 Info    default ] this will always print
All expressions are expected to evaluate to either ‘True’ or ‘False’ otherwise the ‘if’ plugin will exit with an error.
With this plugin you can manage iptables. You can either open/close ports or disable/enable it. Additionally it is possible to gather information about the iptables status.
| Key | Description | |
|---|---|---|
| action | Mandatory | Similiar to the service Plugin you can enable and disable iptables as well as open and close ports. |
| ports | – | If you want to open or close any ports the key ports which requires a list ("ports" or "ports-range"/protocol) is mandatory. Any ports like in the schema above are valid. |
| getFirewallStatus | – | set to a variable name in which status of the iptables will be stored. The status will be either: "running" / "not running" |
languageversion = "1.0.0";
apiversion = "kubernative/kubeops/sina/user/v4";
name = "kosi-example-packagev3";
description = "kosi-example-package";
version = "0.1.0";
docs = "docs.tgz";
logo = "logo.png";

files =
{
    input = "template.yaml";
}

containers =
{
    example = ["docker.io", "nginx", "latest"];
}

install
{
    iptables
    (
        action="close / open / disable";
        ports="['5555/tcp','6666/tcp','8888-9999/udp']";
        getFirewallStatus="status"
    );
}
The kosi plugin provides a means to use features of kosi within a kosi plugin. It enables automation of various package operations, such as logging into a registry, pulling packages, installing, updating, and deleting them within a Kubernetes cluster.
With the kosi plugin, you can:
This plugin is particularly useful for automating deployment workflows, ensuring that Kubernetes resources are managed efficiently.
Depending on the command being executed, different keys must be set. Below is a list of available keys:
| Key | Required | Default Value | Description |
|---|---|---|---|
command |
Yes | - | Specifies the KOSI command to execute (login, install, update, delete, pull). |
userVar |
Yes (for login) |
- | The username for authentication. |
passwordVar |
Yes (for login) |
- | The password in plain text for authentication. |
userHub |
Yes | - | The user hub (registry) to interact with. Use public for public repositories. |
sourcePath |
Yes (for install, delete, update) |
- | The package name or path to install, update, or delete. |
sourceRegistry |
Yes (for install, delete, update) |
- | The registry where the package is located. |
local |
Optional (for install, delete, update) |
false |
Either a package from a hub or a local KOSI package. |
deploymentName |
Optional | Package name | Name assigned to the deployed package in the cluster. Required for updates. |
nameSpace |
Optional | default |
Kubernetes namespace where the package is deployed. |
package |
Yes (for pull) |
- | Name of the package to pull. |
packageDestinationPath |
Yes (for pull) |
- | Path where the pulled package should be saved. |
destinationRegistry |
Optional (for pull) |
- | Destination registry if retagging is enabled. |
targetRegistry |
Optional (for pull) |
- | Target registry for retagged images. |
retag |
Optional | false |
Whether to retag images when pulling. |
values |
Optional | - | A list of values equivalent to the -f option in KOSI CLI. |
Login enables you to log in to your KubeOps user account. This is required to upload packages to a hub and to download packages from a private hub.
Both the username and password must be entered in plain text in package.yaml.
The install command can be used to download and install packages from any registry. If this is a public package you have to set your userHub to “public”. Otherwise you have to set
the userHub, where the package is located. In addition, the namespace in which the package is to be installed can be specified and the name of the deployed package in the cluster can be changed.
The update command updates an already installed KOSI package. For update, the installation and the update package have to be the same name. Update will be defined in the package.yaml (example 3 - Update).
If this is a public package you have to set your userHub to “public”. Otherwise you have to set
the userHub, where the package is located
The delete command can be used to delete packages from any registry. The command delete expected parameters like sourcePath, sourceRegistry and deploymentName,
which are also marked as required. If this is a public package you have to set your userHub to “public”. Otherwise you have to set
the userHub, where the package is located
The nameSpace parameter can be used to specify the name of the package to be deleted.
The pull command can be used to pull packages from any registry. The command pull expected parameters like package, packageDestinationPath and userHub,
which are also marked as mandatory. If you want to pull your images in your own registry you can use the destinationRegistry parameter. If you want to pull your images in your own registry and change your deployment automatically you can use destinationRegistry and targetRegistry. In both scenarios you have to use the retag parameter.
languageversion = "1.0.0";
apiversion = "kubernative/kubeops/sina/user/v4";
name = "kosi-example-package";
description = "kosi-example-package";
version = "0.1.0";
docs = "docs.tgz";
logo = "logo.png";

files =
{
    input = "template.yaml";
}

containers =
{
    example = ["docker.io", "nginx", "latest"];
}

install
{
    kosi
    (
        command = "login";
        userVar = "exampleUser";
        passwordVar = "examplePW";
        hub = "http://dispatcher.kubeops.net/dispatcher/";
    );
}
languageversion = "1.0.0";
apiversion = "kubernative/kubeops/sina/user/v4";
name = "kosi-example-package";
description = "kosi-example-package";
version = "0.1.0";
docs = "docs.tgz";
logo = "logo.png";

files =
{
    input = "template.yaml";
}

containers =
{
    example = ["docker.io", "nginx", "latest"];
}

install
{
    kosi
    (
        command = "install";
        sourcePath = "kosi/kubeops-kubernetes-plugins:0.0.1";
        sourceRegistry = "registry1.kubeops.net";
        deploymentName = "kubernetes-plugins";
        hub = "http://dispatcher.kubeops.net/dispatcher/";
        nameSpace = "kosi";
        values = "['values.yaml']";
        userHub = "public";
        local = "false";
    );
}
languageversion = "1.0.0";
apiversion = "kubernative/kubeops/sina/user/v4";
name = "kosi-example-package";
description = "kosi-example-package";
version = "0.1.0";
docs = "docs.tgz";
logo = "logo.png";

files =
{
    input = "template.yaml";
}

containers =
{
    example = ["docker.io", "nginx", "latest"];
}

install
{
    kosi
    (
        command = "install";
        sourcePath = "/root/kosi-test/package.tgz";
        sourceRegistry = "registry1.kubeops.net";
        deploymentName = "kubernetes-plugins";
        hub = "http://dispatcher.kubeops.net/dispatcher/";
        nameSpace = "kosi";
        values = "['values.yaml']";
        userHub = "public";
        local = "true";
    );
}
languageversion = "1.0.0";
apiversion = "kubernative/kubeops/sina/user/v4";
name = "kosi-example-package";
description = "kosi-example-package";
version = "0.1.0";
docs = "docs.tgz";
logo = "logo.png";

files =
{
    input = "template.yaml";
}

containers =
{
    example = ["docker.io", "nginx", "latest"];
}

update
{
    kosi
    (
        command = "update";
        sourcePath = "/root/kosi-test/package.tgz";
        sourceRegistry = "registry1.kubeops.net";
        deploymentName = "kubernetes-plugins";
        hub = "http://dispatcher.kubeops.net/dispatcher/";
        nameSpace = "kosi";
        values = "['values.yaml']";
        userHub = "public";
        local = "true";
    );
}
languageversion = "1.0.0";
apiversion = "kubernative/kubeops/sina/user/v4";
name = "kosi-example-package";
description = "kosi-example-package";
version = "0.1.0";
docs = "docs.tgz";
logo = "logo.png";

files =
{
    input = "template.yaml";
}

containers =
{
    example = ["docker.io", "nginx", "latest"];
}

delete
{
    kosi
    (
        command = "delete";
        sourcePath = "/root/kosi-test/package.tgz";
        sourceRegistry = "registry1.kubeops.net";
        deploymentName = "kubernetes-plugins";
        hub = "http://dispatcher.kubeops.net/dispatcher/";
        nameSpace = "kosi";
        values = "['values.yaml']";
        userHub = "public";
        local = "true";
    );
}
languageversion = "1.0.0";
apiversion = "kubernative/kubeops/sina/user/v4";
name = "kosi-example-package";
description = "kosi-example-package";
version = "0.1.0";
docs = "docs.tgz";
logo = "logo.png";

files =
{
    input = "template.yaml";
}

containers =
{
    example = ["docker.io", "nginx", "latest"];
}

install
{
    kosi
    (
        command = "pull";
        hub = "http://dispatcher.kubeops.net/dispatcher/";
        package = "lima/kubernetes:1.24.7";
        packageDestinationPath = "/root/kubernetes-1.24.7/package.tgz";
        destinationRegistry = "localhost:5000/myimages";
        targetRegistry = "myregistry.net/myimages";
        retag = "true";
    );
}
Using kosi with the osCheck, if and print plugins
This example shows the interaction of several plugins.
In this example, we use the kosi plugin together with the osCheck, if and print plugins to check whether it is the correct operating system and to output a specific message as well as to execute a corresponding Kosi install operation with the kosi plugin:
languageversion = "1.0.0";
apiversion = "kubernative/kubeops/sina/user/v4";
name = "kosi-example-kosi-oscheck-if-print";
description = "Example using kosi with oscheck and if and print";
version = "0.1.0";
docs = "docs.tgz";
logo = "logo.png";

files =
{
    inputRhel = "rhel8.yaml";
    inputOtherOS = "otherOs.yaml";
}

install
{
    osCheck
    (
        getOSVar = "os";
        getOSVersionVar = "version";
    );

    if (condition = "$os$ = 'Red Hat Enterprise Linux'") then
    {
        print(message = "Performing Kosi install for RHEL 8..");
        kosi
        (
            command = "install";
            sourcePath = "/root/kosi-test/rhel8/package.tgz";
            sourceRegistry = "registry1.kubeops.net";
            deploymentName = "rhel8-kosi";
            hub = "http://dispatcher.kubeops.net/dispatcher/";
            nameSpace = "kosi";
            values = "['rhel8.yaml']";
            userHub = "public";
            local = "true";
        );
    }
    else
    {
        print(message = "Other OS recognized instead of RHEL 8, performing alternative Kosi install..");
        kosi
        (
            command = "install";
            sourcePath = "/root/kosi-test/otherOs/package.tgz";
            sourceRegistry = "registry1.kubeops.net";
            deploymentName = "otherOs-kosi";
            hub = "http://dispatcher.kubeops.net/dispatcher/";
            nameSpace = "kosi";
            values = "['otherOs.yaml']";
            userHub = "public";
            local = "true";
        );
    }
}
If os is Red Hat Enterprise Linux:
2025-02-26 15:18:28 Info: Performing Kosi install for RHEL 8..
/root/kosi-test/rhel8/package.tgz is installed with the values rhel8.yaml.Otherwise:
2025-02-26 15:18:28 Info: Other OS recognized instead of RHEL 8, performing alternative Kosi install..
/root/kosi-test/otherOs/package.tgz is installed with the values otherOs.yaml.This plugin can be used to execute kubeadm commands.
| Key | Description | |
|---|---|---|
| action | - | Action performed when upgrade is used as an operation. |
| kubeadmVersion | - | Any offical verb supported by Kubernetes is allowed when you try the operation “config” or “can-i” |
| outputVar | Mandatory | Save the output of the executed command in the offered variable. |
| sudo | - | Can be true or false. If it is true the Plugin will be executet with sudo privileges. |
| sudoPassword | - | If you use sudo, sudoPassword will be mandatory. |
| phase | - | Phase which will be initialized when using init phase as an operation. |
| token | - | Save the token of the token create command in the offered variable. |
| operation | - | The operations shown above are currently supported when using the kubeadm plugin. Depending on the operation the following inputs are required: |
-o short to get only the Version as output.Action performed when upgrade is used as an operation.
Any offical verb supported by Kubernetes is allowed when you try the operation “config” or “can-i”
The operations shown above are currently supported when using the kubeadm plugin. Depending on the operation the following inputs are required:
-o short to get only the Version as output.languageversion = "1.0.0";
apiversion = "kubernative/kubeops/kosi/user/v4";
name = "kosi-example-packagev3";
description = "kosi-example-package";
version = "0.1.0";
docs = "docs.tgz";
logo = "logo.png";
files =
{
input="template.yaml";
}
containers =
{
example=["docker.io", "nginx", "latest"];
}
install
{
kubeadm(
operation="version"/"reset"/"init"/"init phase"/"token create"/"upgrade";
kubeadmVersion="version";
phase="kubelet-start"/"certs"/"kubeconfig"/"control-plane"/"...";
action="plan"/"apply"/"node"/"apply v1.22.x"/"...";
flag="-f PathToYAML -n kube-system -o wide"/"...";
outputVar="outputStorage";
token="kubeadmToken";
sudo="true";
sudoPassword="Drowssap");
}
The kubectl plugin allows to interact with Kubernetes clusters by executing kubectl commands within a KOSI package. This plugin provides a convenient way to manage Kubernetes resources, retrieve information and execute administrative tasks directly within a KOSI package. It supports various kubectl operations, including retrieving, creating, updating, and deleting Kubernetes resources.
The plugin integrates seamlessly with Kubernetes by supporting all official resource types and their associated subcommands. Additionally, it allows users to save command outputs as variables or files and provides the option to execute commands with elevated privileges using sudo.
| Key | Required | Description |
|---|---|---|
| operation | Yes | Specifies the kubectl subcommand to execute, such as get, apply, delete, etc. |
| resource | Yes (for most operations) | Defines the type of Kubernetes resource being operated on (e.g., pod, service, deployment). |
| resourceName | Optional | Specifies the name(s) of the resource(s) to target. Names are case-sensitive. If omitted, the command applies to all resources of the given type. |
| flags | Optional | Additional flags for the kubectl command. If using -f, an absolute file path must be provided. Multiple flags should be separated by spaces. Example: "-f /path/to/file.yaml -A -o wide". |
| verb | Optional | Specifies an additional action supported by Kubernetes, such as can-i for checking permissions. Used in combination with relevant operations. |
| outputVar | Optional | Stores the command output in a variable for use in subsequent operations within the KOSI package. |
| outputFile | Optional | Saves the output of the command to a specified absolute file path. |
| sudo | Optional | Set to true to execute the command with sudo privileges. |
| sudoPassword | Yes (if sudo is enabled) | Specifies the password required for sudo execution. |
Notes:
- Ensure that the Kubernetes cluster is accessible from the system where KOSI is running.
- When using
sudo, ensure the correct password is provided, or configureNOPASSWDfor the executing user in the system’s sudoers file.- The plugin supports all standard Kubernetes resources and their associated operations.
- Use
outputVaroroutputFileto capture command outputs for further processing.
This example retrieves details about a specific pod called testDeployment in the kube-system namespace. The output is stored in a variable and saved to a file.
languageversion = "1.0.0";
apiversion = "kubernative/kubeops/sina/user/v4";
name = "kosi-example-package";
description = "kosi-example-package";
version = "0.1.0";
docs = "docs.tgz";
logo = "logo.png";

files =
{
    input = "template.yaml";
}

install
{
    kubectl
    (
        operation = "get";
        resource = "pods";
        resourceName = "testDeployment";
        flags = "-n kube-system -o wide";
        outputVar = "outputGet";
        outputFile = "/root/outputKubectlGet.txt";
        sudo = "true";
        sudoPassword = "Drowssap";
    );
}
This example checks whether the current user has permission to list pods in the cluster using the can-i command.
languageversion = "1.0.0";
apiversion = "kubernative/kubeops/sina/user/v4";
name = "kosi-example-package";
description = "kosi-example-package";
version = "0.1.0";
docs = "docs.tgz";
logo = "logo.png";

files =
{
  input = "template.yaml";
}

install
{
    kubectl
    (
        operation = "auth";
        verb = "can-i";
        flags = "list pods";
        outputVar = "permissionCheck";
    );
}
This example applies a Kubernetes manifest file located at /home/user/deployment.yaml.
languageversion = "1.0.0";
apiversion = "kubernative/kubeops/sina/user/v4";
name = "kosi-example-package";
description = "kosi-example-package";
version = "0.1.0";
docs = "docs.tgz";
logo = "logo.png";

files =
{
    input = "template.yaml";
}

install
{
    kubectl
    (
        operation = "apply";
        flags = "-f /home/user/deployment.yaml";
    );
}
This example deletes two specific pods named example-pod1 and example-pod2 with sudo privileges.
languageversion = "1.0.0";
apiversion = "kubernative/kubeops/sina/user/v4";
name = "kosi-example-package";
description = "kosi-example-package";
version = "0.1.0";
docs = "docs.tgz";
logo = "logo.png";

files =
{
    input = "template.yaml";
}

install
{
    kubectl
    (
        operation = "delete";
        resource = "pod";
        resourceName = "example-pod1 example-pod2";
        sudo = "true";
        sudoPassword = "Drowssap";
    );
}
This example retrieves a list of all services and saves the output to a file at /var/log/kubectl_services.log.
languageversion = "1.0.0";
apiversion = "kubernative/kubeops/sina/user/v4";
name = "kosi-example-package";
description = "kosi-example-package";
version = "0.1.0";
docs = "docs.tgz";
logo = "logo.png";

files =
{
    input = "template.yaml";
}

install
{
    kubectl
    (
        operation = "get";
        resource = "services";
        flags = "-A";
        outputFile = "/var/log/kubectl_services.log";
    );
}
The loop plugin enables repeated execution of specific parts of your KOSI package YAML while iterating over a list. It functions similarly to a “for each” loop in other programming languages. During each iteration, an iterator variable holds the current element from the list, allowing dynamic access within the looped section.
| Key | Description | |
|---|---|---|
| iterator | Mandatory | Specifies the variable name that will hold the current item in the list during each loop iteration. Must be a valid string representing a variable name. |
| list | Mandatory when listVar is not set | Defines an inline list in YAML format that will be iterated over. Cannot be used together with listVar. |
| listVar | Mandatory when list is not set | Specifies a pre-defined variable (set by another plugin) that contains a list. Allows looping over dynamic lists instead of hardcoded values. |
In this example, the loop iterates over a predefined list [1,2,3], and the number iterator variable holds the current item in each iteration.
languageversion = "1.0.0";
apiversion = "kubernative/kubeops/sina/user/v4";
name = "kosi-example-packagev3";
description = "kosi-example-package";
version = "0.1.0";
docs = "docs.tgz";
logo = "logo.png";

files =
{
    input = "template.yaml";
}

containers =
{
    example = ["docker.io", "nginx", "latest"];
}


install
{
    loop
    (
        iterator = "number";
        list = "[1,2,3]";
    )
    {
        fprint
        (
            message = "Hello {0}";
            variables ="[number]";
        );
    }
}
[ 06/18/2021 13:04:29 Info    default ] Hello 1
[ 06/18/2021 13:04:29 Info    default ] Hello 2
[ 06/18/2021 13:04:29 Info    default ] Hello 3
The Merge plugin for KOSI enables the merging of XML files, allowing users to combine multiple XML sources into a single target file within a KOSI package.
The plugin supports merging a single XML file into another or merging all XML files within a specified directory into a target file. Additionally, users can create a backup of the original target file before applying the merge, ensuring data safety.
Features
| Key | Required | Description |
|---|---|---|
file1 |
Yes | The target XML file where the merge operation will be applied. |
file2 |
Yes | The source XML file or directory containing multiple XML files to be merged into file1. |
backupPath |
Optional | If specified, a backup of file1 will be created in this location before merging. |
Notes
- If
file2is a single file, that file will be merged intofile1.- If
file2is a directory, all XML files within that directory will be merged intofile1.- The plugin only supports XML files at this time. Other file formats are not supported.
This example merges /root/config-update.xml into /root/config.xml, while keeping a backup of /root/config.xml in the /root/backup/ directory.
languageversion = "1.0.0";
apiversion = "kubernative/kubeops/sina/user/v4";
name = "kosi-example-packagev3";
description = "kosi-example-package";
version = "0.1.0";
docs = "docs.tgz";
logo = "logo.png";

files =
{
    input = "template.yaml";
}

containers =
{
    example = ["docker.io", "nginx", "latest"];
}

install
{
    merge
    (
      file1 = "/root/config.xml";
      file2 = "/root/config-update.xml";
      backupPath = "/root/backup/";
    );
}
In this case, the plugin merges all XML files located in /root/xml-updates/ into /root/main-config.xml. A backup of /root/main-config.xml is created in /root/backup/ before applying the merge.
languageversion = "1.0.0";
apiversion = "kubernative/kubeops/sina/user/v4";
name = "kosi-example-packagev3";
description = "kosi-example-package";
version = "0.1.0";
docs = "docs.tgz";
logo = "logo.png";

files =
{
    input = "template.yaml";
}

containers =
{
    example = ["docker.io", "nginx", "latest"];
}

install
{
    merge
    (
        file1 = "/root/main-config.xml";
        file2 = "/root/xml-updates/";
        backupPath = "/root/backup/";
    );
}
This example merges /root/new-settings.xml into /root/settings.xml without creating a backup.
languageversion = "1.0.0";
apiversion = "kubernative/kubeops/sina/user/v4";
name = "kosi-example-packagev3";
description = "kosi-example-package";
version = "0.1.0";
docs = "docs.tgz";
logo = "logo.png";

files =
{
    input = "template.yaml";
}

containers =
{
    example = ["docker.io", "nginx", "latest"];
}

install
{
    merge
    (
        file1 = "/root/settings.xml";
        file2 = "/root/new-settings.xml";
    );
}
The osCheck plugin is used to detect the operating system name and version on which the plugin is executed. This information is stored in temporary variables, making it available for use by other plugins, such as fPrint. By utilizing osCheck, users can dynamically access OS details within their KOSI packages, enabling better system-specific configurations and logging.
| Key | Description | |
|---|---|---|
| getOSVar | Mandatory | Set a variable name in which the OS name should be stored. |
| getOSVersionVar | Mandatory | Set a variable name in which the OS version should be stored. |
In the example below, the OS name will be stored in the temporary variable os, and the version name in the variable version. The fprint plugin has been added to generate console output, displaying the detected OS name and version.
languageversion = "1.0.0";
apiversion = "kubernative/kubeops/sina/user/v4";
name = "kosi-example-packagev3";
description = "kosi-example-package";
version = "0.1.0";
docs = "docs.tgz";
logo = "logo.png";

files =
{
    input = "template.yaml";
}

containers =
{
    example = ["docker.io", "nginx", "latest"];
}

install
{
    osCheck
    (
        getOSVar = "os";
        getOSVersionVar = "version";
    );

    fprint
    (
        message = "The OS system is {0} in version {1}.";
        variables = "[os,version]"
    );
}
2025-01-31 16:56:23 Info:      KOSI version: 2.14.0.0_XXXXXXXXXX
2025-01-31 16:56:24 Info:      The OS system is Red Hat Enterprise Linux in version 8.9.
2025-01-31 16:56:24 Info:      Installation successful.
Using osCheck with the if and print plugins
This example shows the interaction of several plug-ins.
In this example, we use the osCheck plugin together with the if and print plugins to check the condition whether it is the correct operating system and output a message accordingly:
languageversion = "1.0.0";
apiversion = "kubernative/kubeops/sina/user/v4";
name = "kosi-example-oscheck-if";
description = "Example using oscheck with if";
version = "0.1.0";
docs = "docs.tgz";
logo = "logo.png";

files =
{
    input = "template.yaml";
}

install
{
    osCheck
    (
        getOSVar = "os";
        getOSVersionVar = "version";
    );

    if (condition="$os$ = 'Red Hat Enterprise Linux'") then
    {
        print(message = "This is the expected OS.");
    }
    else
    {
        print(message = "Wrong OS.");
    }
}
If os is ‘Red Hat Enterprise Linux’:
2025-02-26 15:18:28 Info: This is the expected OS.
Otherwise:
2025-02-26 15:18:28 Info: Wrong OS.
The Packagemanager Plugin provides a possibility for managing software packages on supported Linux distributions within a KOSI package. With this plugin users can:
Currently, this plugin supports only CentOS and uses the YUM package manager for executing package-related operations.
| Key | Mandatory | Description |
|---|---|---|
operation |
Yes | Defines the action to be performed. Acceptable values: install, update, remove, list, search. |
packages |
Yes | Specifies the package(s) to be managed. Multiple packages can be specified as a space-separated string. |
flags |
Optional | Optional flags for the package manager (e.g., -y for automatic confirmation, -v for verbose output). |
sudo |
Optional | Set to true to execute the command with elevated privileges. Default is false. |
sudoPassword |
Yes (if sudo is true) |
Required if sudo is set to true. Specifies the password for executing commands with elevated privileges. |
The following examples demonstrate different package management tasks using the Package Manager Plugin on a CentOS system.
Installs nano and containerd-1.4.10 using yum.
languageversion = "1.0.0";
apiversion = "kubernative/kubeops/sina/user/v4";
name = "kosi-example-packagev3";
description = "kosi-example-package";
version = "0.1.0";
docs = "docs.tgz";
logo = "logo.png";

files =
{
    input = "template.yaml";
}

containers =
{
    example = ["docker.io", "nginx", "latest"];
}

install
{
    packagemanager
    (
        operation = "install";
        packages = "nano containerd-1.4.10";
        sudo = "true";
        sudoPassword = "mySecurePassword";
    );
}
Updates docker and containerd to the latest versions.
languageversion = "1.0.0";
apiversion = "kubernative/kubeops/sina/user/v4";
name = "kosi-example-packagev3";
description = "kosi-example-package";
version = "0.1.0";
docs = "docs.tgz";
logo = "logo.png";

files =
{
    input = "template.yaml";
}

containers =
{
    example = ["docker.io", "nginx", "latest"];
}

install
{
    packagemanager
    (
        operation = "update";
        packages = "docker containerd";
        sudo = "true";
        sudoPassword = "mySecurePassword";
    );
}
Removes nano from the system.
languageversion = "1.0.0";
apiversion = "kubernative/kubeops/sina/user/v4";
name = "kosi-example-packagev3";
description = "kosi-example-package";
version = "0.1.0";
docs = "docs.tgz";
logo = "logo.png";

files =
{
    input = "template.yaml";
}

containers =
{
    example = ["docker.io", "nginx", "latest"];
}

install
{
    packagemanager
    (
        operation = "remove";
        packages = "nano";
        sudo = "true";
        sudoPassword = "mySecurePassword";
    );
}
Lists all installed packages related to containerd.
languageversion = "1.0.0";
apiversion = "kubernative/kubeops/sina/user/v4";
name = "kosi-example-packagev3";
description = "kosi-example-package";
version = "0.1.0";
docs = "docs.tgz";
logo = "logo.png";

files =
{
    input = "template.yaml";
}

containers =
{
    example = ["docker.io", "nginx", "latest"];
}

install
{
    packagemanager
    (
        operation = "list";
        packages = "containerd";
        sudo = "true";
        sudoPassword = "mySecurePassword";
    );
}
Searches for available kubernetes packages in the YUM repository.
languageversion = "1.0.0";
apiversion = "kubernative/kubeops/sina/user/v4";
name = "kosi-example-packagev3";
description = "kosi-example-package";
version = "0.1.0";
docs = "docs.tgz";
logo = "logo.png";

files =
{
    input = "template.yaml";
}

containers =
{
    example = ["docker.io", "nginx", "latest"];
}

install
{
    packagemanager
    (
        operation = "search";
        packages = "kubernetes";
        sudo = "true";
        sudoPassword = "mySecurePassword";
    );
}
Performs consecutive list operations on kubeadm, one with default settings and another with additional flags.
languageversion = "1.0.0";
apiversion = "kubernative/kubeops/sina/user/v4";
name = "kosi-example-packagev3";
description = "kosi-example-package";
version = "0.1.0";
docs = "docs.tgz";
logo = "logo.png";

files =
{
    input = "template.yaml";
}

containers =
{
    example = ["docker.io", "nginx", "latest"];
}

install
{
    packagemanager
    (
        operation = "list";
        packages = "kubeadm";
        sudo = "true";
        sudoPassword = "mySecurePassword";
    );

    packagemanager
    (
        operation = "list";
        packages = "kubeadm";
        flags = "-y -v";
        sudo = "true";
        sudoPassword = "mySecurePassword";
    );
}
Using packagemanager with the osCheck, if and print plugins
This example shows the interaction of several plugins.
In this example, we use the packagemanager plugin together with the osCheck, if and print plugins to check whether it is the correct operating system and to output a specific message and execute a corresponding Packagemanager operation with the packagemanager plugin:
languageversion = "1.0.0";
apiversion = "kubernative/kubeops/sina/user/v4";
name = "kosi-example-packagemanager-oscheck-if-print";
description = "Example using packagemanager with oscheck and if and print";
version = "0.1.0";
docs = "docs.tgz";
logo = "logo.png";

files =
{
    input = "template.yaml";
}

install
{
    osCheck
    (
        getOSVar = "os";
        getOSVersionVar = "version";
    );

    if (condition = "$os$ = 'CentOS 7'") then
    {
        print(message="Performing Packagemanager operation for CentOS 7..");

        packagemanager
        (
            operation = "install";
            packages = "nano containerd-1.4.10";
            sudo = "true";
            sudoPassword = "mySecurePassword";
        );
    }
    else
    {
        print(message="Other OS recognized instead of CentOS 7, skipping");
    }
}
If os is CentOS 7:
2025-02-26 15:18:28 Info: Performing Packagemanager operation for CentOS 7..
nano and containerd-1.4.10 software packages are installed on the machine.Otherwise:
2025-02-26 15:18:28 Info: Other OS recognized instead of CentOS 7, skipping
else part of the if plugin, nothing else happens in the else part.The PIA plugin (Plugin-based Infrastructure Administrator) is designed to automate administrative tasks in Kubernetes clusters by enabling remote command execution and file transfers. It operates in two modes:
This plugin simplifies managing multiple nodes, making it useful for executing system configurations, software deployments, and maintenance tasks across a cluster.
| Key | Required | Description |
|---|---|---|
mode |
Yes | Defines how PIA operates. Possible values: ssh or k8s. |
nodes |
Yes (or only labels) |
Specifies target nodes where commands should be executed. Either nodes or labels must be set. |
labels |
Yes (or only nodes) |
Defines node selection via labels instead of explicit node names. Either nodes or labels must be set. |
files |
Optional | Lists files to be uploaded before executing the command. Files in ssh mode are uploaded to PIAROOT, located at KUBEOPSROOT/pia. |
command |
Yes | Specifies the command to be executed on the target nodes. |
user |
Yes in ssh mode |
Defines the user for SSH connections. Typically requires root privileges. |
Notes:
- The
userkey is only applicable in SSH mode.- The default path for KUBEOPSROOT is
/var/kubeops- in this case the PIAROOT is in/var/kubeops/pia.
In this example, the PIA plugin transfers template.yaml to specified nodes and executes a command under the root user.
languageversion = "1.0.0";
apiversion = "kubernative/kubeops/sina/user/v4";
name = "kosi-example-package";
description = "kosi-example-package";
version = "0.1.0";
docs = "docs.tgz";
logo = "logo.png";

files =
{
    input = "template.yaml";
}

containers =
{
    example = ["docker.io", "nginx", "latest"];
}

install
{
    pia
    (
        mode = "ssh";
        nodes = "['cluster2master1', 'cluster2master2']";
        files = "['template.yaml']";
        command = "echo Hello World";
        user = "root";
    );
}
template.yaml file is uploaded to PIAROOT, located at KUBEOPSROOT/pia on cluster2master1 and cluster2master2.echo Hello World is executed on each node using SSH.Recommendation: The specified user should have root privileges to execute administrative commands effectively.
In Kubernetes mode, the PIA plugin deploys a custom resource that gets processed by the PIA operator.
languageversion = "1.0.0";
apiversion = "kubernative/kubeops/sina/user/v4";
name = "kosi-example-package";
description = "kosi-example-package";
version = "0.1.0";
docs = "docs.tgz";
logo = "logo.png";

files =
{
    input = "template.yaml";
}

containers =
{
    example = ["docker.io", "nginx", "latest"];
}

install
{
    pia
    (
        mode = "k8s";
        nodes = "['cluster2master1','cluster2master2']";
        files = "['template.yaml']";
        command = "echo Hello World";
    );
}
customresource.yaml in the KUBEOPSROOT/pia directory.template.yaml file is uploaded.Sample installation log:
[root@cluster2admin1 Test_Pia-Plugin]# kosi install -p package.tgz
2024-01-24 12:12:03 Info:      KOSI version: 2.14.0.0_XXXXXXXXXX
2024-01-24 12:12:05 Info:      template.yaml start uploading to webserver.
2024-01-24 12:12:05 Info:      template.yaml successfully uploaded to webserver.
pia.kubeops.net/example-pia created
2024-01-24 12:12:08 Info:      Installation successful
Using pia with the osCheck, if and print plugins
This example shows the interaction of several plugins.
In this example, we use the pia plugin together with the osCheck, if and print plugins to check whether it is the correct operating system and to output a specific message and execute a corresponding PIA operation with the pia plugin:
languageversion = "1.0.0";
apiversion = "kubernative/kubeops/sina/user/v4";
name = "kosi-example-pia-oscheck-if-print";
description = "Example using pia with oscheck and if and print";
version = "0.1.0";
docs = "docs.tgz";
logo = "logo.png";

files =
{
    inputRhel = "rhel8.yaml";
    inputOtherOS = "otherOs.yaml";
}

install
{
    osCheck(getOSVar = "os"; getOSVersionVar = "version");

    if (condition = "$os$ = 'Red Hat Enterprise Linux'") then
    {
        print(message = "Performing PIA operation for RHEL 8..");
        pia
        (
            mode = "ssh";
            nodes = "['cluster2master1']";
            files = "['rhel8.yaml']";
            command = "echo Hello RHEL 8";
            user = "rhel8User";
        );
    }
    else
    {
        print(message = "Other OS recognized instead of RHEL 8, performing alternative PIA operation..");
        pia
        (
            mode = "ssh";
            nodes = "['cluster2master1']";
            files = "['otherOs.yaml']";
            command = "echo Hello other OS";
            user = "otherUser";
        );
    }
}
If os is Red Hat Enterprise Linux:
2025-02-26 15:18:28 Info: Performing PIA operation for RHEL 8..
rhel8.yaml file is uploaded to cluster2master1.echo Hello RHEL 8 is executed on each node using SSH.Otherwise:
2025-02-26 15:18:28 Info: Other OS recognized instead of RHEL 8, performing alternative PIA operation..
otherOs.yaml file is uploaded to cluster2master1.echo Hello other OS is executed on each node using SSH.The PIA operator processes Kubernetes-based PIA tasks by handling deployed Custom Resources.
Note: The following information does not refer directly to the PIA plug-in, but to the CRD via PIA operator and serves as additional information on the functionality of PIA and as a possible alternative use.
values.yaml with registry credentials:pullsecretRegistry: "https://registry.preprod.kubernative.net"
pullsecretUser: "<username>"
pullsecretPassword: "<userpassword>"
piaWebserverNodePort: 31213
Explanation:
pullsecretUserandpullsecretPasswordare authentication credentials for the image registry.piaWebserverNodePortdefines the NodePort service for the PIA web server, which is used to manage uploaded files.
kosi install --hub public kubeops/piaoperator:0.1.0 -f values.yaml
After installation, check if the operator is running:
kubectl get pods -n pia-test
There are two ways to use the operator:
apiVersion: kubeops.net/v1alpha1
kind: Pia
metadata:
  name: hello-world
  namespace: pia-test
spec:
  command: "echo Hello world; sleep 60;"
  jobId: abcdef
  nodes:
  - cluster2worker1
  - cluster2worker3
  labels:
  #- kubeops-zone=zone2
  files:
  #- file1
The Print plugin for KOSI allows users to display messages on the command line during a KOSI package operation. It is particularly useful for debugging, logging, or providing status updates within a KOSI package. You can print multiple messages in succession if needed.
| Key | Mandatory | Description |
|---|---|---|
message |
Yes | The text message to be displayed on the command line. |
This example demonstrates how to print a single message to the command line.
languageversion = "1.0.0";
apiversion = "kubernative/kubeops/sina/user/v4";
name = "kosi-example-packagev3";
description = "kosi-example-package";
version = "0.1.0";
docs = "docs.tgz";
logo = "logo.png";

files =
{
    input = "template.yaml";
}

containers =
{
    example = ["docker.io", "nginx", "latest"];
}

install
{
    cmd(command = "echo Starting the KOSI install package execution...");

    print(message = "Execution has started successfully.");
}
Starting the KOSI install package execution...
2023-12-01 13:38:14 Info: Execution has started successfully.
In this example, multiple messages are printed during different stages of execution.
languageversion = "1.0.0";
apiversion = "kubernative/kubeops/sina/user/v4";
name = "kosi-example-packagev3";
description = "kosi-example-package";
version = "0.1.0";
docs = "docs.tgz";
logo = "logo.png";

files =
{
    input = "template.yaml";
}

containers =
{
    example = ["docker.io", "nginx", "latest"];
}

install
{
    cmd(command = "echo Initializing installation process...");

    print(message = "Step 1: Checking prerequisites...");

    print(message = "Step 2: Downloading required files...");

    print(message = "Step 3: Installation in progress...");

    print(message = "Installation completed successfully.");
}
Initializing installation process...
2023-12-01 13:41:20 Info: Step 1: Checking prerequisites...
2023-12-01 13:41:21 Info: Step 2: Downloading required files...
2023-12-01 13:41:23 Info: Step 3: Installation in progress...
2023-12-01 13:41:25 Info: Installation completed successfully.
Note: The example above does not download and install anything, it only shows a best practice example with the print plugin.
The Service plugin allows you to manage system services by starting, stopping, restarting and checking their status. It acts as a wrapper for the systemctl command, which is commonly used on Linux-based systems to control services.
This plugin is particularly useful for managing important services such as web servers (e.g. nginx, httpd), databases (e.g. mysql, postgresql) and other system daemons within a KOSI package, if the desired service is available on your system.
With the Service plugin, you can:
| Key | Required | Description |
|---|---|---|
name |
Yes | Specifies the name of the service to be managed. |
state |
Yes | Defines the operation to perform on the service. Supported values: start, stop, restart, status. |
sudo |
Optional | If set to true, the command will be executed with elevated privileges. |
sudoPassword |
Yes if sudo is true |
Provides the password for sudo authentication. |
Note: The services in the following examples assume that the corresponding services exist in the system.
This example starts the Apache HTTP Server (httpd).
languageversion = "1.0.0";
apiversion = "kubernative/kubeops/sina/user/v4";
name = "kosi-example-packagev3";
description = "kosi-example-package";
version = "0.1.0";
docs = "docs.tgz";
logo = "logo.png";

files =
{
    input = "template.yaml";
}

containers =
{
    example = ["docker.io", "nginx", "latest"];
}

install
{
    service
    (
        name = "httpd";
        state = "start";
        sudo = "true";
        sudoPassword = "securePassword";
    );
}
This example stops the Apache HTTP Server.
languageversion = "1.0.0";
apiversion = "kubernative/kubeops/sina/user/v4";
name = "kosi-example-packagev3";
description = "kosi-example-package";
version = "0.1.0";
docs = "docs.tgz";
logo = "logo.png";

files =
{
    input = "template.yaml";
}

containers =
{
    example = ["docker.io", "nginx", "latest"];
}

install
{
    service
    (
        name = "httpd";
        state = "stop";
        sudo = "true";
        sudoPassword = "securePassword";
    );
}
Restarting a service can be useful after configuration changes.
languageversion = "1.0.0";
apiversion = "kubernative/kubeops/sina/user/v4";
name = "kosi-example-packagev3";
description = "kosi-example-package";
version = "0.1.0";
docs = "docs.tgz";
logo = "logo.png";

files =
{
    input = "template.yaml";
}

containers =
{
    example = ["docker.io", "nginx", "latest"];
}

install
{
    service
    (
        name = "httpd";
        state = "restart";
        sudo = "true";
        sudoPassword = "securePassword";
    );
}
This command checks whether the httpd service is currently running.
languageversion = "1.0.0";
apiversion = "kubernative/kubeops/sina/user/v4";
name = "kosi-example-packagev3";
description = "kosi-example-package";
version = "0.1.0";
docs = "docs.tgz";
logo = "logo.png";

files =
{
    input = "template.yaml";
}

containers =
{
    example = ["docker.io", "nginx", "latest"];
}

install
{
    service
    (
        name = "httpd";
        state = "status";
        sudo = "true";
        sudoPassword = "securePassword";
    );
}
Using service with the osCheck, if and print plugins
This example shows the interaction of several plugins.
In this example, we use the service plugin together with the osCheck, if and print plugins to check whether it is the correct operating system and to output a specific message and execute a corresponding operation with the service plugin:
languageversion = "1.0.0";
apiversion = "kubernative/kubeops/sina/user/v4";
name = "kosi-example-service-oscheck-if-print";
description = "Example using service with oscheck and if and print";
version = "0.1.0";
docs = "docs.tgz";
logo = "logo.png";

files =
{
    input = "template.yaml";
}

install
{
    osCheck
    (
        getOSVar = "os";
        getOSVersionVar = "version";
    );

    if (condition = "$os$ = 'Red Hat Enterprise Linux'") then
    {
        print(message = "Performing stop service for RHEL 8..");

        service
        (
            name = "rhelService";
            state = "stop";
            sudo = "true";
            sudoPassword = "securePassword";
        );
    }
    else
    {
        print(message = "Other OS recognized instead of RHEL 8, performing stop for an alternative service..");

        service
        (
            name = "differentService";
            state = "stop";
            sudo = "true";
            sudoPassword = "securePassword";
        );
    }
}
If os is Red Hat Enterprise Linux:
2025-02-26 15:18:28 Info: Performing stop service for RHEL 8..
rhelService service has been stopped.Otherwise:
2025-02-26 15:18:28 Info: Other OS recognized instead of RHEL 8, performing stop for an alternative service..
differentService service has been stopped.The ‘set’ Plugin allows you to set variables inside a KOSI process to get access for other plugin calls.
| Key | Description | |
|---|---|---|
| variable | Mandatory | The variable name for accessing the variable. |
| value | Mandatory | The value of the variable. |
{{ vars.myvariable }}
usecase: "user" #or "kubeops"
languageversion = "1.0.0";
apiversion = "kubernative/kubeops/sina/user/v4";
name = "kosi-set-demo-package";
description = "kosi-set-demo-package";
version = "0.1.0";
docs = "docs.tgz";
logo = "logo.png";

files =
{
    input = "template.yaml";
}

install
{
    set
    (
        variable = "kubeopsvariable";
        value = "Hello KubeOps";
    );

    set
    (
        variable = "uservariable";
        value = "Hello User, you use the set-plugin";
    );

    set
    (
        variable = "ifcondition";
        value = "{{ values.usecase }}";
    );

    if(condition = "$vars.ifcondition$ = 'user'";) then
    {
        print(message = "Your ifcondition-variable: {{ vars.ifcondition }}");
        print(message = "Your usecase-values: {{ values.usecase }}");
        print(message = "Your user-variable: {{ vars.uservariable}}");
    } else
    {
        print(message = "Your ifcondition-variable: {{ vars.ifcondition }}");
        print(message = "Your usecase-values: {{ values.usecase }}");
        print(message = "Your kubeops-variable:{{ vars.kubeopsvariable }}");
    }
    print(message = "This will always print.");
}
[root@localhost]# kosi install -p package.tgz -f values.yaml
2025-03-10 11:30:56 Info:      KOSI version: 2.14.0.0_XXXXXXXXXX
2025-03-10 11:30:57 Info:      Your ifcondition-variable: user
2025-03-10 11:30:57 Info:      Your usecase-values: user
2025-03-10 11:30:57 Info:      Your user-variable: Hello User, you use the set-plugin
2025-03-10 11:30:57 Info:      This will always print.
2025-03-10 11:30:57 Info:      Installation successful.
or with usecase => kubeops
[root@localhost]# kosi install -p package.tgz -f values.yaml
2025-03-10 11:22:04 Info:      KOSI version: 2.14.0.0_XXXXXXXXXX
2025-03-10 11:22:05 Info:      Your ifcondition-variable: kubeops
2025-03-10 11:22:05 Info:      Your usecase-values: kubeops
2025-03-10 11:22:05 Info:      Your kubeops-variable:Hello KubeOps
2025-03-10 11:22:05 Info:      This will always print.
2025-03-10 11:22:05 Info:      Installation successful.
The sh plugin is used to execute shell commands. It allows users to define commands that will be executed in a shell environment during the execution of a kosi package. This plugin is useful for automating system administration tasks, configuring environments, or executing necessary shell operations within a controlled setup.
It supports executing single commands as well as multiple commands separated by a semicolon (;). Additionally, the plugin provides an option to execute commands with elevated privileges (sudo).
| Key | Description | |
|---|---|---|
| command | Mandatory | Contains a string representing a shell command or a sequence of commands to be executed. Multiple commands can be specified, separated by a semicolon (;). |
| sudo | Optional | Set to true to execute the plugin with sudo privileges. |
| sudoPassword | Mandatory if you use sudo | Set sudo password. Only required, if the key sudo is set to true. |
languageversion = "1.0.0";
apiversion = "kubernative/kubeops/sina/user/v4";
name = "kosi-example-shell-package";
description = "kosi-example-shell-package";
version = "0.1.0";
docs = "docs.tgz";
logo = "logo.png";

files =
{
    input = "template.yaml";
}

install
{
    sh(command = "echo hello world");
}
languageversion = "1.0.0";
apiversion = "kubernative/kubeops/sina/user/v4";
name = "kosi-example-shell-package";
description = "kosi-example-shell-package";
version = "0.1.0";
docs = "docs.tgz";
logo = "logo.png";

files =
{
    input = "template.yaml";
}

install
{
    sh(command = "echo foo; echo bar");
}
languageversion = "1.0.0";
apiversion = "kubernative/kubeops/sina/user/v4";
name = "kosi-example-shell-package";
description = "kosi-example-shell-package";
version = "0.1.0";
docs = "docs.tgz";
logo = "logo.png";

files =
{
    input = "template.yaml";
}

install
{
    sh(
        command = "reboot now";
        sudo = "true";
        sudoPassword = "topsecret";
    );
}
sh with the set and if pluginsThis example shows the interaction of several plug-ins.
In this example, we use the sh plugin together with the set and if plugins to check a condition (which is set before) before executing a shell command:
languageversion = "1.0.0";
apiversion = "kubernative/kubeops/sina/user/v4";
name = "kosi-example-shell-if";
description = "Example using sh with set and if";
version = "0.1.0";
docs = "docs.tgz";
logo = "logo.png";

files =
{
    input = "template.yaml";
}

install
{
    set
    (
        variable = "myVar";
        value = "Hello";
    );

    if (condition = "$vars.myVar$ = 'Hello'") then
    {
        sh(command = "echo Variable is 'Hello'");
    }
    else
    {
        sh(command = "echo Variable is not 'Hello'");
    }
}
If myVar is Hello:
2025-02-26 15:18:28 Info: Variable is 'Hello'
If myVar is not Hello:
2025-02-26 15:18:28 Info: Variable is not 'Hello'
The sudo plugin allows executing commands with elevated (sudo) rights within a KOSI package. This is necessary for operations that require administrative privileges, such as modifying system files or managing users.
The sudo plugin wraps other plugin calls that need elevated permissions. When using sudo, commands inside its block are executed with superuser privileges.
The sudo plugin requires a sudo password unless NOPASSWD is configured for the executing user. The NOPASSWD option can be set in the /etc/sudoers file to allow password-less sudo execution for specific users or commands.
| Key | Description | |
|---|---|---|
| password | Mandatory if NOPASSWD is not set |
Set sudo password. |
The following example demonstrates how to use the sudo plugin to create a new user with administrative privileges:
languageversion = "1.0.0";
apiversion = "kubernative/kubeops/sina/user/v4";
name = "kosi-example-package";
description = "kosi-example-package";
version = "0.1.0";
docs = "docs.tgz";
logo = "logo.png";

files =
{
    input = "template.yaml";
}

containers =
{
    example = ["docker.io", "nginx", "latest"];
}

install
{
    cmd(command = "echo --- Using the sudo plugin. ---");

    sudo(password = "myPassword")
    {
        bash(command = "echo The password is correct, the new user is now created!");
        cmd(command = "useradd newuser");
    }

    cmd(command = "echo --- End. ---");
}
NOPASSWDThe NOPASSWD option can be set in the /etc/sudoers file or in a separate file under /etc/sudoers.d/. To allow a user to run sudo commands without entering a password, add the following line:
username ALL=(ALL) NOPASSWD: ALL
Replace username with the actual user’s name.
The sudo plugin can be used with the following plugins that often require elevated privileges:
The KOSI Template Plugin allows users to process and generate configuration files based on predefined templates. By specifying a template file (tmpl) and a target file (target), the plugin dynamically replaces placeholders with actual values retrieved from various sources, such as the KOSI package itself or user-defined values.
This plugin is particularly useful when you need to create configuration files dynamically by integrating predefined values into a structured template. It enables flexibility and automation in generating configuration files for different environments.
The template file (tmpl) consists of placeholders enclosed in double curly braces ({{ }}). These placeholders reference values from configuration files such as the KOSI package itself or user-defined .yaml files. When the plugin processes the template, it replaces these placeholders with the actual values and saves the result in the specified target file.
The plugin utilizes the Scriban templating engine to replace placeholders. Try Scriban Online.
You can use dot notation to navigate through the YAML structure:
package.values.| Key | Mandatory | Description |
|---|---|---|
tmpl |
Yes | Specifies the template file (YAML format) that contains placeholders. |
target |
Yes | Defines the output file where the processed template will be saved. This can be a relative or absolute path. |
This example demonstrates how to use the template plugin to generate a configuration file from a template.
languageversion = "1.0.0";
apiversion = "kubernative/kubeops/sina/user/v4";
name = "kosi-example-package";
description = "kosi-example-package";
version = "0.1.0";
docs = "docs.tgz";
logo = "logo.png";

files =
{
    input = "template.yaml";
}

install
{
    template
    (
        tmpl = "template.yaml";
        target = "result.yaml";
    );
}
Consider the following template.yaml file:
api: {{package.apiversion}}
package:
  name: {{package.name}}
  version: {{package.version}}
  input_file: {{package.includes.files.input}}
  container_registry: {{package.includes.containers.example.registry}}
values:
  primary_ip: {{values.ipNormal}}
  first_listed_ip: {{values.IPList[0]}}
Corresponding package.kosi Example:
languageversion = "1.0.0";
apiversion = "kubernative/kubeops/sina/user/v4";
name = "kosi-example-packagev3";
description = "kosi-example-package";
version = "0.1.0";
docs = "docs.tgz";
logo = "logo.png";

files =
{
    input = "template.yaml";
}

containers =
{
    example = ["docker.io", "nginx", "latest"];
}

install
{
    template
    (
        tmpl = "template.yaml";
        target = "/user/output/result.yaml";
    );
}
Corresponding values.yaml Example:
IPList:
  - "127.0.0.1"
  - "192.128.16.1"
  - "192.128.18.14"
ipNormal: "12.10.45.23"
After we have built the KOSI package with kosi build, we install the created package and include the values.yaml by executing kosi install -p package.tgz -f values.yaml.
result.yamlAfter executing the KOSI install command, result.yaml would contain:
api: kubernative/kubeops/sina/user/v4
package:
  name: kosi-example-packagev3
  version: 0.1.0
  input_file: template.yaml
  container_registry: docker.io
values:
  primary_ip: 12.10.45.23
  first_listed_ip: 127.0.0.1
As already explained in the summary, you can use dot notation to navigate through the YAML structure.
To access values from the KOSI package itself (package.kosi):
name: {{package.name}}
To reference a deeply nested value, use dot notation:
input_file: {{package.includes.files.input}}
The input-element in the KOSI package is accessible with
package.includes.files.input, because the input element is nested inside the files tree, which itself is part of the includes hierarchy.
A plugin is a task a task that can be executed in a kosi package. The Plugins are selsected in the tasks tree in the batch.yaml. The plugin gets passed a parameter tree, which can be read in the plugin.
There are two important classes: the version class and the info class. An overview of the versions of the plugins is in the info class. The class must inherit from the iplugininfo class. a forwarding to the individual version classes is important: Also there is a function which returns a list with all versions of the plugin.
The Logic of the plugin lies in run method in the version class.
The run method gets a sandbox and the parameter-tree passed.
public void Run(ISandbox sandbox, ITree parameter) {
the lint function of the version class checks the tree for the plugin if the parameter-tree is correct. A function for returning the name and version of The plugin is also obligatory.
Sandbox is a class which contains data for the plugin. An example would be the storage space of the package.yaml, which defines the kosi package. You can also set variables in the sandbox.
ITree config = sandbox.GetVariable("config");
You can also get an instance of the logger from the sandbox. with the getlogginmanager() method you can access the logger.
sandbox.GetLoggingManager().Debug1("plugin-template", $"run template plugin");
The method after get logging menager determines the logging level. There are four logging levels:
The first parameter determines the channel. It is recommended that you name it after your plugin. The message for the logging is the second parameter.
The sandbox can create a instance of a fio file, which can be written on hard disk. This fio file has a Tree, which can be modified with the fio-tool.
IFile templateYaml = sandbox.NewFio();
the element of the tree can be accessed with the fio-tool. Fio is included in the toolchain.dll. These Tree have elements and/or subtrees. A element in Fio has only one key and an associated value.
string kosiFileName = (string)templateyaml.GetElement($"apiversion").Value;
when you want to access a subtree, you can use a point structure.
string kosiFileName = (string)templateyaml.GetElement($"import.files.{fileElement}").Value;
In contrast, a subtree can have multiple elements with associated values. “Value” is the keyword for using the value of the element-key.
ITree mergeduservalues = config.GetSubTree("mergedFioFiles");
You have to possibility to use other plugins, the sandbox has also the runPLugin() function. In this example we use the print plugin with a tree as a parameter for the print plugin. The tree have to be the same as the tree you use within the run tree in the batch.yaml for the plugin.
sandbox.RunPlugin("print", parameter);
the parameter-tree can be created with fio. the name of the plguin does not have to be within the parameter-tree. Fio has the option to set parameters, so for example the creation of the parameter-tree for the print-plugin can be like that:
Itree parameter = new Tree();
parameter.setElement("message","now the print plugin can be run!");
sandbox.RunPlugin("print", parameter);
This Guide shows you all the different kind of fileformats KOSI uses and how to use them.
Default-installation-location for:
/var/kubeops/kosi/config.yaml
Location for usage:$KUBEOPSROOT/kosi/config.yaml
The config.yaml file contains all necessary files for networking and logging. For example, config.yaml contains the hub from which the packages are downloaded.
If you have custom values for your config you have to put these in the $KUBEOPSROOT/kosi/config.yaml.
If KOSI can not find the config.yaml, it will use default like the example.
apiversion: kubernative/sina/config/v2                # Shows the supported API-Version
spec:
  hub: https://hub.kubernative.net/v4/dispatcher/     # Adress to the KOSI online hub
  plugins: /kubeops/kosi/kosi-plugins/                # Location of the KOSI-Plugins
  workspace: /tmp/kosi/process/                       # Workspace Path
  logging: info                                       # Loglevel options: info (default), warning, error, debug1, debug2, debug3
housekeeping: true # Housekeeping options: true (all temporary created files and images (-r flag) will be deleted), false (all temporary created files and images won't be deleted)If a $KUBEOPSROOT variable is set and then Kosi is installed or removed and reinstalled, the kosi config.yaml must be adapted to the path of the previously set $KUBEOPSROOT variable. Otherwise Kosi takes the default value which is /var/kubeops/kosi/config.yaml.
#apiversion: kubernative/sina/config/v2                # Shows the supported API-Version
#spec:
  #hub: https://hub.kubernative.net/v4/dispatcher/     # Adress to the KOSI online hub
 --> plugins: /kubeops/kosi/kosi-plugins/              # Location of the KOSI-Plugins
  #workspace: /tmp/kosi/process/                       # Workspace Path
  #logging: info                                       # Loglevel options: info (default), warning, error, debug1, debug2, debug3
  #housekeeping: true                                  # Housekeeping options: true (all temporary created files and images (-r flag) will be deleted), false (all temporary created files and images won't be deleted)
If you want to use your own Hub you can create a user-specific config.yaml file. The original file can be changed too, but it is not recommended.
In KOSI there are two ways to template values and one of them is using a values.yaml the other is using the template.yaml. In a normal values.yaml you can do value templating like in helm.
In the example is a package.kosi with an if-plugin call, where the condition is templated.
firstparam: 1
secondparam: 2
More information about the if-plugin can be find here if-plugin Reference.
languageversion = "1.0.0";
apiversion = "kubernative/kubeops/sina/user/v4";
name = "kosi-example-packagev3";
description = "kosi-example-package";
version = "0.1.0";
docs = "docs.tgz";
logo = "logo.png";

files =
{
    input = "template.yaml";
}

containers =
{
    example = ["docker.io", "nginx", "latest"];
}

install
{
    cmd(command = "echo using if plugin");

    if (condition = "{{values.firstparam}}<2") then
    {
        cmd(command = "echo using templated values.")
        cmd(command = "echo {{values.firstparam}} is smaller than 2");
    }
    else
    {
        cmd(command = "echo {{values.firstparam}} is bigger than 2");
    }
}In KOSI there are two ways to template values and one of them is using a template .yaml the other is using the values.yaml. This type of templating works with the template-plugin.
For more information about the template syntax check the Scriban documentation (https://github.com/scriban/scriban/blob/master/doc/language.md) and try it out in the online demo (https://scribanonline.azurewebsites.net).
package:
file: {{package.includes.files.input}}The package.kosi defines properties of a KOSI package (.tgz). A default package.kosi is created after a
kosi create-command.
There are a few metadata and they are mandatory.
| Parameter | Description |
|---|---|
| languageversion | KOSI language version specification. |
| apiversion | KOSI package version sepcification. |
| name | Set the name of the package, which will displayed on the hub. |
| description | Set the description of the package, which will displayed on the hub. |
| version | Set the description of the package, which will displayed on the hub.The Versioning is semantic (“major.minor.patch” example: 1.0.1) |
| docs | A Tgz with the documentation of the package, which contains Markdown files. |
| logo | A PNG for a logo of the package. |
IMPORTANT: Only use a fully lowercase as name for your package.
Note: Do not change name for logo.png and docs.tgz.
Note: Please name your markdown files inside docs.tgz without versions (docs/documentation-1.0.0.md).
The containers element is used for docker images. The methods which are used in the package.
The files element describes the files which are inluded in the KOSI package.
The installation tree describes the tasks (KOSI plugins), which are executed with the kosi install command.
The update tree describes the tasks (KOSI plugins), which are executed with the kosi update command.
The delete tree describes the tasks (KOSI plugins), which are executed with the kosi delete command.
languageversion = "0.1.0";
apiversion = "kubernative/kubeops/sina/user/v4";
name = "kosi-example-packagev3";
description = "kosi-example-package";
version = "0.1.0";
docs = "docs.tgz";
logo = "logo.png";

files =
{
    input = "template.yaml";
}

containers =
{
    example = ["docker.io", "nginx", "latest"];
}

install
{
    cmd(command = "touch ~/kosiExample1");
}

update
{
    cmd(command = "touch ~/kosiExample2");
}

delete
{
    cmd(command = "rm ~/kosiExample1");
    cmd(command = "rm ~/kosiExample2");
}The package.yaml defines properties of a KOSI package (.tgz). A package.yaml is created after a kosi build-command with a valid package.kosi file.
There are a few metadata and they are mandatory.
| Parameter | Description |
|---|---|
| languageversion | KOSI language version specification. |
| apiversion | KOSI package version sepcification. |
| name | Set the name of the package, which will displayed on the hub. |
| description | Set the description of the package, which will displayed on the hub. |
| version | Set the version of the package, which will displayed on the hub. |
| docs | A Tgz with the documentation of the package, which contains Markdown files. |
| logo | A PNG for a logo of the package. |
IMPORTANT: Only use a fully lowercase as name for your package.
Note: Do not change name for logo.png and docs.tgz.
Note: Please name your markdown files inside docs.tgz without versions (docs/documentation-1.0.0.md).
The includes.containers element is used for docker images. The methods which are used in the package.
The includes.files element describes the files which are inluded in the KOSI package.
The installation tree describes the tasks (KOSI plugins), which are executed with the kosi install.tasks command.
The update.tasks tree describes the tasks (KOSI plugins), which are executed with the kosi update command.
The delete.tasks tree describes the tasks (KOSI plugins), which are executed with the kosi delete command.
# languageversion: "0.1.0"
apiversion: "kubernative/kubeops/sina/user/v4"
name: "kosi-example-packagev3"
description: "kosi-example-package"
version: "0.1.0"
docs: "docs.tgz"
logo: "logo.png"
includes:
  files:
    input: "template.yaml"
  containers:
    example:
      registry: "docker.io"
      image: "nginx"
      tag: "latest"
installation:
  tasks:
    - cmd:
        command: "touch ~/kosiExample1"
update:
  tasks:
    - cmd:
        command: "touch ~/kosiExample2"
delete:
  tasks:
    - cmd:
        command: "rm ~/kosiExample1"
    - cmd:
command: "rm ~/kosiExample2"The KOSI package contains all metadata and installation, update and delete tasks. A package.tgz is created after a kosi build-command with a valid package.kosi file.
The package.tgz is the artefact that will pushed on the KubeOpsHub. There are some default files, that are always included in the KOSI package, beside your included files.
A package.tgz is created after a kosi build-command with a valid package.kosi or package.yaml file.
Note: package.kosi will be preferred in the building process
| File | Description |
|---|---|
| docs.tgz | A Tgz with the documentation of the package, which contains Markdown files. |
| logo.png | A PNG for a logo of the package. |
| package.yaml | KOSI language translated package.yaml for task. execution. |
| template.yaml | KOSI template.yaml for templating values. |
This Guide explains the basic Structure of the package.kosi File using the if and cmd Plugins
languageversion = "1.0.0";
apiversion = "kubernative/kubeops/sina/user/v4";
name = "kosi-example-packagev3";
description = "kosi-example-package";
version = "0.1.0";
docs = "docs.tgz";
logo = "logo.png";

files =
{
    input = "template.yaml";
}

containers =
{
    example = ["docker.io", "nginx", "latest"];
}

install
{
    cmd(command = "echo using if plugin");

    if (condition = "{{values.firstparam}}<2") then
    {
        cmd(command = "echo using templated values.")
        cmd(command = "echo {{values.firstparam}} is smaller than 2");
    }
    else
    {
        cmd(command = "echo {{values.firstparam}} is bigger than 2");
    }
}There are a few metadata and they are mandatory.
| Parameter | Description |
|---|---|
| languageversion | KOSI language version specification. |
| apiversion | KOSI package version sepcification. |
| name | Set the name of the package, which will displayed on the hub. |
| description | Set the description of the package, which will displayed on the hub. |
| version | Set the description of the package, which will displayed on the hub. The Versioning is semantic (“major.minor.patch” example: 1.0.1) |
| docs | A Tgz with the documentation of the package, which contains Markdown files. |
| logo | A PNG for a logo of the package. |
files =
{
    input = "template.yaml";
}
The includes.files element describes the files which are inluded in the KOSI package.
containers =
{
    example = ["docker.io", "nginx", "latest"];
}
- The includes.containers element is used for docker images. The three element array clearly encodes exactly what KOSI needs to pull an image: the registry (docker.io), the repository (nginx) and the tag (latest).
- When you build the package, that shorthand is rewritten into YAML form inside package.yaml.
- the template exposes everything under the root object package. After the build, you can reference any part of the container definition with dot notation. Registry for “example” would be:
{{package.includes.containers.example.registry}}
install
{
    cmd(command = "echo using if plugin");

    if (condition = "{{values.firstparam}}<2") then
    {
        cmd(command = "echo using templated values.")
        cmd(command = "echo {{values.firstparam}} is smaller than 2");
    }
    else
    {
        cmd(command = "echo {{values.firstparam}} is bigger than 2");
    }
}
In this section the logic of the used Pulgins is described.
The cmd Plugin is for executing commands in the commandline and the if Plugin is for creating conditions, under which other plugins are executed.
The main used Trees are Install for installing a new package, Update for updating Packages and Uninstall for uninstalling packages.
This guide explains how to use KOSI with detailed instructions and examples.
kosi:
  Kosi is a software installer for kubernetes cluster

Usage:
  Kosi [options] [command]

Options:
  --version         Show version information
  -?, -h, --help    Show help and usage information

Commands:
  login                    logs you in
  search                   Shows you all the available packages on the softwarehub
  build                    Creates your final kosi.package
  push                     Push package.tgz to KubeOps Hub.
  pull <package>           Downloads an existing package from the hub without installing.
  install <packagename>    install a .tgz file and if it is required, download it
  update <packagename>     update a .tgz file and if it is required, download it
  delete <packagename>     run delete section of a .tgz file and if it is required, download it
  list                     List packages from storage
  lint                     lint your files for your .tgz package
  create                   Creates a package.kosi and a template.yaml for you to manipulate
  version                  Basic infos about KOSI
  logout                   Logout
  remove <package>         Gives you the possibility to remove packages from the hub, if you have write permissions.
  encrypt                  Gives you the possibility to encrypt your values with a password.
  check <hash>             check your local package hash
  manage                   Manage permissions for users and groups
The command kosi --help gives you an overview of all available commands:
kosi --help
Alternatively, you can also enter kosi or kosi -? in the command line.
The kosi version command shows you the current version of KOSI.
kosi version
The output should be:
2026-01-23 08:57:23 Info:      KOSI version: 2.14.0.0
2026-01-23 08:57:23 Info:      Latest KOSI-package-apiversion: kubernative/kubeops/sina/user/v4
2026-01-23 08:57:23 Info:      Latest KOSI-lanugage-version is: 1.0.0
2026-01-23 08:57:23 Info:      This work is licensed under Creative Commons Attribution - NoDerivatives 4.0 International License(see https://creativecommons.org/licenses/by-nd/4.0/legalcode for more details).
2026-01-23 08:57:23 Info:      © KubeOps GmbH, Hinter Stöck 17, 72406 Bisingen - Germany, 2025
The command kosi create creates four files (package.kosi, template.yaml, logo.png and docs.tgz) in the current directory. These files can be edited by the user.
kosi create
Created files:
The kosi build command creates the necessary yaml files for building a package:
kosi build
All files specified in the package.kosi are combined together with the package.yaml to form a KOSI package.
The -o parameter is used to specify your own package name.
kosi build -o mypackage.tgz
package.tgz.
The -r parameter is used to push your container images to a registry at build time.
Additionally, the image references in the package are rewritten to this registry.
kosi build -r registry.kubeops.net/myuser
The kosi lint command is used to check whether the contents of the package.yaml or package.kosi files are valid:
kosi lint
The kosi login command logs on to the KubeOps services. The account name is required for this command.
After the flag -u type your username.
Afterwards you will be asked to enter your password.
kosi login -u <username>
The parameter -p is used to enter the password in the command directly, but it is important to know that the password will be shown in plain text. This parameter can help with the automation of KOSI commands.
kosi login -u <username> -p <password>
The -u parameter is used to specify the user name.
kosi login -u
The -p parameter is used to specify the password.
kosi login -p
The kosi logout command logs out from the KubeOps services.
kosi logout
The kosi push command uploads KOSI packages to the KubeOps Hub:
kosi push --hub <hubname>
kosi login command.
The --hub parameter is used to upload KOSI packages to a specific hub, e.g. in this example we upload our KOSI package to the myhub hub.
kosi push --hub myhub
The kosi pull command downloads a specific KOSI package from the hub without installing it directly.
kosi pull --hub <hubname> <packagename> -o <desired name>
kosi pull downloads the package to the current directory.
Example:
kosi pull --hub myhub donald/kosi-print-test:0.0.1 -o printpackage
The --hub parameter is used to download KOSI packages to a specific hub, e.g. in this example we are pulling our KOSI package from the myhub hub.
kosi pull --hub myhub kubeops/harbor:1.1.0
The parameter r can be used to pull the docker images which are included in the package to a given local docker registry.
kosi pull --hub <hubname> <packagename> -o <desired name> -r <local.docker.registry>
kosi pull downloads the package and pulls the required docker images to the given local docker registry.
Example:
kosi pull --hub myhub kubeops/harbor:1.1.0 -o harborpackage -r 127.0.0.1:5000
Note: After the
kosi pull --hub myhub kubeops/harbor:1.1.0 -o printpackage -r 127.0.0.1:5000command you can usekosi install -p printpackage.tgzto use the docker image from your local docker registry.
For the szenario that the registry of the cluster is exposed to the admin via a network internal domain name, but this name can’t be resolved by the nodes, the flag -t can be used, to use the cluster internal hostname of the registry.
kosi pull --hub <hubname> <packagename> -o <desired name> -r <local.docker.registry> -t <cluster.internal.registry>
kosi pull --hub myhub kubeops/harbor:1.1.0 -o harborpackage -r myregistry:5000 -t clusterregistry:5000
The kosi search command displays all available packages of your own private hub. Only the logged in user can see the packages on his private hub.
The User column contains the name of the creator of the package.
The Name column contains the name of the package.
The Version column contains the version of the package.
The Description column contains the description of the package.
The Install column contains a string consisting of the name of the creator, name and version of the package. This string can be copied and used for the kosi install command.
kosi search --hub <hubname>
Example: User donald is logged in and wants to get the packets from his private hub:
kosi search --hub kosi-enterprise
| User | Name               | Version      | Description             | Install                              |
|------|--------------------|--------------|-------------------------|--------------------------------------|
| kosi | enterprise-plugins | 1.7.0        | KOSI Enterprise Plugins | kosi/enterprise-plugins:1.7.0        |
| kosi | enterprise-plugins | 1.7.1        | KOSI Enterprise Plugins | kosi/enterprise-plugins:1.7.1        |
| kosi | enterprise-plugins | 2.0.0        | KOSI Enterprise Plugins | kosi/enterprise-plugins:2.0.0        |
The --ps parameter can be used to filter for keywords that refer to all five columns. It is also possible to filter by individual word components:
kosi search --hub <hubname> --ps <name>
Example:
In this case, all packets containing the word private are displayed:
kosi search --hub kubeops --ps k9s
| User    | Name | Version  | Description | Install              |
|---------|------|----------|-------------|----------------------|
| kubeops | k9s  | v0.50.16 | Install k9s | kubeops/k9s:v0.50.16 |
| kubeops | k9s  | v0.50.18 | Install k9s | kubeops/k9s:v0.50.18 |
In addition, there is an option to search for packages on a specific hub using the --hub parameter. You need no login to search in the myhub hub.
kosi search --hub myhub
| User   | Name         | Version | Description                      |Install                  |
|--------|--------------|---------|----------------------------------|-------------------------|
| kosi   | lima         | 0.6.2   | installs LIMA                    | kosi/lima:0.6.2         |
| kosi   | installation | 0.0.1   | kosi create example package.yaml | kosi/installation:0.0.1 |
| donald | elk-kosi     | 0.0.1   | ELK installation                 | donald/elk-kosi:0.0.1   |
| donald | prod-test    | 0.0.1   | test for prod                    | donald/prod-test:0.0.1  |
| lima   | lima         | 0.6.0   | installs LIMA                    | lima/lima:0.6.0         |
The parameters --hub and --ps can be combined for a targeted search in the kosi hub:
kosi search --hub <hubname> --ps <package_name>
Example:
The user kosi wants to display all packages in the kosi hub with the term “lima”.
kosi search --hub kosi --ps lima
| User | Name         | Version | Description                      |Install                  |
|------|--------------|---------|----------------------------------|-------------------------|
| kosi | lima         | 0.6.2   | installs LIMA                    | kosi/lima:0.6.2         |
| kosi | lima         | 0.7.1   | installs LIMA                    | kosi/lima:0.7.1         |
The kosi encrypt command is used to encrypt YAML files with AES-256-CBC:
The parameter -f must be used to use yaml files from the user.
kosi encrypt -f <user.yaml>
-f parameter can be specified any number of times to use any number of files.
kosi encrypt -f userfile1.yaml -f userfile2.yaml -f userfile3.yaml
The kosi install command installs a KOSI package:
kosi install --hub <hubname> <package>
Install in the output of kosi search is required:
Example:
The package livedemo of the user kosi with version 2.7.1 is to be installed from the myhub Hub:
kosi install --hub myhub kosi/livedemo:2.7.1
The --hub parameter must be used to install packages from the software hub. Only the logged in user can install the packages from the software hub.
kosi install --hub <hubname> <package>
Example:
The package livedemo of the user kosi with version 2.7.1 is to be installed from the myhub Software Hub:
kosi install --hub myhub kosi/livedemo:2.7.1
The “p” parameter must be used to install local packages. For “p” parameter you need no --hub:
kosi install -p package.tgz
The parameter f must be used to use .yaml files from the user.
kosi install <package> -f <user.yaml>
Example:
The package livedemo of the user kosi with version 2.7.1 is to be installed from the myhub software hub and user specific files are to be used for the installation:
kosi install --hub myhub kosi/livedemo:2.7.1 -f userfile1.yaml -f userfile2.yaml -f userfile3.yaml
-f parameter can be specified any number of times to use any number of files.
-f parameter can also be combined with the --hub parameter.
The parameter --cf must be used to use encrypted yaml files from the user.
kosi install <package> --cf <encryptedUser.yaml>
Example:
The package livedemo of the user kosi with version 2.7.1 is to be installed from the myhub software hub and user specific encrypted files are to be used for the installation:
kosi install --hub myhub kosi/livedemo:2.7.1 --cf encryptedUserfile1.yaml --cf encryptedUserfile2.yaml --cf encryptedUserfile3.yaml
--cf parameter can be specified any number of times to use any number of encrypted files.
--cf parameter can also be combined with the --hub parameter.
--cf parameter can also be combined with the -f parameter.
-f with --cf, you must specify the -f parameter first before specifying --cf!
Example:
kosi install --hub myhub kosi/livedemo:2.7.1 -f userfile1.yaml -f userfile2.yaml --cf encryptedUserfile1.yaml --cf encryptedUserfile2.yaml
The namespace parameter can be used to specify a Kubernetes namespace in which the installation is to be performed.
kosi install --hub <hubname> <package> --namespace <namespace>
Example:
The package livedemo of the user kosi with version 2.7.1 is to be installed from the myhub software hub and a custom kubernetes namespace is used:
kosi install --hub myhub kosi/livedemo:2.7.1 --namespace MyNamespace
--namespace parameter is specified, the namespace default will be used.
The parameter dname can be used to save the package under a specific name.
kosi install --hub <hubname> <package> --dname <deploymentname>
Example:
The package livedemo of the user kosi with version 2.7.1 is to be installed from the myhub software hub and a deployment name is set:
kosi install --hub myhub kosi/livedemo:2.7.1 --dname MyDeployment
--dname parameter is specified, a random deployment name will be generated.
/<user>/var/kubeops/kosi/deployment.yaml.
The kosi list command lists all installed KOSI packages:
kosi list
 KOSI version: 2.10.0_preAlpha0
| Deployment       | Package                           | PublicHub | Hub    |
|------------------|-----------------------------------|-----------|--------|
| kosiinstallslima | kosi/lima:0.6.2                   |           | private|
| kosicreatetest   | kosi/kosi-create:0.0.1            |           | public |
| plugininstall    | local/kubeops-basic-plugins:0.4.0 |           | local  |
The kosi update command updates an already installed KOSI package:
kosi update --hub <hubname> --dname <deploymentname> <package>
Install in the output of kosi search is required:
Example:
The installation of the package lima from the user kosi with version 0.6.2 and deployment name kosiInstallsLima is updated by a package from the myhub Software Hub from kosi.:
kosi update --hub myhub --dname kosiInstallsLima kosi/kosi/lima:0.6.2
The --hub parameter must be used to update packages from the software hub. Only the logged in user can update the packages from the software hub.
kosi update --hub <hubname> <package>
Example:
The package livedemo of the user kosi with version 2.7.1 is to be updated from the myhub Software Hub:
kosi update --hub myhub kosi/livedemo:2.7.1
```create:0.0.1
The “p” parameter must be used to update the installation from a local package. For “p” parameter you need no --hub parameter:
kosi update -p package.tgz
The parameter f must be used to use yaml files from the user.
kosi update --hub <hubname> <package> -f <user.yaml>
Example:
The installation of the package livedemo of the user kosi with version 2.7.1 is updated by a package from the myhub software hub and user specific files are to be used for the update progress:
kosi update --hub myhu kosi/livedemo:2.7.1 -f userfile1.yaml -f userfile2.yaml -f userfile3.yaml
Note: The
-fparameter can be specified any number of times to use any number of files. Note: The-fparameter can also be combined with the--hubparameters.
The parameter --cf must be used to use encrypted yaml files from the user.
kosi update --hub <hubname> <package> --cf <encryptedUser.yaml>
Example:
The installation of the package livedemo of the user kosi with version 2.7.1 is updated by a package from the myhub software hub and user specific encrypted files are to be used for the update progress:
kosi update --hub myhub kosi/livedemo:2.7.1 --cf encryptedUserfile1.yaml --cf encryptedUserfile2.yaml --cf encryptedUserfile3.yaml
--cf parameter can be specified any number of times to use any number of encrypted files.
--cf parameter can also be combined with the --hub parameter.
--cf parameter can also be combined with the -f parameter.
-f with --cf, you must specify the -f parameter first before specifying --cf!
Example:
kosi update --hub myhub kosi/livedemo:2.7.1 -f userfile1.yaml -f userfile2.yaml --cf encryptedUserfile1.yaml --cf encryptedUserfile2.yaml
The namespace parameter can be used to specify a kubernetes namespace in which the update is to be performed.
kosi update --hub <hubname> <package> --namespace <namespace>
Example:
The installation of the package livedemo of the user kosi with version 2.7.1 is updated by a package from the myhub software hub and a custom kubernetes namespace is used:
kosi update --hub myhub kosi/livedemo:2.7.1 --namespace MyNamespace
Note: If no
--namespaceparameter is specified, the default namespace will be used.
The parameter dname can be used to update the deployment by name.
kosi update --hub <hubname> <package> --dname <deploymentname>
Example:
The installation of the package livedemo of the user kosi with version 2.7.1 is updated by a package from the myhub software hub and a deployment name is set:
kosi update --hub myhub kosi/livedemo:2.7.1 --dname MyDeployment
The kosi delete command deletes an already installed KOSI package:
kosi delete --hub <hubname> --dname <deploymentname> <package>
Install in the output of kosi search is required:
Example:
The installation of the package lima from the user kosi with version 0.6.2 and deployment name kosiInstallsLima is deleted by a package from the myhub Software Hub from kosi.:
kosi delete --hub myhub --dname kosiInstallsLima kosi/kosi/lima:0.6.2
The --hub parameter must be used to use the delete section of packages from the software hub. Only the logged in user can use the delete section of packages from the software hub.
kosi delete --hub <hubname> <package>
Example:
The package livedemo of the user kosi with version 2.7.1 is to be updated from the myhub Software Hub:
kosi delete --hub myhub kosi/livedemo:2.7.1
```create:0.0.1
```-create:0.0.1
The “p” parameter must be used to delete the installation from a local package. For “p” parameter you need no --hub parameter:
kosi delete -p package.tgz
The parameter f must be used to use yaml files from the user.
kosi delete --hub <hubname> <package> -f <user.yaml>
Example:
The installation of the package livedemo of the user kosi with version 2.7.1 is deleted by a package from the myhub software hub and user specific files are to be used for the delete progress:
kosi delete --hub myhub kosi/livedemo:2.7.1 -f userfile1.yaml -f userfile2.yaml -f userfile3.yaml
-f parameter can be specified any number of times to use any number of files.
-f parameter can also be combined with the --hub parameter.
The parameter --cf must be used to use encrypted yaml files from the user.
kosi delete --hub <hubname> <package> -f <encryptedUser.yaml>
Example:
The installation of the package livedemo of the user kosi with version 2.7.1 is deleted by a package from the myhub software hub and user specific encrypted files are to be used for the delete progress:
kosi delete --hub myhub kosi/livedemo:2.7.1 -f encryptedUserfile1.yaml -f encryptedUserfile2.yaml -f encryptedUserfile3.yaml
--cf parameter can be specified any number of times to use any number of encrypted files.
--cf parameter can also be combined with the --hub parameter.
--cf parameter can also be combined with the -f parameter.
-f with --cf, you must specify the -f parameter first before specifying --cf!
Example:
kosi delete --hub myhub kosi/livedemo:2.7.1 -f userfile1.yaml -f userfile2.yaml --cf encryptedUserfile1.yaml --cf encryptedUserfile2.yaml
The namespace parameter can be used to specify a kubernetes namespace in which to perform the deletion.
kosi delete --hub <hubname> <package> --namespace <namespace>
Example:
The installation of the package livedemo of the user kosi with version 2.7.1 is deleted by a package from the myhub software hub and a custom kubernetes namespace is used:
kosi delete --hub myhub kosi/livedemo:2.7.1 --namespace MyNamespace
--namespace parameter is specified, the default namespace will be used.
The parameter dname can be used to delete the deployment by name.
kosi delete --hub <hubname> <package> --dname <deploymentname>
Example:
The installation of the package livedemo of the user kosi with version 2.7.1 is deleted by a package from the myhub software hub and a deployment name is set:
kosi delete --hub myhub kosi/livedemo:2.7.1 --dname MyDeployment
The kosi remove command removes a KOSI package from the hub:
kosi remove --hub <hubname> <package>
kosi search command, more precisely in the install column
Example:
The package livedemo of the user kosi with version 2.7.1 will be removed from the myhub hub:
kosi remove --hub myhub kosi/livedemo:2.7.1
The kosi check command is used to compare a local kosi package with a sha256 Checksum.
kosi check -p <localpackagename> <sha256 hash>
Example:
kosi check -p examplepackage c83f3db9639e175f82e7d07d342533866873e2d9ca2f0fd5ee607ea395417edb
The kosi manage add user command is used to add user permissions.
The parameter username is the user who should be added.
The parameter action is the action that is to be authorized (one of view, read, write, owner).
The parameter hub is the hub for which the user should be authorized.
The parameter duration is the duration for which the user should be authorized (format e.g. 10d, 1y, 86400s).
kosi manage add user --username <username> --action <action> --hub <hub> --duration <duration>
Example:
kosi manage add user --username alice --action view --hub rabbithutch --duration 10d
The kosi manage add group command is used to add group permissions.
The parameter groupname is the group to be added.
The parameter action is the action that should be taken for the group (one of view, read, write, owner).
The parameter hub is the hub where the group should be added.
The parameter duration is the duration for which the group should be authorized (format e.g. 10d, 1y, 86400s).
kosi manage add group --groupname <groupname> --action <action> --hub <hub> --duration <duration>
Example:
kosi manage add group --groupname hatter --action view --hub rabbithutch --duration 10d
The kosi manage add user-to-group command is used to add a user to a group.
The parameter username is the user to be added.
The parameter groupname is the group to be added.
The parameter duration is the duration for which the group should be authorized (format e.g. 10d, 1y, 86400s).
kosi manage add user-to-group --username <username> --groupname <groupname> --duration <duration>
Example:
kosi manage add user-to-group --username alice --groupname royalcourt --duration 10d
The kosi manage create group command is used to create a group on a hub.
The parameter groupname is the group to be added.
The parameter hub is the hub where the group should be added.
kosi manage create group --groupname <group> --hub <hub>
Example:
kosi manage create group --groupname royalcourt --hub rabbithutch
The kosi manage list permissions command is used to list permissions for a hub.
The parameter hub is the hub for which the permissions should be displayed.
kosi manage list permissions --hub <hub>
Example:
kosi manage list permissions --hub rabbithutch
The kosi manage remove user command is used to remove a user for a hub.
The parameter username is the user to be removed.
The parameter hub is the hub from which the user should be removed.
kosi manage remove user --username <username> --hub <hub>
Example:
kosi manage remove user --username alice --hub rabbithutch
The kosi manage remove group command is used to remove a group from a hub.
The parameter groupname is the group to be removed.
The parameter hub is the hub from which the group should be removed.
kosi manage remove group --groupname <groupname> --hub <hub>
Example:
kosi manage remove group --groupname royalcourt --hub rabbithutch
The kosi manage remove permission command is used to remove permissions.
The parameter username is the user for whom the permission should be removed.
The parameter groupname is the group for which the permission should be removed.
The parameter action is the action that should be removed (one of view, read, write, owner).
The parameter hub is the hub from which the group should be removed.
kosi manage remove group --groupname <groupname> --hub <hub>
Example:
kosi manage remove group --groupname royalcourt --hub rabbithutch
The kosi manage remove user-from-group command is used to remove a user from a group.
The parameter username is the user who should be removed.
The parameter groupname is the group from which the user should be removed.
kosi manage remove user-from-group --username <username> --groupname <groupname>
Example:
kosi manage remove user-from-group --username alice --groupname royalcourt
This file defines properties of the KOSI package. This file is created after the kosi create command. The package.kosi defines a package in a specific version as well as the tasks needed to install it. The tasks which are used in the package.yaml are plugins, which can be created by the user. The includes.containers element is used for docker images. A container for the docker images will be created when the kosi install, kosi update or kosi delete command is used. There is also a description, which will be shown in the kosi search command.
The includes.files element describes the files which are inluded in the KOSI package. The installation.tasks tree describes the tasks (KOSI plugins), which are executed with the kosi install command. The update.tasks tree describes the tasks (KOSI plugins), which are executed with the kosi update command.The delete.tasks tree describes the tasks (KOSI plugins), which are executed with the kosi delete command.
languageversion = "1.0.0";
apiversion = "kubernative/kubeops/sina/user/v3";
name = "kosi-example-packagev3";
description = "kosi-example-package";
version = "0.1.0";
docs = "docs.tgz";
logo = "logo.png";

files =
{
    input = "template.yaml";
}

containers =
{
    example = ["docker.io", "nginx", "latest"];
}

install
{
    cmd(command = "touch ~/kosiExample1");
}

update
{
    cmd(command = "touch ~/kosiExample2");
}

delete
{
    cmd(command = "rm ~/kosiExample1");
    cmd(command = "rm ~/kosiExample2");
}
This file defines properties of the KOSI package. This file is created after the kosi build command. The package.yaml defines a package in a specific version as well as the tasks needed to install it. The tasks which are used in the package.yaml are plugins, which can be created by the user. The includes.containers element is used for docker images. A container for the docker images will be created when the kosi install, kosi update or kosi delete command is used. There is also a description, which will be shown in the kosi search command.
The includes.files element describes the files which are inluded in the KOSI package. The installation.tasks tree describes the tasks (KOSI plugins), which are executed with the kosi install command. The update.tasks tree describes the tasks (KOSI plugins), which are executed with the kosi update command.The delete.tasks tree describes the tasks (KOSI plugins), which are executed with the kosi delete command.
registry and image.
# languageversion: "1.0.0"
apiversion: "kubernative/kubeops/sina/user/v3"
name: "kosi-example-packagev3"
description: "kosi-example-package"
version: "0.1.0"
docs: "docs.tgz"
logo: "logo.png"
includes:
  files:
    input: "template.yaml"
  containers:
    example:
      registry: "docker.io"
      image: "nginx"
      tag: "latest"
installation:
  tasks:
    - cmd:
        command: "touch ~/kosiExample1"
update:
  tasks:
    - cmd:
        command: "touch ~/kosiExample2"
delete:
  tasks:
    - cmd:
        command: "rm ~/kosiExample1"
    - cmd:
        command: "rm ~/kosiExample2"
The default.yaml in a package.tgz is used for setting default variables. In case you use the -f parameter in install, update or delete, the file which you address is merged with the default.yaml. If you have the same keys but different values in both files, your adressed file will overwrite the values set by the default.yaml.
/var/kubeops/kosi/config.yaml
The config.yaml file contains all necessary files for networking and logging. For example, config.yaml contains the hub from which the packages are downloaded.
apiversion: kubernative/sina/config/v2                # Shows the supported API-Version
spec:
  hub: https://dispatcher.kubeops.net/v4/dispatcher/  # Adress to the KOSI online hub
  plugins: /var/kubeops/plugins/                      # Location of the KOSI-Plugins
  workspace: /tmp/kosi/process/                       # Workspace Path
  logging: info                                       # Loglevel options: info (default), warning, error, debug1, debug2, debug3
  housekeeping: false                                 # Housekeeping options: true (all temporary created folders will be deleted), false (all temporary created folders won't be deleted)
  proxy: false                                        # Use kosi proxy false (default)
To keep KOSI running there has to be a valid config.yaml file.
After installing KOSI, a valid config.yaml file is created under the location /var/kubeops/kosi/config.yaml.
If you want to use your own Hub you can create a user-specific config.yaml file. The original file can be changed too, but it is not recommended.
The $KUBEOPSROOT environment variable stores the location of the KOSI plugins and the config.yaml. To use the variable, the config.yaml and the plugins have to be copied manually.
So for example:
cp -r /var/kubeops/kosi/config.yaml /home/<user>/kubeopsrootdir/kosi/config.yaml
cp -r /var/kubeops/plugins /home/<user>/kubeopsrootdir/plugins
This is an example of how templating in a package.kosi is working with kosi 2.14.x
First we need to create this package.kosi:
languageversion = "1.0.0";
apiversion = "kubernative/kubeops/sina/user/v3";
name = "kosi-example-packagev3";
description = "kosi-example-package";
version = "0.1.0";
docs = "docs.tgz";
logo = "logo.png";

files =
{
    input = "template.yaml";
}

containers =
{
    example = ["docker.io", "nginx", "latest"];
}

install
{
    cmd(command = "echo using templatep plugin.");
    template(tmpl = "{{package.includes.files.input}}"; target = "{{values.target}}");
}

update
{
    cmd(command = "touch ~/kosiExample2");
    template(tmpl = "{{package.includes.files.input}}"; target = "{{values.target}}");
}

delete
{
    cmd(command = "rm ~/kosiExample1");
    cmd(command = "rm ~/kosiExample2");
}
Now we create a template.yaml:
package:
  file: {{package.includes.files.input}}
  uservalues: {{values.example}}
Next we create a default.yaml:
example: example
target: target.yaml
Now we are ready to create a kosi package. For this we need the following command:
kosi build
Next we can run the installation section we have defined in the package.yaml with the following command:
kosi install -p package.tgz --dname example
We can check the result in the directory $KUBEOPSROOT/kosi/tmp.
The file of interest is the target.yaml. But most of the time this file is not in tmp Folder . In this case, type the command find / -name target.yaml to find the location of the target.yaml file.
the content of target.yaml is:
package:
file: template.yaml
uservalues: example
So what exactly happened?
In the package.yaml you can see that we use {{package.includes.files.input}} for defining the template.yaml as value for the key tmpl. You can use any value of the package.yaml but make sure that the path to the value is correct and starts with package.. This is the indicator for using a variable from the package.yaml.
You can also see that we use {{values.target}} for defining the target.yaml as value for the key target. If you wonder where the target.yaml is coming from you can check the default.yaml. If you want to use a variable from the default.yaml or from a file specified with the parameter -f make sure that the path to the value is correct and starts with values..
For more information about the template syntax check the Scriban documentation (https://github.com/scriban/scriban/blob/master/doc/language.md) and try it out in the online demo (https://scribanonline.azurewebsites.net).
With the installation of KOSI a handful of plugins are included. Which plugins are included can be seen under “pre-installed plugins” in the Plugin References
This guide explains how to use KOSI with detailed instructions and examples.
kosi:
Kosi is a SoftwareINstAller for kubernetes cluster
Usage:
Kosi [options] [command]
Options:
--version Show version information
-?, -h, --help Show help and usage information
Commands:
login logs you in
search Shows you all the available packages on the softwarehub
build Creates your final kosi.package
push Push package.tgz to KubeOps Hub.
pull <package> Downloads an existing package from the hub without installing.
install <packagename> install a .tgz file and if it is required, download it
update <packagename> update a .tgz file and if it is required, download it
delete <packagename> run delete section of a .tgz file and if it is required, download it
list List packages from storage
lint lint your files for your .tgz package
create Creates a package.kosi and a template.yaml for you to manipulate
version Basic infos about KOSI
logout Logout
remove <package> Gives you the possibility to remove packages from the hub, if you have write permissions.
encrypt Gives you the possibility to encrypt your values with a password.
check <hash> check your local package hash
The command kosi --help gives you an overview of all available commands:
kosi --help
Alternatively, you can also enter kosi or kosi -? in the command line.
The kosi version command shows you the current version of KOSI.
kosi version
The output should be:
2025-03-18 08:07:41 Info: KOSI version: 2.13.0.1
2025-03-18 08:07:41 Info: Latest KOSI-package-apiversion is: kubernative/kubeops/sina/user/v4
2025-03-18 08:07:41 Info: Latest KOSI-lanugage-version is: 1.0.0
2025-03-18 08:07:41 Info: This work is licensed under Creative Commons Attribution - NoDerivatives 4.0 International License(see https://creativecommons.org/licenses/by-nd/4.0/legalcode for more details).
2025-03-18 08:07:41 Info: © KubeOps GmbH, Hinter Stöck 17, 72406 Bisingen - Germany, 2025
The command kosi create creates four files (package.kosi, template.yaml, logo.png and docs.tgz) in the current directory. These files can be edited by the user.
kosi create
Created files:
The kosi build command creates the necessary yaml files for building a package:
kosi build
All files specified in the package.kosi are combined together with the package.yaml to form a KOSI package.
The kosi lint command is used to check whether the contents of the package.yaml or package.kosi files are valid:
kosi lint
The kosi login command logs on to the KubeOps services. The account name is required for this command.
After the flag -u type your username.
Afterwards you will be asked to enter your password.
kosi login -u <username>
The parameter -p is used to enter the password in the command directly, but it is important to know that the password will be shown in plain text. This parameter can help with the automation of KOSI commands.
kosi login -u <username> -p <password>
The -u parameter is used to specify the user name.
kosi login -u
The -p parameter is used to specify the password.
kosi login -p
The kosi logout command logs out from the KubeOps services.
kosi logout
The kosi push command uploads KOSI packages to the KubeOps Hub:
kosi push --hub <hubname>
kosi login command.
The --hub parameter is used to upload KOSI packages to a specific hub, e.g. in this example we upload our KOSI package to the myhub hub.
kosi push --hub myhub
The kosi pull command downloads a specific KOSI package from the hub without installing it directly.
kosi pull --hub <hubname> <packagename> -o <desired name>
kosi pull downloads the package to the current directory.
Example:
kosi pull --hub myhub donald/kosi-print-test:0.0.1 -o printpackage
The --hub parameter is used to download KOSI packages to a specific hub, e.g. in this example we are pulling our KOSI package from the myhub hub.
kosi pull --hub myhub kubeops/harbor:1.1.0
The parameter r can be used to pull the docker images which are included in the package to a given local docker registry.
kosi pull --hub <hubname> <packagename> -o <desired name> -r <local.docker.registry>
kosi pull downloads the package and pulls the required docker images to the given local docker registry.
Example:
kosi pull --hub myhub kubeops/harbor:1.1.0 -o harborpackage -r 127.0.0.1:5000
Note: After the
kosi pull --hub myhub kubeops/harbor:1.1.0 -o printpackage -r 127.0.0.1:5000command you can usekosi install -p printpackage.tgzto use the docker image from your local docker registry.
For the szenario that the registry of the cluster is exposed to the admin via a network internal domain name, but this name can’t be resolved by the nodes, the flag -t can be used, to use the cluster internal hostname of the registry.
kosi pull --hub <hubname> <packagename> -o <desired name> -r <local.docker.registry> -t <cluster.internal.registry>
kosi pull --hub myhub kubeops/harbor:1.1.0 -o harborpackage -r myregistry:5000 -t clusterregistry:5000
The kosi search command displays all available packages of your own private hub. Only the logged in user can see the packages on his private hub.
The User column contains the name of the creator of the package.
The Name column contains the name of the package.
The Version column contains the version of the package.
The Description column contains the description of the package.
The Install column contains a string consisting of the name of the creator, name and version of the package. This string can be copied and used for the kosi install command.
kosi search --hub <hubname>
Example: User donald is logged in and wants to get the packets from his private hub:
kosi search --hub donald
| User | Name | Version | Description |Install |
|--------|--------------|---------|----------------------------------|---------------------------|
| donald | private-kosi | 0.0.1 | private installation | donald/private-kosi:0.0.1 |
| donald | private-test | 0.0.1 | private package | donald/private-test:0.0.1 |
| donald | livedemo | 2.7.2 | welcome to kosi | donald/livedemo:2.7.1 |
The --ps parameter can be used to filter for keywords that refer to all five columns. It is also possible to filter by individual word components:
kosi search --hub <hubname> --ps <name>
Example:
In this case, all packets containing the word private are displayed:
kosi search --hub donald --ps private
| User | Name | Version | Description |Install |
|--------|--------------|---------|----------------------------------|---------------------------|
| donald | private-kosi | 0.0.1 | private installation | donald/private-kosi:0.0.1 |
| donald | private-test | 0.0.1 | private package | donald/private-test:0.0.1 |
In addition, there is an option to search for packages on a specific hub using the --hub parameter. You need no login to search in the myhub hub.
kosi search --hub myhub
| User | Name | Version | Description |Install |
|--------|--------------|---------|----------------------------------|-------------------------|
| kosi | lima | 0.6.2 | installs LIMA | kosi/lima:0.6.2 |
| kosi | installation | 0.0.1 | kosi create example package.yaml | kosi/installation:0.0.1 |
| donald | elk-kosi | 0.0.1 | ELK installation | donald/elk-kosi:0.0.1 |
| donald | prod-test | 0.0.1 | test for prod | donald/prod-test:0.0.1 |
| lima | lima | 0.6.0 | installs LIMA | lima/lima:0.6.0 |
The parameters --hub and --ps can be combined for a targeted search in the kosi hub:
kosi search --hub <hubname> --ps <package_name>
Example:
The user kosi wants to display all packages in the kosi hub with the term “lima”.
kosi search --hub kosi --ps lima
| User | Name | Version | Description |Install |
|------|--------------|---------|----------------------------------|-------------------------|
| kosi | lima | 0.6.2 | installs LIMA | kosi/lima:0.6.2 |
| kosi | lima | 0.7.1 | installs LIMA | kosi/lima:0.7.1 |
The kosi encrypt command is used to encrypt YAML files with AES-256-CBC:
The parameter -f must be used to use yaml files from the user.
kosi encrypt -f <user.yaml>
-f parameter can be specified any number of times to use any number of files.
kosi encrypt -f userfile1.yaml -f userfile2.yaml -f userfile3.yaml
The kosi install command installs a KOSI package:
kosi install --hub <hubname> <package>
Install in the output of kosi search is required:
Example:
The package livedemo of the user kosi with version 2.7.1 is to be installed from the myhub Hub:
kosi install --hub myhub kosi/livedemo:2.7.1
The --hub parameter must be used to install packages from the software hub. Only the logged in user can install the packages from the software hub.
kosi install --hub <hubname> <package>
Example:
The package livedemo of the user kosi with version 2.7.1 is to be installed from the myhub Software Hub:
kosi install --hub myhub kosi/livedemo:2.7.1
The “p” parameter must be used to install local packages. For “p” parameter you need no --hub:
kosi install -p package.tgz
The parameter f must be used to use .yaml files from the user.
kosi install <package> -f <user.yaml>
Example:
The package livedemo of the user kosi with version 2.7.1 is to be installed from the myhub software hub and user specific files are to be used for the installation:
kosi install --hub myhub kosi/livedemo:2.7.1 -f userfile1.yaml -f userfile2.yaml -f userfile3.yaml
-f parameter can be specified any number of times to use any number of files.
-f parameter can also be combined with the --hub parameter.
The parameter --cf must be used to use encrypted yaml files from the user.
kosi install <package> --cf <encryptedUser.yaml>
Example:
The package livedemo of the user kosi with version 2.7.1 is to be installed from the myhub software hub and user specific encrypted files are to be used for the installation:
kosi install --hub myhub kosi/livedemo:2.7.1 --cf encryptedUserfile1.yaml --cf encryptedUserfile2.yaml --cf encryptedUserfile3.yaml
--cf parameter can be specified any number of times to use any number of encrypted files.
--cf parameter can also be combined with the --hub parameter.
--cf parameter can also be combined with the -f parameter.
-f with --cf, you must specify the -f parameter first before specifying --cf!
Example:
kosi install --hub myhub kosi/livedemo:2.7.1 -f userfile1.yaml -f userfile2.yaml --cf encryptedUserfile1.yaml --cf encryptedUserfile2.yaml
The namespace parameter can be used to specify a Kubernetes namespace in which the installation is to be performed.
kosi install --hub <hubname> <package> --namespace <namespace>
Example:
The package livedemo of the user kosi with version 2.7.1 is to be installed from the myhub software hub and a custom kubernetes namespace is used:
kosi install --hub myhub kosi/livedemo:2.7.1 --namespace MyNamespace
--namespace parameter is specified, the namespace default will be used.
The parameter dname can be used to save the package under a specific name.
kosi install --hub <hubname> <package> --dname <deploymentname>
Example:
The package livedemo of the user kosi with version 2.7.1 is to be installed from the myhub software hub and a deployment name is set:
kosi install --hub myhub kosi/livedemo:2.7.1 --dname MyDeployment
--dname parameter is specified, a random deployment name will be generated.
/<user>/var/kubeops/kosi/deployment.yaml.
The kosi list command lists all installed KOSI packages:
kosi list
KOSI version: 2.10.0_preAlpha0
| Deployment | Package | PublicHub | Hub |
|------------------|-----------------------------------|-----------|--------|
| kosiinstallslima | kosi/lima:0.6.2 | | private|
| kosicreatetest | kosi/kosi-create:0.0.1 | | public |
| plugininstall | local/kubeops-basic-plugins:0.4.0 | | local |
The kosi update command updates an already installed KOSI package:
kosi update --hub <hubname> --dname <deploymentname> <package>
Install in the output of kosi search is required:
Example:
The installation of the package lima from the user kosi with version 0.6.2 and deployment name kosiInstallsLima is updated by a package from the myhub Software Hub from kosi.:
kosi update --hub myhub --dname kosiInstallsLima kosi/kosi/lima:0.6.2
The --hub parameter must be used to update packages from the software hub. Only the logged in user can update the packages from the software hub.
kosi update --hub <hubname> <package>
Example:
The package livedemo of the user kosi with version 2.7.1 is to be updated from the myhub Software Hub:
kosi update --hub myhub kosi/livedemo:2.7.1
```create:0.0.1
The “p” parameter must be used to update the installation from a local package. For “p” parameter you need no --hub parameter:
kosi update -p package.tgz
The parameter f must be used to use yaml files from the user.
kosi update --hub <hubname> <package> -f <user.yaml>
Example:
The installation of the package livedemo of the user kosi with version 2.7.1 is updated by a package from the myhub software hub and user specific files are to be used for the update progress:
kosi update --hub myhu kosi/livedemo:2.7.1 -f userfile1.yaml -f userfile2.yaml -f userfile3.yaml
Note: The
-fparameter can be specified any number of times to use any number of files. Note: The-fparameter can also be combined with the--hubparameters.
The parameter --cf must be used to use encrypted yaml files from the user.
kosi update --hub <hubname> <package> --cf <encryptedUser.yaml>
Example:
The installation of the package livedemo of the user kosi with version 2.7.1 is updated by a package from the myhub software hub and user specific encrypted files are to be used for the update progress:
kosi update --hub myhub kosi/livedemo:2.7.1 --cf encryptedUserfile1.yaml --cf encryptedUserfile2.yaml --cf encryptedUserfile3.yaml
--cf parameter can be specified any number of times to use any number of encrypted files.
--cf parameter can also be combined with the --hub parameter.
--cf parameter can also be combined with the -f parameter.
-f with --cf, you must specify the -f parameter first before specifying --cf!
Example:
kosi update --hub myhub kosi/livedemo:2.7.1 -f userfile1.yaml -f userfile2.yaml --cf encryptedUserfile1.yaml --cf encryptedUserfile2.yaml
The namespace parameter can be used to specify a kubernetes namespace in which the update is to be performed.
kosi update --hub <hubname> <package> --namespace <namespace>
Example:
The installation of the package livedemo of the user kosi with version 2.7.1 is updated by a package from the myhub software hub and a custom kubernetes namespace is used:
kosi update --hub myhub kosi/livedemo:2.7.1 --namespace MyNamespace
Note: If no
--namespaceparameter is specified, the default namespace will be used.
The parameter dname can be used to update the deployment by name.
kosi update --hub <hubname> <package> --dname <deploymentname>
Example:
The installation of the package livedemo of the user kosi with version 2.7.1 is updated by a package from the myhub software hub and a deployment name is set:
kosi update --hub myhub kosi/livedemo:2.7.1 --dname MyDeployment
The kosi delete command deletes an already installed KOSI package:
kosi delete --hub <hubname> --dname <deploymentname> <package>
Install in the output of kosi search is required:
Example:
The installation of the package lima from the user kosi with version 0.6.2 and deployment name kosiInstallsLima is deleted by a package from the myhub Software Hub from kosi.:
kosi delete --hub myhub --dname kosiInstallsLima kosi/kosi/lima:0.6.2
The --hub parameter must be used to use the delete section of packages from the software hub. Only the logged in user can use the delete section of packages from the software hub.
kosi delete --hub <hubname> <package>
Example:
The package livedemo of the user kosi with version 2.7.1 is to be updated from the myhub Software Hub:
kosi delete --hub myhub kosi/livedemo:2.7.1
```create:0.0.1
```-create:0.0.1
The “p” parameter must be used to delete the installation from a local package. For “p” parameter you need no --hub parameter:
kosi delete -p package.tgz
The parameter f must be used to use yaml files from the user.
kosi delete --hub <hubname> <package> -f <user.yaml>
Example:
The installation of the package livedemo of the user kosi with version 2.7.1 is deleted by a package from the myhub software hub and user specific files are to be used for the delete progress:
kosi delete --hub myhub kosi/livedemo:2.7.1 -f userfile1.yaml -f userfile2.yaml -f userfile3.yaml
-f parameter can be specified any number of times to use any number of files.
-f parameter can also be combined with the --hub parameter.
The parameter --cf must be used to use encrypted yaml files from the user.
kosi delete --hub <hubname> <package> -f <encryptedUser.yaml>
Example:
The installation of the package livedemo of the user kosi with version 2.7.1 is deleted by a package from the myhub software hub and user specific encrypted files are to be used for the delete progress:
kosi delete --hub myhub kosi/livedemo:2.7.1 -f encryptedUserfile1.yaml -f encryptedUserfile2.yaml -f encryptedUserfile3.yaml
--cf parameter can be specified any number of times to use any number of encrypted files.
--cf parameter can also be combined with the --hub parameter.
--cf parameter can also be combined with the -f parameter.
-f with --cf, you must specify the -f parameter first before specifying --cf!
Example:
kosi delete --hub myhub kosi/livedemo:2.7.1 -f userfile1.yaml -f userfile2.yaml --cf encryptedUserfile1.yaml --cf encryptedUserfile2.yaml
The namespace parameter can be used to specify a kubernetes namespace in which to perform the deletion.
kosi delete --hub <hubname> <package> --namespace <namespace>
Example:
The installation of the package livedemo of the user kosi with version 2.7.1 is deleted by a package from the myhub software hub and a custom kubernetes namespace is used:
kosi delete --hub myhub kosi/livedemo:2.7.1 --namespace MyNamespace
--namespace parameter is specified, the default namespace will be used.
The parameter dname can be used to delete the deployment by name.
kosi delete --hub <hubname> <package> --dname <deploymentname>
Example:
The installation of the package livedemo of the user kosi with version 2.7.1 is deleted by a package from the myhub software hub and a deployment name is set:
kosi delete --hub myhub kosi/livedemo:2.7.1 --dname MyDeployment
The kosi remove command removes a KOSI package from the hub:
kosi remove --hub <hubname> <package>
kosi search command, more precisely in the install column
Example:
The package livedemo of the user kosi with version 2.7.1 will be removed from the myhub hub:
kosi remove --hub myhub kosi/livedemo:2.7.1
The kosi check command is used to compare a local kosi package with a sha256 Checksum.
kosi check -p <localpackagename> <sha256 hash>
Example:
kosi check -p examplepackage c83f3db9639e175f82e7d07d342533866873e2d9ca2f0fd5ee607ea395417edb
This file defines properties of the KOSI package. This file is created after the kosi create command. The package.kosi defines a package in a specific version as well as the tasks needed to install it. The tasks which are used in the package.yaml are plugins, which can be created by the user. The includes.containers element is used for docker images. A container for the docker images will be created when the kosi install, kosi update or kosi delete command is used. There is also a description, which will be shown in the kosi search command.
The includes.files element describes the files which are inluded in the KOSI package. The installation.tasks tree describes the tasks (KOSI plugins), which are executed with the kosi install command. The update.tasks tree describes the tasks (KOSI plugins), which are executed with the kosi update command.The delete.tasks tree describes the tasks (KOSI plugins), which are executed with the kosi delete command.
languageversion = "1.0.0";
apiversion = "kubernative/kubeops/sina/user/v3";
name = "kosi-example-packagev3";
description = "kosi-example-package";
version = "0.1.0";
docs = "docs.tgz";
logo = "logo.png";
files =
{
input="template.yaml";
}
containers =
{
example=["docker.io", "nginx", "latest"];
}
install
{
cmd(command="touch ~/kosiExample1");
}
update
{
cmd(command="touch ~/kosiExample2");
}
delete
{
cmd(command="rm ~/kosiExample1");
cmd(command="rm ~/kosiExample2");
}
This file defines properties of the KOSI package. This file is created after the kosi build command. The package.yaml defines a package in a specific version as well as the tasks needed to install it. The tasks which are used in the package.yaml are plugins, which can be created by the user. The includes.containers element is used for docker images. A container for the docker images will be created when the kosi install, kosi update or kosi delete command is used. There is also a description, which will be shown in the kosi search command.
The includes.files element describes the files which are inluded in the KOSI package. The installation.tasks tree describes the tasks (KOSI plugins), which are executed with the kosi install command. The update.tasks tree describes the tasks (KOSI plugins), which are executed with the kosi update command.The delete.tasks tree describes the tasks (KOSI plugins), which are executed with the kosi delete command.
registry and image.
# languageversion: "0.1.0"
apiversion: "kubernative/kubeops/sina/user/v3"
name: "kosi-example-packagev3"
description: "kosi-example-package"
version: "0.1.0"
docs: "docs.tgz"
logo: "logo.png"
includes:
files:
input: "template.yaml"
containers:
example:
registry: "docker.io"
image: "nginx"
tag: "latest"
installation:
tasks:
- cmd:
command: "touch ~/kosiExample1"
update:
tasks:
- cmd:
command: "touch ~/kosiExample2"
delete:
tasks:
- cmd:
command: "rm ~/kosiExample1"
- cmd:
command: "rm ~/kosiExample2"
The default.yaml in a package.tgz is used for setting default variables. In case you use the -f parameter in install, update or delete, the file which you address is merged with the default.yaml. If you have the same keys but different values in both files, your adressed file will overwrite the values set by the default.yaml.
/var/kubeops/kosi/config.yaml
The config.yaml file contains all necessary files for networking and logging. For example, config.yaml contains the hub from which the packages are downloaded.
apiversion: kubernative/kosi/config/v2 # Shows the supported API-Version
spec:
hub: https://hub.kubernative.net/dispatcher/ # Adress to the KOSI online hub
plugins: /kubeops/kosi/kosi-plugins/ # Location of the KOSI-Plugins
registry: registry1.kubernative.net/ # Registry, where Docker-images will be pulled to (kosi pull)
workspace: /tmp/kosi/process/ # Workspace Path
logging: info # Loglevel options: info (default), warning, error, debug1, debug2, debug3
housekeeping: true # Housekeeping options: true (all temporary created folders will be deleted), false (all temporary created folders won't be deleted)
To keep KOSI running there has to be a valid config.yaml file.
After installing KOSI, a valid config.yaml file is created under the location /var/kubeops/kosi/config.yaml.
If you want to use your own Hub you can create a user-specific config.yaml file. The original file can be changed too, but it is not recommended.
The $KUBEOPSROOT environment variable stores the location of the KOSI plugins and the config.yaml. To use the variable, the config.yaml and the plugins have to be copied manually.
So for example:
cp -r /var/kubeops/kosi/config.yaml /home/<user>/kubeopsrootdir/kosi/config.yaml
rm -rf /var/kubeops/kosi
cp -r /var/kubeops/plugins /home/<user>/kubeopsrootdir/plugins
rm -rf /var/kubeops/plugins
This is an example of how templating in a package.kosi is working with kosi 2.10.x
First we need to create this package.kosi:
# languageversion: "0.1.0"
apiversion = "kubernative/kubeops/sina/user/v3";
name = "kosi-example-packagev3";
description = "kosi-example-package";
version = "0.1.0";
docs = "docs.tgz";
logo = "logo.png";
files =
{
input="template.yaml";
}
containers =
{
example=["docker.io", "nginx", "latest"];
}
install
{
cmd(command='"echo using templatep plugin."');
template(tmpl='{{package.includes.files.input}}';target='{{values.target}}');
}
update
{
cmd(command='"touch ~/kosiExample2"');
template(tmpl='{{package.includes.files.input}}';target='{{values.target}}');
}
delete
{
cmd(command='"rm ~/kosiExample1"');
cmd(command='"rm ~/kosiExample2"');
}
Now we create a template.yaml:
package:
file: {{package.includes.files.input}}
uservalues: {{values.example}}
Next we create a default.yaml:
example: example
target: target.yaml
Now we are ready to create a kosi package. For this we need the following command:
kosi build
Next we can run the installation section we have defined in the package.yaml with the following command:
kosi install -p package.tgz --dname example
We can check the result in the directory $KUBEOPSROOT/kosi/tmp.
The file of interest is the target.yaml. But most of the time this file is not in tmp Folder . In this case, type the command find / -name target.yaml to find the location of the target.yaml file.
the content of target.yaml is:
package:
file: template.yaml
uservalues: example
So what exactly happened?
In the package.yaml you can see that we use {{package.includes.files.input}} for defining the template.yaml as value for the key tmpl. You can use any value of the package.yaml but make sure that the path to the value is correct and starts with package.. This is the indicator for using a variable from the package.yaml.
You can also see that we use {{values.target}} for defining the target.yaml as value for the key target. If you wonder where the target.yaml is coming from you can check the default.yaml. If you want to use a variable from the default.yaml or from a file specified with the parameter -f make sure that the path to the value is correct and starts with values..
For more information about the template syntax check the Scriban documentation (https://github.com/scriban/scriban/blob/master/doc/language.md) and try it out in the online demo (https://scribanonline.azurewebsites.net).
With the installation of KOSI a handful of plugins are included. Which plugins are included can be seen under “pre-installed plugins” in the Plugin References
This guide explains how to use KOSI with detailed instructions and examples.
kosi:
Kosi is a SoftwareINstAller for kubernetes cluster
Usage:
Kosi [options] [command]
Options:
--version Show version information
-?, -h, --help Show help and usage information
Commands:
login logs you in
search Shows you all the available packages on the softwarehub
build Creates your final kosi.package
push Push package.tgz to KubeOps Hub.
pull <package> Downloads an existing package from the hub without installing.
install <packagename> install a .tgz file and if it is required, download it
update <packagename> update a .tgz file and if it is required, download it
delete <packagename> run delete section of a .tgz file and if it is required, download it
list List packages from storage
lint lint your files for your .tgz package
create Creates a package.kosi and a template.yaml for you to manipulate
version Basic infos about KOSI
logout Logout
remove <package> Gives you the possibility to remove packages from the hub, if you have write permissions.
encrypt Gives you the possibility to encrypt your values with a password.
check <hash> check your local package hash
The command kosi --help gives you an overview of all available commands:
kosi --help
Alternatively, you can also enter kosi or kosi -? in the command line.
The kosi version command shows you the current version of KOSI.
kosi version
The output should be:
2025-03-18 08:07:41 Info: KOSI version: 2.12.0.11
2025-03-18 08:07:41 Info: Latest KOSI-package-apiversion is: kubernative/kubeops/sina/user/v4
2025-03-18 08:07:41 Info: Latest KOSI-lanugage-version is: 1.0.0
2025-03-18 08:07:41 Info: This work is licensed under Creative Commons Attribution - NoDerivatives 4.0 International License(see https://creativecommons.org/licenses/by-nd/4.0/legalcode for more details).
2025-03-18 08:07:41 Info: © KubeOps GmbH, Hinter Stöck 17, 72406 Bisingen - Germany, 2025
Note: The command works in the current directory.
The command kosi create creates four files (package.kosi, template.yaml, logo.png and docs.tgz) in the current directory. These files can be edited by the user.
The template.yaml is required if the template engine Scriban is to be used.
The logo.png is a package-thumbnail with the size of 50x50px
The docs.tgz is a zipped directory with the documentation of the package. The documentation of the package is written down in markdown. The file for the documentation is called readme.md.
Note: Please name your markdown files inside docs.tgz without a version-tag (docs/documentation-1.0.0.md).
kosi create
Created files:
Note: The command works in the current working directory.
Note: If you have no package.kosi file in your current working directory, KOSI will pick a package.yaml file.
Note: Name your package in the package.kosi in full lower case.
Note: Don´t change the name for logo.png and docs.tgz
Note: Please name your markdown files inside docs.tgz without a version-tag (docs/documentation-1.0.0.md).
IMPORTANT: Please name your packages without docker tags (:v1.0.0).
The kosi build command creates the necessary yaml files for building a package:
kosi build
All files specified in the package.kosi are combined together with the package.yaml to form a KOSI package.
The package.yaml is only generated once, if it is not available. If the package.yaml already exists the package.yaml will not be generated.
The kosi lint command is used to check whether the contents of the package.yaml or package.kosi files are valid:
kosi lint
The kosi login command logs on to the KubeOps services. The account name is required for this command.
Note: To push packages into the hub, you need to create an account here first. Note: We recommend lowercase usernames for your kubeops-accounts.
After the flag -u type your username.
Afterwards you will be asked to enter your password.
kosi login -u <username>
The parameter -p is used to enter the password in the command directly, but it is important to know that the password will be shown in plain text. This parameter can help with the automation of KOSI commands.
kosi login -u <username> -p <password>
The -u parameter is used to specify the user name.
kosi login -u
This parameter is required.
The -p parameter is used to specify the password.
kosi login -p
This parameter is not required. We recommend to use this parameter only if it is absolutely necessary.
The kosi logout command logs out from the KubeOps services.
Note: To logout from the KubeOps services, you have to be logged in.
kosi logout
The kosi push command uploads KOSI packages to the KubeOps Hub:
kosi push --hub <hubname>
Note: In order to upload KOSI packages, you first have to log in using the
kosi logincommand.
Note: The package name is case-sensitive and should be lowercase.
The --hub parameter is used to upload KOSI packages to a specific hub, e.g. in this example we upload our KOSI package to the myhub hub.
kosi push --hub myhub
The kosi pull command downloads a specific KOSI package from the hub without installing it directly.
kosi pull --hub <hubname> <packagename> -o <desired name>
Note:
kosi pulldownloads the package to the current directory.
Note: The downloaded packages can be transferred to machines without internet access via USB, for example.
Note: The package name is case-sensitive and should be lowercase.
Example:
kosi pull --hub myhub donald/kosi-print-test:0.0.1 -o printpackage
Note: The -o option specifies a name that the package will have after download. The file automatically gets the .tgz extension. The -o option is not optional.
The --hub parameter is used to download KOSI packages to a specific hub, e.g. in this example we are pulling our KOSI package from the myhub hub.
kosi pull --hub myhub kubeops/harbor:1.1.0
The parameter r can be used to pull the docker images which are included in the package to a given local docker registry.
kosi pull --hub <hubname> <packagename> -o <desired name> -r <local.docker.registry>
Note:
kosi pulldownloads the package and pulls the required docker images to the given local docker registry.
Example:
kosi pull --hub myhub kubeops/harbor:1.1.0 -o harborpackage -r 127.0.0.1:5000
Note: After the
kosi pull --hub myhub kubeops/harbor:1.1.0 -o printpackage -r 127.0.0.1:5000command you can usekosi install -p printpackage.tgzto use the docker image from your local docker registry.
Note: You can now install your packages including docker images without internet connection from your local machine.
For the szenario that the registry of the cluster is exposed to the admin via a network internal domain name, but this name can’t be resolved by the nodes, the flag -t can be used, to use the cluster internal hostname of the registry.
kosi pull --hub <hubname> <packagename> -o <desired name> -r <local.docker.registry> -t <cluster.internal.registry>
Note: local.docker.registry is the same registry as cluster.internal.registry but with a different hostname.
Example:
kosi pull --hub myhub kubeops/harbor:1.1.0 -o harborpackage -r myregistry:5000 -t clusterregistry:5000
IMPORTANT: -t flag can only be used in combination with the -r flag.
The kosi search command displays all available packages of your own private hub. Only the logged in user can see the packages on his private hub.
The User column contains the name of the creator of the package.
The Name column contains the name of the package.
The Version column contains the version of the package.
The Description column contains the description of the package.
The Install column contains a string consisting of the name of the creator, name and version of the package. This string can be copied and used for the kosi install command.
kosi search --hub <hubname>
Example: User donald is logged in and wants to get the packets from his private hub:
kosi search --hub donald
| User | Name | Version | Description |Install |
|--------|--------------|---------|----------------------------------|---------------------------|
| donald | private-kosi | 0.0.1 | private installation | donald/private-kosi:0.0.1 |
| donald | private-test | 0.0.1 | private package | donald/private-test:0.0.1 |
| donald | livedemo | 2.7.2 | welcome to kosi | donald/livedemo:2.7.1 |
The --ps parameter can be used to filter for keywords that refer to all five columns. It is also possible to filter by individual word components:
kosi search --hub <hubname> --ps <name>
Example:
In this case, all packets containing the word private are displayed:
kosi search --hub donald --ps private
| User | Name | Version | Description |Install |
|--------|--------------|---------|----------------------------------|---------------------------|
| donald | private-kosi | 0.0.1 | private installation | donald/private-kosi:0.0.1 |
| donald | private-test | 0.0.1 | private package | donald/private-test:0.0.1 |
In addition, there is an option to search for packages on a specific hub using the --hub parameter. You need no login to search in the myhub hub.
kosi search --hub myhub
| User | Name | Version | Description |Install |
|--------|--------------|---------|----------------------------------|-------------------------|
| kosi | lima | 0.6.2 | installs LIMA | kosi/lima:0.6.2 |
| kosi | installation | 0.0.1 | kosi create example package.yaml | kosi/installation:0.0.1 |
| donald | elk-kosi | 0.0.1 | ELK installation | donald/elk-kosi:0.0.1 |
| donald | prod-test | 0.0.1 | test for prod | donald/prod-test:0.0.1 |
| lima | lima | 0.6.0 | installs LIMA | lima/lima:0.6.0 |
The parameters --hub and --ps can be combined for a targeted search in the kosi hub:
kosi search --hub <hubname> --ps <package_name>
Example:
The user kosi wants to display all packages in the kosi hub with the term “lima”.
kosi search --hub kosi --ps lima
| User | Name | Version | Description |Install |
|------|--------------|---------|----------------------------------|-------------------------|
| kosi | lima | 0.6.2 | installs LIMA | kosi/lima:0.6.2 |
| kosi | lima | 0.7.1 | installs LIMA | kosi/lima:0.7.1 |
The kosi encrypt command is used to encrypt YAML files with AES-256-CBC:
The parameter -f must be used to use yaml files from the user.
This parameter is required.
kosi encrypt -f <user.yaml>
Note: The
-fparameter can be specified any number of times to use any number of files.
kosi encrypt -f userfile1.yaml -f userfile2.yaml -f userfile3.yaml
Note: Once your file is encrypted you can not decrypt it with KOSI for get an decrypted file. KOSI do this on runtime, if you use this file.
The kosi install command installs a KOSI package:
kosi install --hub <hubname> <package>
The string of the column
Installin the output ofkosi searchis required:
Example:
The package livedemo of the user kosi with version 2.7.1 is to be installed from the myhub Hub:
kosi install --hub myhub kosi/livedemo:2.7.1
The --hub parameter must be used to install packages from the software hub. Only the logged in user can install the packages from the software hub.
kosi install --hub <hubname> <package>
Example:
The package livedemo of the user kosi with version 2.7.1 is to be installed from the myhub Software Hub:
kosi install --hub myhub kosi/livedemo:2.7.1
The “p” parameter must be used to install local packages. For “p” parameter you need no --hub:
kosi install -p package.tgz
The parameter f must be used to use .yaml files from the user.
kosi install <package> -f <user.yaml>
Example:
The package livedemo of the user kosi with version 2.7.1 is to be installed from the myhub software hub and user specific files are to be used for the installation:
kosi install --hub myhub kosi/livedemo:2.7.1 -f userfile1.yaml -f userfile2.yaml -f userfile3.yaml
Note: The
-fparameter can be specified any number of times to use any number of files. Note: The-fparameter can also be combined with the--hubparameter.
The parameter --cf must be used to use encrypted yaml files from the user.
kosi install <package> --cf <encryptedUser.yaml>
Example:
The package livedemo of the user kosi with version 2.7.1 is to be installed from the myhub software hub and user specific encrypted files are to be used for the installation:
kosi install --hub myhub kosi/livedemo:2.7.1 --cf encryptedUserfile1.yaml --cf encryptedUserfile2.yaml --cf encryptedUserfile3.yaml
Note: The
--cfparameter can be specified any number of times to use any number of encrypted files.
Note: The--cfparameter can also be combined with the--hubparameter.
Note: The--cfparameter can also be combined with the-fparameter.
IMPORTANT: If you combine
-fwith--cf, you must specify the-fparameter first before specifying--cf!
Example:
kosi install --hub myhub kosi/livedemo:2.7.1 -f userfile1.yaml -f userfile2.yaml --cf encryptedUserfile1.yaml --cf encryptedUserfile2.yaml
The namespace parameter can be used to specify a Kubernetes namespace in which the installation is to be performed.
kosi install --hub <hubname> <package> --namespace <namespace>
Example:
The package livedemo of the user kosi with version 2.7.1 is to be installed from the myhub software hub and a custom kubernetes namespace is used:
kosi install --hub myhub kosi/livedemo:2.7.1 --namespace MyNamespace
Note: If no
--namespaceparameter is specified, the namespacedefaultwill be used.
The parameter dname can be used to save the package under a specific name.
kosi install --hub <hubname> <package> --dname <deploymentname>
Example:
The package livedemo of the user kosi with version 2.7.1 is to be installed from the myhub software hub and a deployment name is set:
kosi install --hub myhub kosi/livedemo:2.7.1 --dname MyDeployment
Note: If no
--dnameparameter is specified, a random deployment name will be generated. Note: Deploymentnames are unique, the installation will stop if the deploymentname already exists.
Note: The deployment name is stored in the file/<user>/var/kubeops/kosi/deployment.yaml.
The kosi list command lists all installed KOSI packages:
kosi list
KOSI version: 2.10.0_preAlpha0
| Deployment | Package | PublicHub | Hub |
|------------------|-----------------------------------|-----------|--------|
| kosiinstallslima | kosi/lima:0.6.2 | | private|
| kosicreatetest | kosi/kosi-create:0.0.1 | | public |
| plugininstall | local/kubeops-basic-plugins:0.4.0 | | local |
The kosi update command updates an already installed KOSI package:
For update, the installation and the update package have to be the same name. Update will be defined in the package.yaml.
kosi update --hub <hubname> --dname <deploymentname> <package>
The string of the column
Installin the output ofkosi searchis required:
Example:
The installation of the package lima from the user kosi with version 0.6.2 and deployment name kosiInstallsLima is updated by a package from the myhub Software Hub from kosi.:
kosi update --hub myhub --dname kosiInstallsLima kosi/kosi/lima:0.6.2
The --hub parameter must be used to update packages from the software hub. Only the logged in user can update the packages from the software hub.
kosi update --hub <hubname> <package>
Example:
The package livedemo of the user kosi with version 2.7.1 is to be updated from the myhub Software Hub:
kosi update --hub myhub kosi/livedemo:2.7.1
```create:0.0.1
The “p” parameter must be used to update the installation from a local package. For “p” parameter you need no --hub parameter:
kosi update -p package.tgz
The parameter f must be used to use yaml files from the user.
kosi update --hub <hubname> <package> -f <user.yaml>
Example:
The installation of the package livedemo of the user kosi with version 2.7.1 is updated by a package from the myhub software hub and user specific files are to be used for the update progress:
kosi update --hub myhu kosi/livedemo:2.7.1 -f userfile1.yaml -f userfile2.yaml -f userfile3.yaml
Note: The
-fparameter can be specified any number of times to use any number of files. Note: The-fparameter can also be combined with the--hubparameters.
The parameter --cf must be used to use encrypted yaml files from the user.
kosi update --hub <hubname> <package> --cf <encryptedUser.yaml>
Example:
The installation of the package livedemo of the user kosi with version 2.7.1 is updated by a package from the myhub software hub and user specific encrypted files are to be used for the update progress:
kosi update --hub myhub kosi/livedemo:2.7.1 --cf encryptedUserfile1.yaml --cf encryptedUserfile2.yaml --cf encryptedUserfile3.yaml
Note: The
--cfparameter can be specified any number of times to use any number of encrypted files. Note: The--cfparameter can also be combined with the--hubparameter.
Note: The--cfparameter can also be combined with the-fparameter.
IMPORTANT: If you combine
-fwith--cf, you must specify the-fparameter first before specifying--cf!
Example:
kosi update --hub myhub kosi/livedemo:2.7.1 -f userfile1.yaml -f userfile2.yaml --cf encryptedUserfile1.yaml --cf encryptedUserfile2.yaml
The namespace parameter can be used to specify a kubernetes namespace in which the update is to be performed.
kosi update --hub <hubname> <package> --namespace <namespace>
Example:
The installation of the package livedemo of the user kosi with version 2.7.1 is updated by a package from the myhub software hub and a custom kubernetes namespace is used:
kosi update --hub myhub kosi/livedemo:2.7.1 --namespace MyNamespace
Note: If no
--namespaceparameter is specified, the default namespace will be used.
The parameter dname can be used to update the deployment by name.
kosi update --hub <hubname> <package> --dname <deploymentname>
Example:
The installation of the package livedemo of the user kosi with version 2.7.1 is updated by a package from the myhub software hub and a deployment name is set:
kosi update --hub myhub kosi/livedemo:2.7.1 --dname MyDeployment
The kosi delete command deletes an already installed KOSI package:
For delete, the installation and the update package have to be the same name. Delete will be defined in the package.yaml.
kosi delete --hub <hubname> --dname <deploymentname> <package>
The string of the column
Installin the output ofkosi searchis required:
Example:
The installation of the package lima from the user kosi with version 0.6.2 and deployment name kosiInstallsLima is deleted by a package from the myhub Software Hub from kosi.:
kosi delete --hub myhub --dname kosiInstallsLima kosi/kosi/lima:0.6.2
The --hub parameter must be used to use the delete section of packages from the software hub. Only the logged in user can use the delete section of packages from the software hub.
kosi delete --hub <hubname> <package>
Example:
The package livedemo of the user kosi with version 2.7.1 is to be updated from the myhub Software Hub:
kosi delete --hub myhub kosi/livedemo:2.7.1
```create:0.0.1
```-create:0.0.1
The “p” parameter must be used to delete the installation from a local package. For “p” parameter you need no --hub parameter:
kosi delete -p package.tgz
The parameter f must be used to use yaml files from the user.
kosi delete --hub <hubname> <package> -f <user.yaml>
Example:
The installation of the package livedemo of the user kosi with version 2.7.1 is deleted by a package from the myhub software hub and user specific files are to be used for the delete progress:
kosi delete --hub myhub kosi/livedemo:2.7.1 -f userfile1.yaml -f userfile2.yaml -f userfile3.yaml
Note: The
-fparameter can be specified any number of times to use any number of files. Note: The-fparameter can also be combined with the--hubparameter.
The parameter --cf must be used to use encrypted yaml files from the user.
kosi delete --hub <hubname> <package> -f <encryptedUser.yaml>
Example:
The installation of the package livedemo of the user kosi with version 2.7.1 is deleted by a package from the myhub software hub and user specific encrypted files are to be used for the delete progress:
kosi delete --hub myhub kosi/livedemo:2.7.1 -f encryptedUserfile1.yaml -f encryptedUserfile2.yaml -f encryptedUserfile3.yaml
Note: The
--cfparameter can be specified any number of times to use any number of encrypted files. Note: The--cfparameter can also be combined with the--hubparameter.
Note: The--cfparameter can also be combined with the-fparameter.
IMPORTANT: If you combine
-fwith--cf, you must specify the-fparameter first before specifying--cf!
Example:
kosi delete --hub myhub kosi/livedemo:2.7.1 -f userfile1.yaml -f userfile2.yaml --cf encryptedUserfile1.yaml --cf encryptedUserfile2.yaml
The namespace parameter can be used to specify a kubernetes namespace in which to perform the deletion.
kosi delete --hub <hubname> <package> --namespace <namespace>
Example:
The installation of the package livedemo of the user kosi with version 2.7.1 is deleted by a package from the myhub software hub and a custom kubernetes namespace is used:
kosi delete --hub myhub kosi/livedemo:2.7.1 --namespace MyNamespace
Note: If no
--namespaceparameter is specified, the default namespace will be used.
The parameter dname can be used to delete the deployment by name.
kosi delete --hub <hubname> <package> --dname <deploymentname>
Example:
The installation of the package livedemo of the user kosi with version 2.7.1 is deleted by a package from the myhub software hub and a deployment name is set:
kosi delete --hub myhub kosi/livedemo:2.7.1 --dname MyDeployment
The kosi remove command removes a KOSI package from the hub:
Note: Only logged users can delete there OWN packages on their OWN hubs.
kosi remove --hub <hubname> <package>
Note: the package you want to remove can be found in the output of the
kosi searchcommand, more precisely in theinstallcolumn
Example:
The package livedemo of the user kosi with version 2.7.1 will be removed from the myhub hub:
kosi remove --hub myhub kosi/livedemo:2.7.1
Note: If your package already deleted, the command will try do delete your package successfully. Deleting non-existing packages does not cause any errors.
The kosi check command is used to compare a local kosi package with a sha256 Checksum.
kosi check -p <localpackagename> <sha256 hash>
Example:
kosi check -p examplepackage c83f3db9639e175f82e7d07d342533866873e2d9ca2f0fd5ee607ea395417edb
This file defines properties of the KOSI package. This file is created after the kosi create command. The package.kosi defines a package in a specific version as well as the tasks needed to install it. The tasks which are used in the package.yaml are plugins, which can be created by the user. The includes.containers element is used for docker images. A container for the docker images will be created when the kosi install, kosi update or kosi delete command is used. There is also a description, which will be shown in the kosi search command.
The includes.files element describes the files which are inluded in the KOSI package. The installation.tasks tree describes the tasks (KOSI plugins), which are executed with the kosi install command. The update.tasks tree describes the tasks (KOSI plugins), which are executed with the kosi update command.The delete.tasks tree describes the tasks (KOSI plugins), which are executed with the kosi delete command.
IMPORTANT: To get your package please enter a fully lowercase name for your package.
Note: Do not change name for logo.png and docs.tgz
Note: Please name your markdown files inside docs.tgz without versions (docs/documentation-1.0.0.md).
IMPORTANT: Please name your packages without docker tags (:v1.0.0).
languageversion = "1.0.0";
apiversion = "kubernative/kubeops/sina/user/v3";
name = "kosi-example-packagev3";
description = "kosi-example-package";
version = "0.1.0";
docs = "docs.tgz";
logo = "logo.png";
files =
{
input="template.yaml";
}
containers =
{
example=["docker.io", "nginx", "latest"];
}
install
{
cmd(command="touch ~/kosiExample1");
}
update
{
cmd(command="touch ~/kosiExample2");
}
delete
{
cmd(command="rm ~/kosiExample1");
cmd(command="rm ~/kosiExample2");
}
This file defines properties of the KOSI package. This file is created after the kosi build command. The package.yaml defines a package in a specific version as well as the tasks needed to install it. The tasks which are used in the package.yaml are plugins, which can be created by the user. The includes.containers element is used for docker images. A container for the docker images will be created when the kosi install, kosi update or kosi delete command is used. There is also a description, which will be shown in the kosi search command.
The includes.files element describes the files which are inluded in the KOSI package. The installation.tasks tree describes the tasks (KOSI plugins), which are executed with the kosi install command. The update.tasks tree describes the tasks (KOSI plugins), which are executed with the kosi update command.The delete.tasks tree describes the tasks (KOSI plugins), which are executed with the kosi delete command.
IMPORTANT: The apiversion has been changed from …/user/v2 to …/user/v3. The Image Key has been split into to seperate Keys
registryandimage.
IMPORTANT: To get your package please enter a fully lowercase name for your package.
Note: Do not change name for logo.png and docs.tgz
Note: Please name your markdown files inside docs.tgz without versions (docs/documentation-1.0.0.md).
IMPORTANT: Please name your packages without docker tags (:v1.0.0).
# languageversion: "0.1.0"
apiversion: "kubernative/kubeops/sina/user/v3"
name: "kosi-example-packagev3"
description: "kosi-example-package"
version: "0.1.0"
docs: "docs.tgz"
logo: "logo.png"
includes:
files:
input: "template.yaml"
containers:
example:
registry: "docker.io"
image: "nginx"
tag: "latest"
installation:
tasks:
- cmd:
command: "touch ~/kosiExample1"
update:
tasks:
- cmd:
command: "touch ~/kosiExample2"
delete:
tasks:
- cmd:
command: "rm ~/kosiExample1"
- cmd:
command: "rm ~/kosiExample2"
The default.yaml in a package.tgz is used for setting default variables. In case you use the -f parameter in install, update or delete, the file which you address is merged with the default.yaml. If you have the same keys but different values in both files, your adressed file will overwrite the values set by the default.yaml.
Location for:
/var/kubeops/kosi/config.yaml
The config.yaml file contains all necessary files for networking and logging. For example, config.yaml contains the hub from which the packages are downloaded.
apiversion: kubernative/kosi/config/v2 # Shows the supported API-Version
spec:
hub: https://hub.kubernative.net/dispatcher/ # Adress to the KOSI online hub
plugins: /kubeops/kosi/kosi-plugins/ # Location of the KOSI-Plugins
registry: registry1.kubernative.net/ # Registry, where Docker-images will be pulled to (kosi pull)
workspace: /tmp/kosi/process/ # Workspace Path
logging: info # Loglevel options: info (default), warning, error, debug1, debug2, debug3
housekeeping: true # Housekeeping options: true (all temporary created folders will be deleted), false (all temporary created folders won't be deleted)
KOSI uses Workspaces for processing the packages. These workspaces can be deleted if you using CLI-commands and setting the housekeeping to true. Plugins also will operate in this workspace.
To keep KOSI running there has to be a valid config.yaml file.
After installing KOSI, a valid config.yaml file is created under the location /var/kubeops/kosi/config.yaml.
If you want to use your own Hub you can create a user-specific config.yaml file. The original file can be changed too, but it is not recommended.
The $KUBEOPSROOT environment variable stores the location of the KOSI plugins and the config.yaml. To use the variable, the config.yaml and the plugins have to be copied manually.
So for example:
cp -r /var/kubeops/kosi/config.yaml /home/<user>/kubeopsrootdir/kosi/config.yaml
rm -rf /var/kubeops/kosi
cp -r /var/kubeops/plugins /home/<user>/kubeopsrootdir/plugins
rm -rf /var/kubeops/plugins
If you want to use the config file and plugins with a user you have to go through these steps.
This is an example of how templating in a package.kosi is working with kosi 2.10.x
First we need to create this package.kosi:
# languageversion: "0.1.0"
apiversion = "kubernative/kubeops/sina/user/v3";
name = "kosi-example-packagev3";
description = "kosi-example-package";
version = "0.1.0";
docs = "docs.tgz";
logo = "logo.png";
files =
{
input="template.yaml";
}
containers =
{
example=["docker.io", "nginx", "latest"];
}
install
{
cmd(command='"echo using templatep plugin."');
template(tmpl='{{package.includes.files.input}}';target='{{values.target}}');
}
update
{
cmd(command='"touch ~/kosiExample2"');
template(tmpl='{{package.includes.files.input}}';target='{{values.target}}');
}
delete
{
cmd(command='"rm ~/kosiExample1"');
cmd(command='"rm ~/kosiExample2"');
}
Now we create a template.yaml:
package:
file: {{package.includes.files.input}}
uservalues: {{values.example}}
Next we create a default.yaml:
example: example
target: target.yaml
Please make sure that you create all these files in the same directory.
Now we are ready to create a kosi package. For this we need the following command:
kosi build
Next we can run the installation section we have defined in the package.yaml with the following command:
kosi install -p package.tgz --dname example
We can check the result in the directory $KUBEOPSROOT/kosi/tmp.
The file of interest is the target.yaml. But most of the time this file is not in tmp Folder . In this case, type the command find / -name target.yaml to find the location of the target.yaml file.
the content of target.yaml is:
package:
file: template.yaml
uservalues: example
So what exactly happened?
In the package.yaml you can see that we use {{package.includes.files.input}} for defining the template.yaml as value for the key tmpl. You can use any value of the package.yaml but make sure that the path to the value is correct and starts with package.. This is the indicator for using a variable from the package.yaml.
You can also see that we use {{values.target}} for defining the target.yaml as value for the key target. If you wonder where the target.yaml is coming from you can check the default.yaml. If you want to use a variable from the default.yaml or from a file specified with the parameter -f make sure that the path to the value is correct and starts with values..
For more information about the template syntax check the Scriban documentation (https://github.com/scriban/scriban/blob/master/doc/language.md) and try it out in the online demo (https://scribanonline.azurewebsites.net).
With the installation of KOSI a handful of plugins are included. Which plugins are included can be seen under “pre-installed plugins” in the Plugin References
This guide explains how to use KOSI with detailed instructions and examples.
kosi:
Kosi is a SoftwareINstAller for kubernetes cluster
Usage:
Kosi [options] [command]
Options:
--version Show version information
-?, -h, --help Show help and usage information
Commands:
login logs you in
search Shows you all the available packages on the softwarehub
build Creates your final kosi.package
push Push package.tgz to KubeOps Hub.
pull <package> Downloads an existing package from the hub without installing.
install <packagename> install a .tgz file and if it is required, download it
update <packagename> update a .tgz file and if it is required, download it
delete <packagename> run delete section of a .tgz file and if it is required, download it
list List packages from storage
lint lint your files for your .tgz package
create Creates a package.kosi and a template.yaml for you to manipulate
version Basic infos about KOSI
logout Logout
remove <package> Gives you the possibility to remove packages from the hub, if you have write permissions.
encrypt Gives you the possibility to encrypt your values with a password.
check <hash> check your local package hash
The command kosi --help gives you an overview of all available commands:
kosi --help
Alternatively, you can also enter kosi or kosi -? in the command line.
The kosi version command shows you the current version of KOSI.
kosi version
The output should be:
[ 12/03/2021 10:13:20 Debug1 default ] Check OS Support...
[ 12/03/2021 10:13:20 Debug1 default ] set Loglevel info
Version: 2.11.3.0
This work is licensed under Creative Commons Attribution - NoDerivatives 4.0 International License(see https://creativecommons.org/licenses/by-nd/4.0/legalcode for more details).
©KubeOps GmbH, Hinter Stöck 17, 72406 Bisingen - Germany, 2022
Note: The command works in the current directory.
The command kosi create creates four files (package.kosi, template.yaml, logo.png and docs.tgz) in the current directory. These files can be edited by the user.
The template.yaml is required if the template engine Scriban is to be used.
The logo.png is a package-thumbnail with the size of 50x50px
The docs.tgz is a zipped directory with the documentation of the package. The documentation of the package is written down in markdown. The file for the documentation is called readme.md.
Note: Please name your markdown files inside docs.tgz without a version-tag (docs/documentation-1.0.0.md).
kosi create
Created files:
Note: The command works in the current working directory.
Note: If you have no package.kosi file in your current working directory, KOSI will pick a package.yaml file.
Note: Name your package in the package.kosi in full lower case.
Note: Don´t change the name for logo.png and docs.tgz
Note: Please name your markdown files inside docs.tgz without a version-tag (docs/documentation-1.0.0.md).
IMPORTANT: Please name your packages without docker tags (:v1.0.0).
The kosi build command creates the necessary yaml files for building a package:
kosi build
All files specified in the package.kosi are combined together with the package.yaml to form a KOSI package.
The package.yaml is only generated once, if it is not available. If the package.yaml already exists the package.yaml will not be generated.
The kosi lint command is used to check whether the contents of the package.yaml or package.kosi files are valid:
kosi lint
The kosi login command logs on to the KubeOps services. The account name is required for this command.
Note: To push packages into the hub, you need to create an account here first. Note: We recommend lowercase usernames for your kubeops-accounts.
After the flag -u type your username.
Afterwards you will be asked to enter your password.
kosi login -u <username>
The parameter -p is used to enter the password in the command directly, but it is important to know that the password will be shown in plain text. This parameter can help with the automation of KOSI commands.
kosi login -u <username> -p <password>
The -u parameter is used to specify the user name.
kosi login -u
This parameter is required.
The -p parameter is used to specify the password.
kosi login -p
This parameter is not required. We recommend to use this parameter only if it is absolutely necessary.
The kosi logout command logs out from the KubeOps services.
Note: To logout from the KubeOps services, you have to be logged in.
kosi logout
The kosi push command uploads KOSI packages to the KubeOps Hub:
kosi push --hub <hubname>
Note: In order to upload KOSI packages, you first have to log in using the
kosi logincommand.
Note: The package name is case-sensitive and should be lowercase.
The --hub parameter is used to upload KOSI packages to a specific hub, e.g. in this example we upload our KOSI package to the public hub.
kosi push --hub public
The kosi pull command downloads a specific KOSI package from the hub without installing it directly.
kosi pull --hub <hubname> <packagename> -o <desired name>
Note:
kosi pulldownloads the package to the current directory.
Note: The downloaded packages can be transferred to machines without internet access via USB, for example.
Note: The package name is case-sensitive and should be lowercase.
Example:
kosi pull --hub public donald/kosi-print-test:0.0.1 -o printpackage
Note: The -o option specifies a name that the package will have after download. The file automatically gets the .tgz extension. The -o option is not optional.
The --hub parameter is used to download KOSI packages to a specific hub, e.g. in this example we are pulling our KOSI package from the public hub.
kosi pull --hub public kubeops/harbor:1.1.0
The parameter r can be used to pull the docker images which are included in the package to a given local docker registry.
kosi pull --hub <hubname> <packagename> -o <desired name> -r <local.docker.registry>
Note:
kosi pulldownloads the package and pulls the required docker images to the given local docker registry.
Example:
kosi pull --hub public kubeops/harbor:1.1.0 -o harborpackage -r 127.0.0.1:5000
Note: After the
kosi pull kubeops/harbor:1.1.0 -o printpackage -r 127.0.0.1:5000command you can usekosi install -p printpackage.tgzto use the docker image from your local docker registry.
Note: You can now install your packages including docker images without internet connection from your local machine.
For the szenario that the registry of the cluster is exposed to the admin via a network internal domain name, but this name can’t be resolved by the nodes, the flag -t can be used, to use the cluster internal hostname of the registry.
kosi pull --hub <hubname> <packagename> -o <desired name> -r <local.docker.registry> -t <cluster.internal.registry>
Note: local.docker.registry is the same registry as cluster.internal.registry but with a different hostname.
Example:
kosi pull --hub public kubeops/harbor:1.1.0 -o harborpackage -r myregistry:5000 -t clusterregistry:5000
IMPORTANT: -t flag can only be used in combination with the -r flag.
The kosi search command displays all available packages of your own private hub. Only the logged in user can see the packages on his private hub.
The User column contains the name of the creator of the package.
The Name column contains the name of the package.
The Version column contains the version of the package.
The Description column contains the description of the package.
The Install column contains a string consisting of the name of the creator, name and version of the package. This string can be copied and used for the kosi install command.
kosi search --hub <hubname>
Example: User donald is logged in and wants to get the packets from his private hub:
kosi search --hub donald
| User | Name | Version | Description |Install |
|--------|--------------|---------|----------------------------------|---------------------------|
| donald | private-kosi | 0.0.1 | private installation | donald/private-kosi:0.0.1 |
| donald | private-test | 0.0.1 | private package | donald/private-test:0.0.1 |
| donald | livedemo | 2.7.2 | welcome to kosi | donald/livedemo:2.7.1 |
The --ps parameter can be used to filter for keywords that refer to all five columns. It is also possible to filter by individual word components:
kosi search --hub <hubname> --ps <name>
Example:
In this case, all packets containing the word private are displayed:
kosi search --hub donald --ps private
| User | Name | Version | Description |Install |
|--------|--------------|---------|----------------------------------|---------------------------|
| donald | private-kosi | 0.0.1 | private installation | donald/private-kosi:0.0.1 |
| donald | private-test | 0.0.1 | private package | donald/private-test:0.0.1 |
In addition, there is an option to search for packages on a specific hub using the --hub parameter. You need no login to search in the public hub.
kosi search --hub public
| User | Name | Version | Description |Install |
|--------|--------------|---------|----------------------------------|-------------------------|
| kosi | lima | 0.6.2 | installs LIMA | kosi/lima:0.6.2 |
| kosi | installation | 0.0.1 | kosi create example package.yaml | kosi/installation:0.0.1 |
| donald | elk-kosi | 0.0.1 | ELK installation | donald/elk-kosi:0.0.1 |
| donald | prod-test | 0.0.1 | test for prod | donald/prod-test:0.0.1 |
| lima | lima | 0.6.0 | installs LIMA | lima/lima:0.6.0 |
The parameters --hub and --ps can be combined for a targeted search in the kosi hub:
kosi search --hub <hubname> --ps <package_name>
Example:
The user kosi wants to display all packages in the kosi hub with the term “lima”.
kosi search --hub kosi --ps lima
| User | Name | Version | Description |Install |
|------|--------------|---------|----------------------------------|-------------------------|
| kosi | lima | 0.6.2 | installs LIMA | kosi/lima:0.6.2 |
| kosi | lima | 0.7.1 | installs LIMA | kosi/lima:0.7.1 |
The kosi encrypt command is used to encrypt YAML files with AES-256-CBC:
The parameter -f must be used to use yaml files from the user.
This parameter is required.
kosi encrypt -f <user.yaml>
Note: The
-fparameter can be specified any number of times to use any number of files.
kosi encrypt -f userfile1.yaml -f userfile2.yaml -f userfile3.yaml
The kosi install command installs a KOSI package:
kosi install --hub <hubname> <package>
The string of the column
Installin the output ofkosi searchis required:
Example:
The package livedemo of the user kosi with version 2.7.1 is to be installed from the public Hub:
kosi install --hub public kosi/livedemo:2.7.1
The --hub parameter must be used to install packages from the software hub. Only the logged in user can install the packages from the software hub.
kosi install --hub <hubname> <package>
Example:
The package livedemo of the user kosi with version 2.7.1 is to be installed from the public Software Hub:
kosi install --hub public kosi/livedemo:2.7.1
The “p” parameter must be used to install local packages. For “p” parameter you need no --hub:
kosi install -p package.tgz
The parameter f must be used to use .yaml files from the user.
kosi install <package> -f <user.yaml>
Example:
The package livedemo of the user kosi with version 2.7.1 is to be installed from the public software hub and user specific files are to be used for the installation:
kosi install --hub public kosi/livedemo:2.7.1 -f userfile1.yaml -f userfile2.yaml -f userfile3.yaml
Note: The
-fparameter can be specified any number of times to use any number of files. Note: The-fparameter can also be combined with the--hubparameter.
The parameter --cf must be used to use encrypted yaml files from the user.
kosi install <package> --cf <encryptedUser.yaml>
Example:
The package livedemo of the user kosi with version 2.7.1 is to be installed from the public software hub and user specific encrypted files are to be used for the installation:
kosi install --hub public kosi/livedemo:2.7.1 --cf encryptedUserfile1.yaml --cf encryptedUserfile2.yaml --cf encryptedUserfile3.yaml
Note: The
--cfparameter can be specified any number of times to use any number of encrypted files.
Note: The--cfparameter can also be combined with the--hubparameter.
Note: The--cfparameter can also be combined with the-fparameter.
IMPORTANT: If you combine
-fwith--cf, you must specify the-fparameter first before specifying--cf!
Example:
kosi install --hub public kosi/livedemo:2.7.1 -f userfile1.yaml -f userfile2.yaml --cf encryptedUserfile1.yaml --cf encryptedUserfile2.yaml
The namespace parameter can be used to specify a Kubernetes namespace in which the installation is to be performed.
kosi install --hub <hubname> <package> --namespace <namespace>
Example:
The package livedemo of the user kosi with version 2.7.1 is to be installed from the public software hub and a custom kubernetes namespace is used:
kosi install --hub public kosi/livedemo:2.7.1 --namespace MyNamespace
Note: If no
--namespaceparameter is specified, the namespacedefaultwill be used.
The parameter dname can be used to save the package under a specific name.
kosi install --hub <hubname> <package> --dname <deploymentname>
Example:
The package livedemo of the user kosi with version 2.7.1 is to be installed from the public software hub and a deployment name is set:
kosi install --hub public kosi/livedemo:2.7.1 --dname MyDeployment
Note: If no
--dnameparameter is specified, a random deployment name will be generated. Note: Deploymentnames are unique, the installation will stop if the deploymentname already exists.
Note: The deployment name is stored in the file/<user>/var/kubeops/kosi/deployment.yaml.
The kosi list command lists all installed KOSI packages:
kosi list
KOSI version: 2.10.0_preAlpha0
| Deployment | Package | PublicHub | Hub |
|------------------|-----------------------------------|-----------|--------|
| kosiinstallslima | kosi/lima:0.6.2 | | private|
| kosicreatetest | kosi/kosi-create:0.0.1 | | public |
| plugininstall | local/kubeops-basic-plugins:0.4.0 | | local |
The kosi update command updates an already installed KOSI package:
For update, the installation and the update package have to be the same name. Update will be defined in the package.yaml.
kosi update --hub <hubname> --dname <deploymentname> <package>
The string of the column
Installin the output ofkosi searchis required:
Example:
The installation of the package lima from the user kosi with version 0.6.2 and deployment name kosiInstallsLima is updated by a package from the private Software Hub from kosi.:
kosi update --hub public --dname kosiInstallsLima kosi/kosi/lima:0.6.2
The --hub parameter must be used to update packages from the software hub. Only the logged in user can update the packages from the software hub.
kosi update --hub <hubname> <package>
Example:
The package livedemo of the user kosi with version 2.7.1 is to be updated from the public Software Hub:
kosi update --hub public kosi/livedemo:2.7.1
```create:0.0.1
The “p” parameter must be used to update the installation from a local package. For “p” parameter you need no --hub parameter:
kosi update -p package.tgz
The parameter f must be used to use yaml files from the user.
kosi update --hub <hubname> <package> -f <user.yaml>
Example:
The installation of the package livedemo of the user kosi with version 2.7.1 is updated by a package from the public software hub and user specific files are to be used for the update progress:
kosi update --hub public kosi/livedemo:2.7.1 -f userfile1.yaml -f userfile2.yaml -f userfile3.yaml
Note: The
-fparameter can be specified any number of times to use any number of files. Note: The-fparameter can also be combined with the--hubparameters.
The parameter --cf must be used to use encrypted yaml files from the user.
kosi update --hub <hubname> <package> --cf <encryptedUser.yaml>
Example:
The installation of the package livedemo of the user kosi with version 2.7.1 is updated by a package from the public software hub and user specific encrypted files are to be used for the update progress:
kosi update --hub public kosi/livedemo:2.7.1 --cf encryptedUserfile1.yaml --cf encryptedUserfile2.yaml --cf encryptedUserfile3.yaml
Note: The
--cfparameter can be specified any number of times to use any number of encrypted files. Note: The--cfparameter can also be combined with the--hubparameter.
Note: The--cfparameter can also be combined with the-fparameter.
IMPORTANT: If you combine
-fwith--cf, you must specify the-fparameter first before specifying--cf!
Example:
kosi update --hub public kosi/livedemo:2.7.1 -f userfile1.yaml -f userfile2.yaml --cf encryptedUserfile1.yaml --cf encryptedUserfile2.yaml
The namespace parameter can be used to specify a kubernetes namespace in which the update is to be performed.
kosi update --hub <hubname> <package> --namespace <namespace>
Example:
The installation of the package livedemo of the user kosi with version 2.7.1 is updated by a package from the public software hub and a custom kubernetes namespace is used:
kosi update --hub public kosi/livedemo:2.7.1 --namespace MyNamespace
Note: If no
--namespaceparameter is specified, the default namespace will be used.
The parameter dname can be used to update the deployment by name.
kosi update --hub <hubname> <package> --dname <deploymentname>
Example:
The installation of the package livedemo of the user kosi with version 2.7.1 is updated by a package from the public software hub and a deployment name is set:
kosi update --hub public kosi/livedemo:2.7.1 --dname MyDeployment
The kosi delete command deletes an already installed KOSI package:
For delete, the installation and the update package have to be the same name. Delete will be defined in the package.yaml.
kosi delete --hub <hubname> --dname <deploymentname> <package>
The string of the column
Installin the output ofkosi searchis required:
Example:
The installation of the package lima from the user kosi with version 0.6.2 and deployment name kosiInstallsLima is deleted by a package from the public Software Hub from kosi.:
kosi delete --hub public --dname kosiInstallsLima kosi/kosi/lima:0.6.2
The --hub parameter must be used to use the delete section of packages from the software hub. Only the logged in user can use the delete section of packages from the software hub.
kosi delete --hub <hubname> <package>
Example:
The package livedemo of the user kosi with version 2.7.1 is to be updated from the public Software Hub:
kosi delete --hub public kosi/livedemo:2.7.1
```create:0.0.1
```-create:0.0.1
The “p” parameter must be used to delete the installation from a local package. For “p” parameter you need no --hub parameter:
kosi delete -p package.tgz
The parameter f must be used to use yaml files from the user.
kosi delete --hub <hubname> <package> -f <user.yaml>
Example:
The installation of the package livedemo of the user kosi with version 2.7.1 is deleted by a package from the public software hub and user specific files are to be used for the delete progress:
kosi delete --hub public kosi/livedemo:2.7.1 -f userfile1.yaml -f userfile2.yaml -f userfile3.yaml
Note: The
-fparameter can be specified any number of times to use any number of files. Note: The-fparameter can also be combined with the--hubparameter.
The parameter --cf must be used to use encrypted yaml files from the user.
kosi delete --hub <hubname> <package> -f <encryptedUser.yaml>
Example:
The installation of the package livedemo of the user kosi with version 2.7.1 is deleted by a package from the public software hub and user specific encrypted files are to be used for the delete progress:
kosi delete --hub public kosi/livedemo:2.7.1 -f encryptedUserfile1.yaml -f encryptedUserfile2.yaml -f encryptedUserfile3.yaml
Note: The
--cfparameter can be specified any number of times to use any number of encrypted files. Note: The--cfparameter can also be combined with the--hubparameter.
Note: The--cfparameter can also be combined with the-fparameter.
IMPORTANT: If you combine
-fwith--cf, you must specify the-fparameter first before specifying--cf!
Example:
kosi delete --hub public kosi/livedemo:2.7.1 -f userfile1.yaml -f userfile2.yaml --cf encryptedUserfile1.yaml --cf encryptedUserfile2.yaml
The namespace parameter can be used to specify a kubernetes namespace in which to perform the deletion.
kosi delete --hub <hubname> <package> --namespace <namespace>
Example:
The installation of the package livedemo of the user kosi with version 2.7.1 is deleted by a package from the public software hub and a custom kubernetes namespace is used:
kosi delete --hub public kosi/livedemo:2.7.1 --namespace MyNamespace
Note: If no
--namespaceparameter is specified, the default namespace will be used.
The parameter dname can be used to delete the deployment by name.
kosi delete --hub <hubname> <package> --dname <deploymentname>
Example:
The installation of the package livedemo of the user kosi with version 2.7.1 is deleted by a package from the public software hub and a deployment name is set:
kosi delete --hub public kosi/livedemo:2.7.1 --dname MyDeployment
The kosi remove command removes a KOSI package from the hub:
Note: Only logged users can delete there own packages on their own hubs.
kosi remove --hub <hubname> <package>
Note: the package you want to remove can be found in the output of the
kosi searchcommand, more precisely in theinstallcolumn
Example:
The package livedemo of the user kosi with version 2.7.1 will be removed from the public hub:
kosi remove --hub public kosi/livedemo:2.7.1
Note: If your package already deleted, the command will try do delete your package successfully. Deleting non-existing packages does not cause any errors.
The kosi check command is used to compare a local kosi package with a sha256 Checksum.
kosi check -p <localpackagename> <sha256 hash>
Example:
kosi check -p examplepackage c83f3db9639e175f82e7d07d342533866873e2d9ca2f0fd5ee607ea395417edb
This file defines properties of the KOSI package. This file is created after the kosi create command. The package.kosi defines a package in a specific version as well as the tasks needed to install it. The tasks which are used in the package.yaml are plugins, which can be created by the user. The includes.containers element is used for docker images. A container for the docker images will be created when the kosi install, kosi update or kosi delete command is used. There is also a description, which will be shown in the kosi search command.
The includes.files element describes the files which are inluded in the KOSI package. The installation.tasks tree describes the tasks (KOSI plugins), which are executed with the kosi install command. The update.tasks tree describes the tasks (KOSI plugins), which are executed with the kosi update command.The delete.tasks tree describes the tasks (KOSI plugins), which are executed with the kosi delete command.
IMPORTANT: To get your package please enter a fully lowercase name for your package.
Note: Do not change name for logo.png and docs.tgz
Note: Please name your markdown files inside docs.tgz without versions (docs/documentation-1.0.0.md).
IMPORTANT: Please name your packages without docker tags (:v1.0.0).
languageversion = "1.0.0";
apiversion = "kubernative/kubeops/sina/user/v3";
name = "kosi-example-packagev3";
description = "kosi-example-package";
version = "0.1.0";
docs = "docs.tgz";
logo = "logo.png";
files =
{
input = "template.yaml";
}
containers =
{
example = ["docker.io", "nginx", "latest"];
}
install
{
cmd(command = "touch ~/kosiExample1");
}
update
{
cmd(command= "touch ~/kosiExample2");
}
delete
{
cmd(command = "rm ~/kosiExample1");
cmd(command = "rm ~/kosiExample2");
}
This file defines properties of the KOSI package. This file is created after the kosi build command. The package.yaml defines a package in a specific version as well as the tasks needed to install it. The tasks which are used in the package.yaml are plugins, which can be created by the user. The includes.containers element is used for docker images. A container for the docker images will be created when the kosi install, kosi update or kosi delete command is used. There is also a description, which will be shown in the kosi search command.
The includes.files element describes the files which are inluded in the KOSI package. The installation.tasks tree describes the tasks (KOSI plugins), which are executed with the kosi install command. The update.tasks tree describes the tasks (KOSI plugins), which are executed with the kosi update command.The delete.tasks tree describes the tasks (KOSI plugins), which are executed with the kosi delete command.
IMPORTANT: The apiversion has been changed from …/user/v2 to …/user/v3. The Image Key has been split into to seperate Keys
registryandimage.
IMPORTANT: To get your package please enter a fully lowercase name for your package.
Note: Do not change name for logo.png and docs.tgz
Note: Please name your markdown files inside docs.tgz without versions (docs/documentation-1.0.0.md).
IMPORTANT: Please name your packages without docker tags (:v1.0.0).
# languageversion: "0.1.0"
apiversion: "kubernative/kubeops/sina/user/v3"
name: "kosi-example-packagev3"
description: "kosi-example-package"
version: "0.1.0"
docs: "docs.tgz"
logo: "logo.png"
includes:
files:
input: "template.yaml"
containers:
example:
registry: "docker.io"
image: "nginx"
tag: "latest"
installation:
tasks:
- cmd:
command: "touch ~/kosiExample1"
update:
tasks:
- cmd:
command: "touch ~/kosiExample2"
delete:
tasks:
- cmd:
command: "rm ~/kosiExample1"
- cmd:
command: "rm ~/kosiExample2"
The default.yaml in a package.tgz is used for setting default variables. In case you use the -f parameter in install, update or delete, the file which you address is merged with the default.yaml. If you have the same keys but different values in both files, your adressed file will overwrite the values set by the default.yaml.
Location for:
/var/kubeops/kosi/config.yaml
The config.yaml file contains all necessary files for networking and logging. For example, config.yaml contains the hub from which the packages are downloaded.
apiversion: kubernative/kosi/config/v2 # Shows the supported API-Version
spec:
hub: https://hub.kubernative.net/dispatcher/ # Adress to the KOSI online hub
plugins: /kubeops/kosi/kosi-plugins/ # Location of the KOSI-Plugins
registry: registry1.kubernative.net/ # Registry, where Docker-images will be pulled to (kosi pull)
workspace: /tmp/kosi/process/ # Workspace Path
logging: info # Loglevel options: info (default), warning, error, debug1, debug2, debug3
housekeeping: true # Housekeeping options: true (all temporary created folders will be deleted), false (all temporary created folders won't be deleted)
To keep KOSI running there has to be a valid config.yaml file.
After installing KOSI, a valid config.yaml file is created under the location /var/kubeops/kosi/config.yaml.
If you want to use your own Hub you can create a user-specific config.yaml file. The original file can be changed too, but it is not recommended.
The $KUBEOPSROOT environment variable stores the location of the KOSI plugins and the config.yaml. To use the variable, the config.yaml and the plugins have to be copied manually.
So for example:
cp -r /var/kubeops/kosi/config.yaml /home/<user>/kubeopsrootdir/kosi/config.yaml
rm -rf /var/kubeops/kosi
cp -r /var/kubeops/plugins /home/<user>/kubeopsrootdir/plugins
rm -rf /var/kubeops/plugins
If you want to use the config file and plugins with a user you have to go through these steps.
This is an example of how templating in a package.kosi is working with kosi 2.10.x
First we need to create this package.kosi:
# languageversion: "0.1.0"
apiversion = "kubernative/kubeops/sina/user/v3";
name = "kosi-example-packagev3";
description = "kosi-example-package";
version = "0.1.0";
docs = "docs.tgz";
logo = "logo.png";
files =
{
input = "template.yaml";
}
containers =
{
example = ["docker.io", "nginx", "latest"];
}
install
{
cmd(command = '"echo using templatep plugin."');
template
(
tmpl = '{{package.includes.files.input}}';
target = '{{values.target}}';
);
}
update
{
cmd(command = '"touch ~/kosiExample2"');
template
(
tmpl = '{{package.includes.files.input}}';
target = '{{values.target}}';
);
}
delete
{
cmd(command = '"rm ~/kosiExample1"');
cmd(command = '"rm ~/kosiExample2"');
}
Now we create a template.yaml:
package:
file: {{package.includes.files.input}}
uservalues: {{values.example}}
Next we create a default.yaml:
example: example
target: target.yaml
Please make sure that you create all these files in the same directory.
Now we are ready to create a kosi package. For this we need the following command:
kosi build
Next we can run the installation section we have defined in the package.yaml with the following command:
kosi install -p package.tgz --dname example
We can check the result in the directory $KUBEOPSROOT/kosi/tmp.
The file of interest is the target.yaml. But most of the time this file is not in tmp Folder . In this case, type the command find / -name target.yaml to find the location of the target.yaml file.
the content of target.yaml is:
package:
file: template.yaml
uservalues: example
So what exactly happened?
In the package.yaml you can see that we use {{package.includes.files.input}} for defining the template.yaml as value for the key tmpl. You can use any value of the package.yaml but make sure that the path to the value is correct and starts with package.. This is the indicator for using a variable from the package.yaml.
You can also see that we use {{values.target}} for defining the target.yaml as value for the key target. If you wonder where the target.yaml is coming from you can check the default.yaml. If you want to use a variable from the default.yaml or from a file specified with the parameter -f make sure that the path to the value is correct and starts with values..
For more information about the template syntax check the Scriban documentation (https://github.com/scriban/scriban/blob/master/doc/language.md) and try it out in the online demo (https://scribanonline.azurewebsites.net).
With the installation of KOSI a handful of plugins are included. Which plugins are included can be seen under “pre-installed plugins” in the Plugin References