This is the multi-page printable view of this section. Click here to print.
Getting Started
- 1: About Kosi
- 2: About KubeOps Licences
- 3: Installation Guide
- 4: Create a KOSI account (with SSO)
- 5: Creating a Basic KOSI-Package and Deployment
- 6: KubeOps Migration
1 - About Kosi
What is KOSI
KOSI is a professional software installation tool tailored for Kubernetes clusters. Its primary function is to streamline the process of defining, installing, and managing self-contained packages within Kubernetes environments. These packages are versatile and can be adapted to suit various requirements and configurations.
By packaging applications and their associated Kubernetes resources into KOSI packages, developers can easily share and distribute their applications. Users can then use KOSI to install, upgrade, and manage these packages, making it easier to deploy complex applications in Kubernetes environments.
KOSI uses a quick-to-learn command line interface (CLI).
Why use KOSI?
KOSI, drawing inspiration from Helm’s user-friendly design, empowers software developers to craft comprehensive packages. These packages can include multiple artifacts and essential dependencies, consolidated into a single KOSI package.
When deploying software into your environments, you simply retrieve this package from the KubeOps hub. KOSI efficiently manages all relevant dependencies, ensuring smooth installation processes.
This makes the process of installing software with KOSI into your cluster simplified, secure and flawless.
Highlights
-
Supports Images and Artifacts in one Package
OSI stands out among other package managers because of its distinctive capability to package container images alongside other artifacts within the same package. -
Self-Contained Packages
KOSI’s ability to generate a single, self-contained package reduces the risk of human errors that can result from manual steps during software deployment. -
Customizable Plugins
KOSI offers pre-built plugins that facilitate the execution of several common tasks directly through KOSI packages. Additionally, you can easily access more plugins via our KubeOps hub. -
Scalable and Secure
KOSI supports software distribution in complex environments, including those where outgoing proxies restrict broad internet access. -
Integration and Support of other Tools KOSI seamlessly integrates with Helm, Podman and Docker, ensuring compatibility across various containerized environments. This compatibility allows users to leverage the strengths of Helms package management capabilities and Dockers containerization technology within the KOSI ecosystem. By supporting these widely used tools, KOSI enhances flexibility and efficiency in deploying and managing software across diverse infrastructure setups.
Click here to download and get started with KOSI now.
2 - About KubeOps Licences
About KubeOps Licences
For KubeOps 1.7+ licences are required. KubeOps is a tool set which consists of 3 tools: KOSI, KubeOps Platform (Compliance and Compliance + VM). In the table you can see which functions are accessable with given licence.
If you create an account, you get a free 10 days trail-version of our licences.
KubeOps KOSI
| Functions | KOSI-Essential | KOSI-Enterprise |
|---|---|---|
| Push Packages | ✓ | ✓ |
| Pull Packages | ✓ | ✓ |
| List Packages | ✓ | ✓ |
| Install Packages | ✓ | ✓ |
| Update Packages | ✓ | ✓ |
| Delete Packages | ✓ | ✓ |
| Remove Packages | ✓ | ✓ |
| Encrypt Value-files | ✓ | ✓ |
| Lint Packages | ✓ | ✓ |
| Use Private Registry-space | ✓ | ✓ |
| Use Private Hub | ✓ | ✓ |
| Build *Basic Packages | ✓ | ✓ |
| Build **Advanced Packages | ✗ | ✓ |
| Price | FREE | Contact Sales |
* Basic Packages: Package-build-process is limited by the basic plugins. Click Here
** Advanced Packages: Package-build-process hase full access to all plugins. Click Here
KubeOps Platform
| Functions | Compliance | Compliance + VM |
|---|---|---|
| Cluster Lifecycle Management | ✓ | ✓ |
| - Build Cluster | ✓ | ✓ |
| - Build Airgap Cluster | ✓ | ✓ |
| Security Hardening | ✓ | ✓ |
| Cloud Native VM Hypervisor | ✗ | ✓ |
| Price | Contact Sales | Contact Sales |
3 - Installation Guide
In this quickstart you will learn about:
- KOSI system requirements
- how to install KOSI
- how to use the official KubeOps Website to download KOSI
- how to install required software
KOSI seamlessly integrates with other package management software such as Helm and Podman. To ensure compatibility across different containerized environments, KOSI requires the installation of this software.
After the installation, KOSI is available as command line interface.
Prerequisites
To get the most out of this guide, the following requirements should be met:
- basic understanding of Linux environments, bash / shell
- sudo privileges (root) to install packages
Step 1 - System Requirements
Make sure you have prepared the listed requirements before installing KOSI.
KOSI is designed to work with the latest versions of the following operating systems:
| OS | Diskspace |
|---|---|
| Red Hat Enterprise Linux 9.6 and 9.7 | 500 MB |
| Ubuntu 24.04.02 | 500 MB |
By default Red Hat Enterprise Linux restricts package management such as installing or updating. Before installing any software, you may need to register and subscribe with the Red Hat Customer Portal.
To register and subscribe, run the command subscription-manager register.
Step 2 - Include Package Repo
To easily install the kosi package you should add the kubeops package repo to your operating system’s package manager.
wget https://packagerepo.kubeops.net/pgp-key.public
cat pgp-key.public | sudo gpg --dearmor -o /usr/share/keyrings/kubeops.gpg
echo 'deb [arch=amd64 signed-by=/usr/share/keyrings/kubeops.gpg] https://packagerepo.kubeops.net/deb stable main' | sudo tee /etc/apt/sources.list.d/kubeops.list
sudo apt update
sudo dnf config-manager --add-repo https://packagerepo.kubeops.net/rpm/kubeops.repo
Step 3 - Install KOSI
There are two ways to install kosi.
a) quick via the package repo of your operating system’s package manager.
sudo apt update
sudo apt install -y kosi=2.14*
sudo dnf install -y --disableexcludes=kubeops-repo kosi-2.14.0.0-0
b) manual download the kosi package from the official KubeOps Website and install it.
Downloading KOSI
Login into your KubeOps account. If you don‘t have an account, you can create one by following the instructions for Create a KOSI account (with SSO).
Download your desired version of the KOSI package file (.rpm or .deb) from the official download page.
# download kosi deb manually and install with
sudo dpkg --install kosi_2.14.0.0-1_amd64.deb
# download kosi rpm manually and install with
sudo rpm --install -v kosi-2.14.0.0-0.x86_64.rpm
Step 4 - Set the KUBEOPSROOT env var
Set KUBEOPSROOT and XDG_RUNTIME_DIR in ~/.bashrc
# file ~/.bashrc
# Append these values to the end of your ~/.bashrc file
export KUBEOPSROOT=/home/<yourUser>/kubeops
export XDG_RUNTIME_DIR=$KUBEOPSROOT
Source .bashrc to apply the values
source ~/.bashrc
echo $KUBEOPSROOT
echo $XDG_RUNTIME_DIR
As a result you should see your KUBEOPSROOT-path two times.
Step 5 - Adjust KOSI Configuration
This creates a kubeops directory in your home directory and transfers all necessary files, e.g., the kosi-config and the plugins, to it.
mkdir ~/kubeops
cd ~/kubeops
cp -R /var/kubeops/kosi/ .
cp -R /var/kubeops/plugins/ .
The config.yaml is in your KUBEOPSROOT-path (typically in
~/kubeops/kosi)
- Set hub in your kosi config to
hub: https://dispatcher.kubeops.net/v4/dispatcher/
- Set the “plugins”-entry in your kosi config to
plugins: /home/<yourUser>/kubeops/plugins, whereis changed to your username
# file $KUBEOPSROOT/kosi/config.yaml
apiversion: kubernative/sina/config/v2

spec:
  hub: https://dispatcher.kubeops.net/v4/dispatcher/ # <-- set hub url
  plugins: <your kubeopsroot>/plugins/ # <-- set the path to your plugin folder (~ for home or $KUBEOPSROOT don't work, it has to be the full path)
  workspace: /tmp/kosi/process/
  logging: info
  housekeeping: false
  proxy: false
Step 6 - Install KOSI enterprise plugins
kosi install --hub kosi-enterprise kosi/enterprise-plugins:2.0.0
Step 7 - Install Podman
To ensure compatibility across different containerized environments, KOSI requires the installation of Podman (latest version).
Install Podman using the inbuilt package manager.
sudo apt update
sudo apt install -y podman
sudo dnf install -y podman
Step 8 - Install Helm
Many KOSI packages use helm. Therefore, it is recommended to install helm.
Install Helm using the KubeOps package repo.
sudo apt update
sudo apt install -y helm
sudo dnf install -y helm
Verify your Installation
To verify the installation of KOSI on your system, use the command kosi version.
kosi version
The output displays the KOSI version along with relevant information. It confirms the successful installation of KOSI.
2026-01-23 16:09:55 Info:      KOSI version: 2.14.0.0
2026-01-23 16:09:55 Info:      Latest KOSI-package-apiversion: kubernative/kubeops/sina/user/v4
2026-01-23 16:09:55 Info:      Latest KOSI-lanugage-version is: 1.0.0
2026-01-23 16:09:55 Info:      This work is licensed under Creative Commons Attribution - NoDerivatives 4.0 International License(see https://creativecommons.org/licenses/by-nd/4.0/legalcode for more details).
2026-01-23 16:09:55 Info:      © KubeOps GmbH, Hinter Stöck 17, 72406 Bisingen - Germany, 2025
Check if you can log in with the command kosi login.
kosi login -u <yourUser>
The output confirms that you are successfully loged in.
2026-01-23 16:11:40 Info:      KOSI version: 2.14.0.0
2026-01-23 16:11:47 Info:      Login Succeeded to Hub.
2026-01-23 16:11:48 Info:      The login to registry was successful. You are now logged in as kubeops and can use the public and private registry.
4 - Create a KOSI account (with SSO)
How to register a KubeOps account
You can register a KubeOps account either via the website or directly via the KubeOps-Registry.
Register account via the Website
You can create an account on our website by scrolling to the bottom of the page and clicking the Login button.
This will redirect you to our login page:
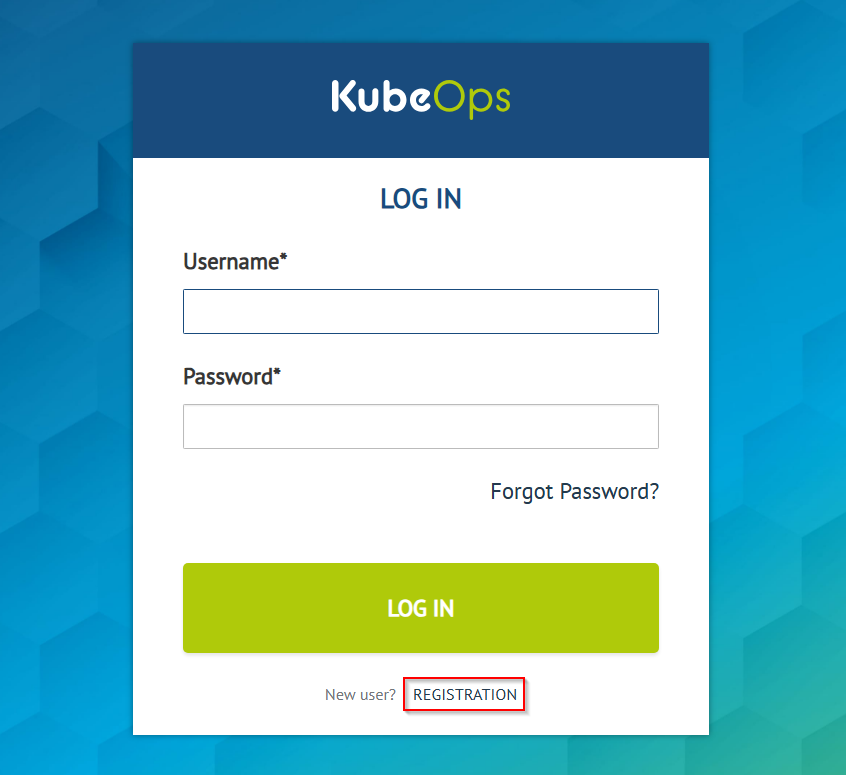
At the bottom of the form, you will find the REGISTRATION button. Click it to open the registration form, enter your details, and create your account.
Activate your account to use KOSI
After successful registration, you must log in once into the KubeOps-Registry. Once logged in, you can switch to KOSI and use it as normal.
(alternative) Register account via KubeOps-registry
You can also register a user account directly on the KubeOps-Registry page. Click LOGIN WITH keycloak. You will be redirected to the SSO page where you can REGISTER a new user account.
Activate your account to use KOSI
After successful registration, you must log in once to the KubeOps-Registry. Once logged in, you can switch to KOSI and use it as normal.
How to manually push images to your KubeOps-Registry project space
To manually push container images into your KubeOps-Registry project space, you need to use your Harbor CLI secret for authentication when using podman.
How to get your CLI secret
-
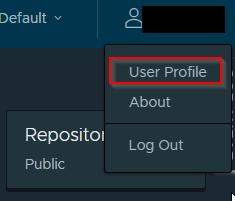
Click on your username and select User Profile.
-
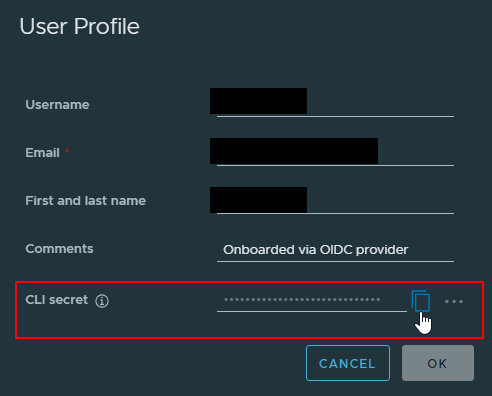
On the User Profile page, you can copy or change your CLI secret if needed.
Now you can push your image using the CLI secret:
podman login registry.kubeops.net -u <username> -p <CLI_secret>
Note: Replace
<username>with your KubeOps username and<CLI_secret>with your actual CLI secret.
5 - Creating a Basic KOSI-Package and Deployment
In this quickstart you will learn about:
- how to get to know KOSI-packages
- add repositories and download helm charts
- create a KOSI-package
- configure a KOSI-package to deploy a demo WordPress page
- optional: install and deploy the KOSI-package to a cluster
The intent of this guide is to setup a demo WordPress page on your cluster or your machine.
We do not recommend this guide for production environments.
Prerequisites
To get the most out of this guide, the following requirements should be met:
- KOSI is installed, see KOSI Installation Guide
- basic understanding of Kubernetes, network clusters and tools such as
HelmorPodman - basic understanding of Linux environments, bash / shell
- administrator privileges (root) are granted
Step 1 - Create a KOSI-Package
After the installation, KOSI is available as command line interface.
Login into the machine where KOSI is installed.
Create a new folder and use the command kosi create to create a default KOSI-package with pre-built files.
mkdir ~/kosi-demo
cd ~/kosi-demo

kosi create
Example output:
2024-08-07 13:49:00 Info:      KOSI version: 2.14.0.0_XXXXXXXXXX
2024-08-07 13:49:00 Info:      Write package.kosi to /root/kosi-demo
2024-08-07 13:49:00 Info:      Write template.yaml to /root/kosi-demo
2024-08-07 13:49:00 Info:      Write logo.png to /root/kosi-demo
2024-08-07 13:49:00 Info:      Write docs.tgz to /root/kosi-demo
| File | Description |
|---|---|
package.kosi |
Contains the „logic“ of the package. |
template.yml |
A template file for configurations and the templating engine. |
logo.png |
A logo for the package. replace this with your desired logo (png format). |
docs.tgz |
Contains your documentaion of your package. |
Step 2 - Understand the Package Logic
The package.kosi file contains the „logic“ of the package. This file uses the kosi format which itself uses the highly expressive KOSI Language.
Among other things the package.kosi file defines:
- a preambel for meta data and descriptions
- a files section to - manages files, such as templates, to be included and target files
- a set of commands - for example „install“ or „upgrade“ which work as scripts within the kosi file
Templates make it possible to use variantes for your packages. For example, you want to reuse a package for different environments. Templates also allow to parse additional „value files“ as command line arguments.
Advanced templating makes it possible to split one large value files into smaller ones. In this case we use some of the defaultvalues but all values will be transfered.
Step 3 - Modify the Template File
For the transfer of values into a package, a valuestemplate.yaml file is needed.
Use an editor to edit the file:
nano ~/kosi-demo/valuestemplate.yaml
To get the most out of this guide, add the following line:
{{values}}
This command will allow to parse the values of the file values.yaml. On installing, the file values.yaml will be automatically transcluded into the cluster. This is helpful to reuse a package for different environments.
Notice the exact same naming of the command with the file.
Step 4 - Add Necessary Repositories and Pull Charts
In this guide we want to create a KOSI-package containing a demo WordPress page. Therefore you need to add the necessary repository via helm. Afterwards you need to pull the latest version of the helm chart.
helm repo add bitnami https://charts.bitnami.com/bitnami
helm pull bitnami/wordpress --version X.Y.Z
Step 5 - Configure the Package
Configure the package to inlucde the valuestemplate.yaml file. Also add commands for install, update, and delete.
Use an editor to edit the file:
nano ~/kosi-demo/package.kosi
To get the most out of this guide, overwrite the file with the following lines:
languageversion = "1.0.0";
apiversion = "kubernative/kubeops/sina/user/v3";
name = "wordpressdemo";
description = "Deploys a wordpress helm chart";
version = "0.1.0";
docs = "docs.tgz";
logo = "logo.png";

files =
{
    wordpressvaluestemplate= "valuestemplate.yaml";
    chart = "wordpress-X.Y.Z.tgz";
}


install
{
    template(tmpl="valuestemplate.yaml";target="wordpressvalues.yaml");
    helm(command="upgrade";tgz="wordpress-X.Y.Z.tgz";values="['wordpressvalues.yaml']";deploymentName="wordpressdemo";namespace="wordpressdemo";flags="['--create-namespace',' --install']");
}

update
{
    template(tmpl="valuestemplate.yaml";target="wordpressvalues.yaml");
    helm(command="upgrade";tgz="wordpress-X.Y.Z.tgz";values="['wordpressvalues.yaml']";deploymentName="wordpressdemo";namespace="wordpressdemo";flags="['--create-namespace',' --install']");
}

delete
{
    cmd(command="echo delete wordpressdemo helm deployment.");
    helm(command="delete";deploymentName="wordpressdemo";namespace="wordpressdemo";flags="['--wait']");
    cmd(command="echo delete wordpressdemo namespace.");
    cmd(command="kubectl delete namespace wordpressdemo");
}
Step 6 - Create Package Documentation
It is always a good practice to document your packages.
Within your package folder, create a docs folder:
mkdir -p ~/kosi-demo/docs
Create a simple README file (for example markdown format) and write some helpful descriptions. For example:
echo „My first KOSI-package. Contains a demo WordPress page.“ > ~/kosi-demo/docs/README.md
Afterwards you need to compress the whole docs folder using the tgs format.
cd ~/kosi-demo/
tar -cvzf docs.tgz docs/
These docs will be included when building the deployable package file.
Step 7 - Build the Package
When the package.kosi is finished and the documentation is done, the KOSI-package can be built. Navigate to the package folder and simply use the kosi build command.
cd ~/kosi-demo/
kosi build
During the build process, the files package.tgz and package.yaml are created.
Step 8 - Setting Values for the Package
To install the package.tgz, you need the package itself and some values. Among other things, you need to define the nodePorts for http at 30123. This node port will be needed to access and test your WordPress page.
In a previous step we made the package reuseable by using the valuestemplate.yaml file. This files expects a values.yaml file as command line argument.
Use an editor to edit the file:
nano ~/kosi-demo/values.yaml
To get the most out of this guide, add the following lines:
global:
    storageClass: rook-cephfs
service:
    type: NodePort
    nodePorts:
        http: 30123
mariadb:
    enabled: true
    auth:
        rootPassword: topsecretChangeMe
        password: secretChangeMe
    primary:
        persistence:
            enabled: true
            storageClass: rook-cephfs
            accessModes:
                - ReadWriteOnce
persistence:
    enabled: true
    storageClass: rook-cephfs
Optional Step 9 - Installing the Package and Deploy to Cluster
As recommended you need a running Kubernetes cluster to install and deploy your new KOSI-package. You must also be logged in to the Admin machine where you have created the KOSI-package. To set up a cluster easily and conveniently, you can use kubeopsctl (see kubeopsctl documentation).
Navigate to your built KOSI-package. Install the package and pass the prepared values.yaml file as command line argument.
cd ~/kosi-demo
kosi install -p package.tgz -f values.yaml
Optional Step 10 - Test the WordPress Page
After you deployed the KOSI-package you can test the access via your cluster to the WordPress page.
Depending on your setup you need the following:
- the IP or hostname of a master node
- tunneling or expossing of ports according to the
nodePortsas set invalues.yaml
In this guides we set 30123 as nodePort. For example, in your browser navigate to:
http://master1:30123
6 - KubeOps Migration
About KubeOps Migration
For KubeOps 1.7+ licences are required. KubeOps is a tool set which consists of 3 tools: KOSI, KubeOps Platform (Compliance and Compliance + VM). Since 1.7 the background process is diffrent then in the older versions. To use your account in the future you have to do some steps to migrate your account.
KubeOps Account
If you created your account before March 2025, you must complete the migration steps. Most of the steps will be carried out by us, but some actions are required from your side:
IMPORTANT: These steps are only necessary if you want to use KubeOps 1.7+ tools and have no effect on versions below 1.7.
-
Every user who created an account before March 2025 must choose a new password due to a change in our login process. On your next login attempt, you will be required to set a new password.
-
If you want to use KubeOps tools, you must log in to the kubeops-registry first. A step-by-step guide is available here.
-
We have created new hub and registry spaces. Therefore, you must upload your existing packages to your new private space. The public hub is no longer available. If you encounter any issues while migrating your packages to the new hub, contact us via e-mail for technical support. Existing permissions will be migrated to the new system.
IMPORTANT: The old and new systems are not synchronized. If you want to keep packages in sync across both systems, you must upload them to both.